The Ultimate Spin Down Counter System
prusaprinters
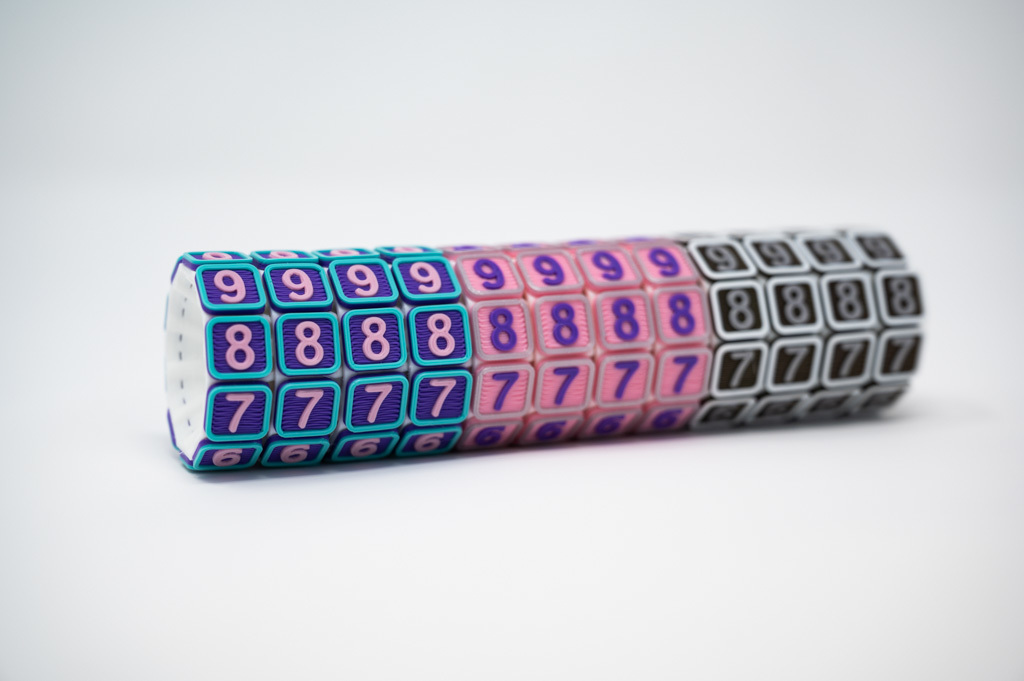
<p>Hello! This version only comes with number tiles. If you would like to support my work you can purchase all of the symbol tiles here: <a href="https://cults3d.com/en/3d-model/game/ultimate-counter-system">https://cults3d.com/en/3d-model/game/ultimate-counter-system</a></p><p>Make your game nights more organized and take away the complexity of tracking large numbers of tokens, counters, life gain, and even mana when you are storming out, with UCSs, the 3D printed, magnetic, customizable counter system. A UCS consists of a magnetic core surrounded by customizable icon tiles. Simply print some cores, print some number and symbol tiles using a filament swap to introduce color, and press fit or glue some 6mm diameter 3mm high cylindrical magnets. Since the number and symbol tiles can be snapped into the core in any configuration you have unlimited customization options for your counters.</p><p>UCS is designed primarily for Magic the Gathering but can be easily adapted other games like Dungons and Dragons with over 20 options for additional symbols. The snap in nature of the UCS node tiles allows you to customize the node exactly for your game, and the magnetic UCS-to-UCS connection allows enormous flexibility to show almost any state your game needs to keep track of!</p><p>All UCS parts can be printed with no supports. This excludes bonus parts that are intended to be printed with multiple extruder printers such as a Prusa equipped with the multi material unit. Please note you must be able to swap materials during your print. This can be done with a color change command that can be inserted with most modern slicing software.</p><p><strong>Print Settings</strong></p><p>Printer Brand: Prusa</p><p>Printer: i3 MK3</p><p>Rafts: No</p><p>Supports: No</p><p>Resolution: 200</p><p>Infill: Minimum 15%</p><p>Filament: Any Any Ridged Material</p><p><strong>Materials:</strong></p><p><strong>Filament</strong>: Many different brands of filament and materials should work. My preferred material is PTEG but other materials such as PLA will work just fine. My favorite brands of PTEG available on amazon are Duramic and YOYI. You can get those materials here:</p><p><strong>Duramic</strong>: https://www.amazon.com/gp/product/B086342QN7/ref=as\_li\_tl?ie=UTF8&camp=1789&creative=9325&creativeASIN=B086342QN7&linkCode=as2&tag=juhbrony-20&linkId=24a455c95aa8fb9fa3e1506f50cca272</p><p><strong>YOYI</strong>: https://www.amazon.com/gp/product/B086342QN7/ref=as\_li\_tl?ie=UTF8&camp=1789&creative=9325&creativeASIN=B086342QN7&linkCode=as2&tag=juhbrony-20&linkId=24a455c95aa8fb9fa3e1506f50cca272</p><p><strong>Magnets</strong>: Each UCS requires two 6mm diameter, 3mm tall Neodymium magnets. Any brand of magnet that holds a tolerance on the diameter and height of the magnet of +-0.05mm should work. The magnets I use can be found here: https://www.amazon.com/gp/product/B086342QN7/ref=as\_li\_tl?ie=UTF8&camp=1789&creative=9325&creativeASIN=B086342QN7&linkCode=as2&tag=juhbrony-20&linkId=24a455c95aa8fb9fa3e1506f50cca272</p><p><strong>Glue</strong>: The glue you select should be able to both the outer coating of the magnet and the material you are 3D printing with. For the magnet I have previously linked and PTEG I have found this product form Loctite to work well: https://www.amazon.com/gp/product/B086342QN7/ref=as\_li\_tl?ie=UTF8&camp=1789&creative=9325&creativeASIN=B086342QN7&linkCode=as2&tag=juhbrony-20&linkId=24a455c95aa8fb9fa3e1506f50cca272</p><p><br> </p><p><strong>Printing Tips:</strong></p><p>Level Your Bed: For the text to show up well it is crucial you have a level bed. Follow your printer manufacture’s instructions for the bed level procedure.</p><p>Clean Your Bed: Some parts have a very small contact area, so adhesion is critical. For best results follow your printer manufacturers instructions for bed adhesion.</p><p>Print the First Layer Slowly: For best results, I recommend you use at least half the first default first layer printing speed to make sure the text comes out clearly.</p><p>Increase the Bed Temperature: To get the two tone effect for the tiles, the tiles have less contact area with the print bed than other parts. To compensate for this, it might be necessary to raise your print bed temperature more than you normally would. I find that a change of 5-10C greater than the bed temperature you normally use is good enough. Always consult your printer manufacture manual and filament instructions before making this change.</p><p><strong>Performing a Color Change</strong>: In order to get the two-color effect without a multiple extruder system it is necessary to change filaments during the print. The first 0.6mm of each tile should be printed in one color and the rest of the part should be printed in a separate contrasting color. Most modern slicers have an easy way to insert this color change G-Code. If you have never done a color change before, consult the documentation of your slicer, for reference here are some documents from some common slicing software.</p><p>Prusa Slicer - https://help.prusa3d.com/en/article/color-change\_1687</p><p>Cura - https://all3dp.com/2/cura-pause-at-height-how-to-do-it/</p><p>Selecting Colors: In general, it is best to use contrasting colors, a dark color and a light color, or colors that are complimentary are generally good combinations to start with. You can find complimentary colors here: https://en.wikipedia.org/wiki/Complementary\_colors. If you are using a transparent material, it is generally best to make this material the background color. If you are using a light color and dark color, the tile will generally be more visible if you place the darker color in the foreground and the lighter color as the background. If you want to print a transparent color as the foreground it might be more visible if you use smaller layer heights, this will introduce more air in between the layers increasing the opacity.</p><p>Nozzle Selection: I have printed these parts with a 0.25mm, 0.4mm, and 0.6mm nozzle. All the nozzles can produce useable parts. Nozzle selection has the most impact on the quality of the tiles. If you are looking to optimize printing time and want to use a larger nozzle to do it, printing the nodes with a 0.6mm nozzle might be a good way to do that. A 0.25mm nozzle will be able to reproduce the smallest details but printing times are much longer. A 0.6mm nozzle can produce parts very quickly but will produce parts with the worst tolerances. A 0.4mm nozzle is the best compromise of being able to reproduce small details and get decent printing speeds.</p><p>Multiple Extruder Printers: For printers with the ability to print multiple materials at the same time you can load in one of the special multiple material files available for number nodes. These have a slightly different shape but are fully compatible with other types of UCSs. To print these it is necessary to place supports from the build platform. Supports within the digits are not necessary or recommended. Models intended to be part of the numbers node all begin with the prefix MMU.</p><p><br><strong>Assembly Tips</strong></p><p>Safety First!: Remember to always use proper PPE when working. Use safety glasses, and proper work gloves when assembling. When using sharp objects never apply force towards body or hands. When using glue follow the manufacturer’s instructions, especially those regarding contact with skin, eyes, and ventilation.</p><p>Apply the Glue: Glue is not always necessary depending on the tolerances of your printer. The design intends for all parts to be press fit or snap fit, but sometimes the tolerances of different printers or materials mean the fit will be too loose for the press fit to hold the magnet or side panels in. In that case a small amount of glue applied (generally less than the volume of a grain of rice) should be adequate. The small reliefs in the sides of the magnet holes should allow any excess glue to be displaced without coming up to the top of the part. If that occurs, simply wipe the excess glue away and use less glue for the next part. The glue has a 2 hour set time, but I generally allow a full 24 hour cure time before I use the UCSs.</p><p>Place the Magnets: Make sure you properly align the poles of the magnets so your UCSs stick together. I like to use a sharpie to make a dot on the top of all my magnets so that I always know which polarity is up when the magnet is placed into the hole. When placing the magnets in the holes, make sure that one side has a south pole facing out and the other side has a north pole facing out. If done properly the magnets placed to each end of the hole should try to stick together, not repel each other. It is important to make sure you always use the same pole orientation between all the UCSs you make or a freshly printed batch may not stick to older UCSs you have already made.</p><p>Once you are sure the poles are properly aligned, press in the magnets. While you can do this with your fingers it is generally easier to stack the magnets in a column and force the magnet in using the column of magnets to get a better, more ergonomic grip. If you prefer you can use a metal object like the back of a screwdriver or plyers to force the magnet in as well. Never use anything that is sharp or could injure you if you slip. Wipe off any excess glue with a disposable rag and remember to allow the glue to fully cure before use.</p><p>Insert the Tiles: The first step is to select 10 tiles you want to use on your UCS. To make it easier to use while you are playing, I recommend you stick to a few “Standardized” types of UCSs that each have the same set of tiles in the same relative positions. This makes it easier to find the specific symbol you are looking for when you are playing. I like to assemble my tiles by placing a blank node on a node I have already made to make sure I am putting the correct tiles on the correct positions. When making a numbers tile make sure the numbers count up or down in the same direction (as you spin towards you, is a 0 going to be followed by a 1 or a 9?). The choice is up to you but I recommend you remain consistent. The tiles have a small protrusion on the bottom that serves as a locking feature, this allows the tile to remain securely locked to the node when pressed in, while it is possible to remove a tile once assembled there is a possibility you could break the tile trying to remove it so double check the arrangement of your tiles before locking them in. Once you have arranged your tiles in position and are ready to lock in use your fingers to press the tile into the node. You should feel a small bump as the tile locks itself into place. If the connection is to lose apply a small amount of glue to the underside of the tile before assembly. If the tile is difficult to push in use a dull, flat object to press the tile into the UCS node. Never use any object that could hurt you like a knife or pointy screwdriver.</p><p><strong>Recommended Configurations:</strong> One of the best things about UCSs is the ability to configure them anyway you want, however if you don’t want to think about what the best way to put them together here are some suggested configurations for Magic the Gathering. In general it is best to have 2 numbers nodes for every other type of node you have available.</p><p><br> </p><p>· Numbers Node: 0, 1 ,2, 3, 4, 5, 6, 7, 8, 9</p><p>· Mana Node: Plus, Minus, Blue Mana, Green Mana, White Mana, Red Mana, Colorless Mana, X, Heart</p><p>· General Utility Node: Plus, Minus, Right Arrow, Summoning Sick, X, Star, Slash, Poison, Commander Damage, Heart</p><p>· Directional Nodes: Plus, Minus, Commander Damage, Summoning Sick, Poison Counter, Right Arrow, Left Arrow, Down Arrow, Up Arrow ,Heart</p><p> </p><p><strong>Avaliable Tiles</strong></p><p>Numbers:</p><pre><code class="language-plaintext">1 2 3 4 5 6 7 8 9 0</code></pre><p>Generic Counters (Paid Version Only):</p><pre><code class="language-plaintext">- + Commander Damage Heart # Poison / * Summoning Sickness Tapped Untapped X</code></pre><p>Direction Arrows (Paid Version Only):</p><pre><code class="language-plaintext">Up Down Left Right</code></pre><p>Mana Symbols (Paid Version Only):</p><pre><code class="language-plaintext">Black Blue Colorless Green Red White</code></pre><p>Keyword Counters (Paid Version Only):</p><pre><code class="language-plaintext">Deathtouch Double Strike First Strike Flying Hexproof Indestructable Menace Reach Trample Vigilance Lifelink (use Heart tile from generic)</code></pre><p>Specialty Counters (Paid Version Only):</p><pre><code class="language-plaintext">Energy Experience Level/Quest Storage Time</code></pre><p><br> </p><p>Category: Toys & Games</p>
With this file you will be able to print The Ultimate Spin Down Counter System with your 3D printer. Click on the button and save the file on your computer to work, edit or customize your design. You can also find more 3D designs for printers on The Ultimate Spin Down Counter System.