Thermal Enclosure For 3D Printer
thingiverse
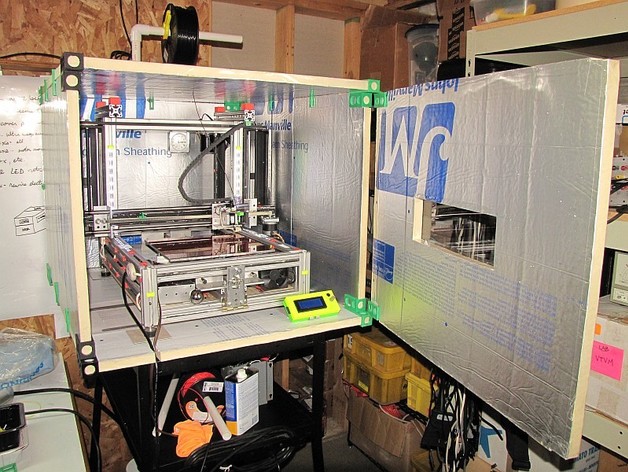
Update: I apparently never uploaded the stl file for the rear corners. Well, now I have. Enjoy! Large ABS 3D prints tend to delaminate during printing if you don't keep them warm while printing. This "thing" is a group of 3D printable parts to make a thermally insulating box from 1" PIR foam to contain your printer. I designed printed pieces to hold the foam boards because I frequently take my printer to demonstrations and I wanted to be able take the box apart and put it back together. If you don't need to move your printer, just use duct tape to hold the foam pieces together and don't bother printing parts to do it. Instructions Measure your printer and calculate the sizes of the foam pieces you'll need to build the box to enclose it. Cut the pieces in the configuration shown or the printed parts may not work. I used 1" PIR foam with foil on both sides because it is fire retardant, but you could probably get away with polystyrene foam. You'll need four of the rear corners, two of the front corners, and two of the hinge assemblies. Print as many of the clips as you think you'll need for your box size. The front and rear corner pieces and the hinges are printed in two parts then superglued together in order to avoid using support material during printing. Print with a 3-5mm brim to prevent corners lifting off the print bed (see the photo of the rear corner). It's a good idea to tape the edges of the foam pieces to prevent damaging them. 2" packing tape or duct tape works fine. You may want to put some pieces of masonite or wood under your printer's feet, depending on how heavy it is, to prevent them from sinking into the foam. The hinges are designed so that 6-32 screws will screw tightly into the door hinge pieces and fit loosely in the box hinge piece. It's also a good idea to move the printer's electronics outside the box- heat and electronics are not a good combination. 1) Cut notches in the foam then put the clips, corners, and hinge on the bottom piece of foam, 2) set your printer on it, 3) add suitably notched back and side pieces of foam, 4) put the clips, corners, and hinge on the suitably notched top piece 5) put the top on the box and press it into place 6) put the door on the hinge 7) cut notches/holes as needed for filament, cables, and windows. You don't really need to seal the box air tight, so don't worry about small gaps at corners and edges. If you're really paranoid about it you can make "weather strips" using packing tape at the edges of the foam boards. Update: I measured the temperature inside the box using a thermocouple and found that I had to leave the door open a little to keep the temperature from rising above 42C. My electronics are still inside the box and that was as hot as I wanted to let it get without some provision for cooling the electronics. The last photo shows a 3 Face Cup (blue) I printed inside the box using ABS. It took about 15 hours to print and exhibits no delamination.
With this file you will be able to print Thermal Enclosure For 3D Printer with your 3D printer. Click on the button and save the file on your computer to work, edit or customize your design. You can also find more 3D designs for printers on Thermal Enclosure For 3D Printer.