Thermo-electric Headlamp (Peltier, Seebeck)
thingiverse
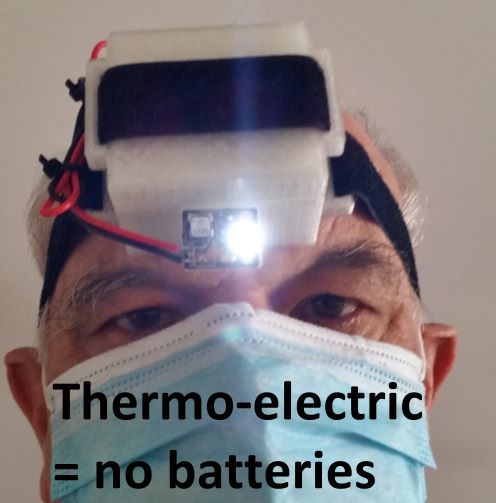
Do you believe a headlamp needs batteries? Wrong! It just needs your fridge. ---------------------------------------------------------------------------------------------------------------------- Updated 29 October 2020: Unfortunately Thingiverse does not automatically include this summary in the download zipfile. Added a copy of this summary in a HTML file which is now part of the download. ---------------------------------------------------------------------------------------------------------------------- This thermoelectric headlamp powers its LED from ice. It is sufficiently bright to illuminate your trail immediately in front of you in pitch darkness for about one hour. During a further half-hour you may still be able to read a book under your blanket. And then you simply charge it again in your fridge. The key is a Peltier element which converts temperature difference into electric current (Seebeck effect). The current is significant, but the voltage is tiny (a few tens of millivolt). An electronic circuit transforms the voltage to some 3'500 millivolt (3.5 volt), sufficient for lighting a LED. Bill of materials: - This download - A velcro strap with a buckle, up to 30 mm wide and at least 80 cm long - A cast aluminium enclosure with gasket (50 x 45 x 31 mm, type G101-67 from www.gainta.com.tw, available on ebay) - A Peltier element (40 x 40 x 3.8 mm, type TEC1-12706, available on ebay) - An electronic board with LED available at https://www.tindie.com/products/bobricius/40mv-module-for-body-heat-powered-white-led/ - A small piece of double-sided adhesive tape - A soldering iron Proceed as follows: 1. Purchase velcro, aluminium enclosure, Peltier element and electronic board. Stick to the exact properties and types specified above. However I include the OpenSCAD source file by which you may customize my design in case you have to purchase parts deviating from the proposed types. The electronic board is very specific as it starts transforming at an extremely low voltage. 2. Fill 80% of the aluminium enclosure with water. Only 80% !!! The water will expand during freezing and may crack the aluminium enclosure if filled completely. Reassemble the aluminium enclosure (including the seal) and put it in your freezer. 3. Print the three .stl files of this download on your 3D printer. 4. Insert the Peltier element into the 3D-printed enclosure and solder its leads to the electronics. Polarity matters, but thanks to the Peltier element's low voltage wrong polarity will not damage anything. If you got it wrong just flip the Peltier element. Stick the electronic board to the smaller surface of the tilted console by means of the double-sided adhesive tape. 5. Put the aluminium enclosure (now containing ice) into the 3D-printed container and close it with the 3D-printed cover. The LED will start shining dim. 4. Insert the velcro into the lugs (see picture) and wrap it around your head with the Peltier element touching your forehead. You will start sensing an arctic storm and the LED will shine bright. 7. Dash at the darkness Beware of frostbite !!! Put one or several samples of the 3D-printed tile in between the Peltier element and your forehead in order to ease the pain and avoid injury. Be amazed and enjoy.
With this file you will be able to print Thermo-electric Headlamp (Peltier, Seebeck) with your 3D printer. Click on the button and save the file on your computer to work, edit or customize your design. You can also find more 3D designs for printers on Thermo-electric Headlamp (Peltier, Seebeck).