Thin iPhone Case (2 Part Design) (Socket Case) (Iteration 4)
thingiverse
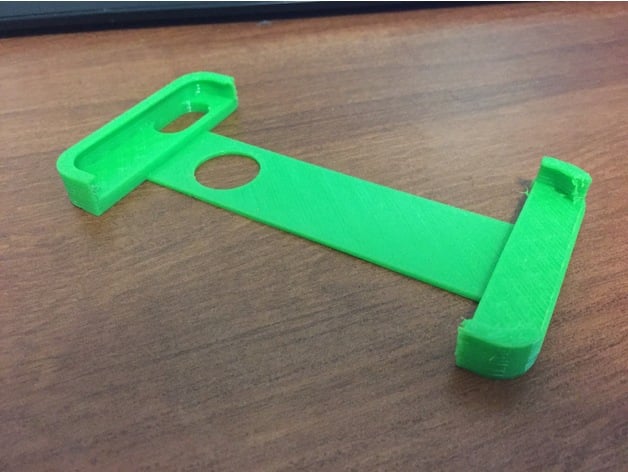
For more designs like this and to see the development of this project, check out my homepage here! (http://www.thingiverse.com/Rubiks_Cubist/about) This is an iPhone 6 case with 4 hex sockets. The smallest (bottom) is 1/4", the next are 5/16", 3/8", and 1/2". In addition, there are tick marks on the side of the Metal to indicate where the edges of the sockets are even if you cant see them. These marks may be lost in the printing process. I have plans to add more socket holes (potentially metric) on the other side or some other utility. I will update this page when I decide. For now, that part is available as is. Each side around the perimeter of the phone is 2 mm thick, and the back of the phone case is about 4 mm thick. The intention with this particular design is for the larger component to be cast/printed in metal, and for the smaller part that covers the top and bottom of the phone case to be printed in plastic. The file Cast Body.stl (the part intended to be in plastic) does work well on its own as a phone case, as it covers the 4 corners and appeals to a sense of minimalism. There are no issues with it staying /on/ the phone itself as long as it is printed in hard plastic such as PLA or ABS. More details on that aspect below. There are 3 different Cast Metal.stl files. The Iter 4 version has a 1.5 mm channel that spans the length of the case and a 1 mm internal fillet to the inside edge. The Iter 4 alternate also has a 1 mm internal fillet, but on the one small bit on the upper right side, the fillet is 3 mm. This is still fully compatible with iPhones. The Iter 5 version has a deeper (2.25mm) channel on the bottom side, this is to cope with the thicker corresponding bridge section of the Cast Body file when printed in Semiflex or Ninjaflex, as well as the thicker fillet found in Iter 4 Alternate. Print Settings Printer Brand: LulzBot Printer: TAZ 5 Rafts: No Supports: No Infill: 20% Post-Printing Cast Body.stl printed in PLA Gray PLA Details I made a mistake in the initial design of this model, and so the internal section is not as deep on the Z axis as it needed to be. However, because the flaw was relatively slight, it was still viable as a phone case design and I've successfully used it for several weeks. However, I corrected the flaw in the later designs (both the outer shell and inner piece) shown below. I wanted, with this design, to test the viability of different materials, such as Semiflex and Ninjaflex, because the main part of the case is to be made of metal. And I thought that having rubber protect the corners and edges would be better than using PLA in the first place, especially since there is no particular need for hardness in this design. Cast Body.stl printed in Ninjaflex Ninjaflex Details The ninjaflex material did not prove sufficient in the design of this case. The lip on the top and bottom edges to hold the phone inside is larger than the lips in the previous iterations of this project (found on my page). Despite this, there is just not enough contact area, particularly on the bottom half, to hold well to the phone, as the material is too rubbery. This design has the corrected depth, and otherwise fits very well. In addtion, printing in Ninjaflex caused heavy stringing problems (image is of post-processed case) Cast Body.stl printed in Semiflex White Semiflex Details This white semiflex proved to be the best material for this design. While the PLA did fit well and does a good job of protecting the phone, I really wanted to have a rubbery aspect to this component. Its harder than the ninjaflex, so it does not have the problem of slipping off of the phone case the first chance it gets, but it still maintains a rubbery feel. However, this design has the same stringing problems that the ninjaflex had. (Image is post processing) I made a couple of design changes to this model. First, the obvious one. Because of the Ninjaflex's floppiness, I was worried that the Semi would not be that much better, so I included a small piece that could fit into the charging port of the phone, the goal being added strength on the hold. The second detail is a little bit finer. In the versions above, after adding the lip structure, which was just an quarter-circle arc tangential to both the internal side edge and the plane formed by the front face, I would add a small fillet to make the design look better in Inventor. However, on this print, I left out that fillet to try to increase the lip size just a little bit. After printing this, I realize that only making the second change would have been likely sufficient in solving the problems posed by the Ninjaflex case. In addition, I later realized that the bridging section in the middle was much thicker in the Z direction than it should have been. I assume this is another consequence of the material, as the PLA version did not have this problem. This picture highlights the inset in the back of the metal part, and allows the bridging part of the Body to sit into it and hold the Metal to the phone. Comparison of Flexibilities In the three images below, I compared the flexibilities of the three materials. This was my first project printing in a non-standard plastic and so I wanted to share my findings with the 3D printing community at large to help better inform people who are making the same decisions I have been. These better illustrate the differences in the three materials than the simple details given above. Cast Metal.stl Post-Print Details This print was less than ideal, but I was still able to learn quite a bit from it. I printed it as the STL appears in the preview picture, flattest side down. I printed it with support material on a Ultimaker 2, because I thought there would be drooping otherwise. However, there was so little support material, as the channel was only 1.5 mm deep, that I had to sand and scrape just to get some of it off. Eventually I just gave up on removing it and will print it in another form. However, this did cause me to check the thickness of the bridge on the Cast Body part and I was stunned to find that in both the Ninjaflex and Semiflex versions, the bridge was over 2.25 mm thick! So on the next version of this, I will make the channel deeper and see if either A) that improves the validity of the support material or B) I can print it without any support material. I was happy to see that the tick marks on the outside wall of the socket holes printed well, as I was worried that they may be too small to appear. In addition, the small bit at the top right above the power button does not appear in these pictures because it immediately snapped off following printing. So there is now a new alternative STL file for the Cast Metal design that features a large fillet on the inside corner (that will not interfere with the phone) to allow for a stronger bond. How I Designed This I used Autodesk Inventor to make this design, and used 2 schematics that I found on Google Images that can be found here. (https://www.dropbox.com/sh/arr8215uvqb5ui5/AAAcxp7K8Z7l7q_B4LfcLZZ9a?dl=0) These images were used for all designs moving forward as well
With this file you will be able to print Thin iPhone Case (2 Part Design) (Socket Case) (Iteration 4) with your 3D printer. Click on the button and save the file on your computer to work, edit or customize your design. You can also find more 3D designs for printers on Thin iPhone Case (2 Part Design) (Socket Case) (Iteration 4).