Thing-o-matic accesible electronics
thingiverse
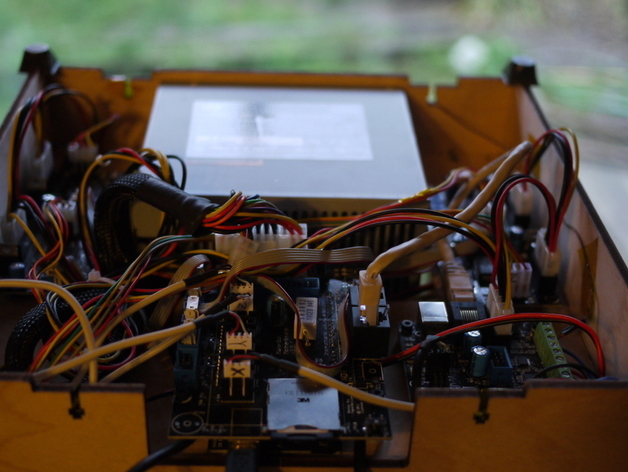
Make the electronics accessible by just turning the TOM on it's side. Problems with current Thing-o-matic electronics mount design You can't route all the cables in the build phase. Some of the cables are pretty tight once you get the printer set up all the way. You can't access the electronics without 3 hands. You can't reach anything even if you did have 3 hands. When the dog get tangled in the USB cable and breaks the USB port on the motherboard, you have to tear the whole thing down. My solution Flip the electronics board over with a cutout for the power supply. Then mount it up inside the chassis. Instructions These instructions are meant for a retrofit. Recomended Pre-Work: if your printer is working, print some Thing-o-matic feet. http://www.thingiverse.com/thing:11414 or http://www.thingiverse.com/thing:13039 Carefully remove the bottom. Remove the nuts and bolts completely. Removed the rubber feet. Try to save them. Label and remove each of the cables. (You may be able to keep the extruder controller hooked up for the most part.) Label your stepper motor drivers. A sharpie on the main logic chip works great. Remove all the electronics from the board. Saving the spacers and screws is easier if you put them back in the boards as you take them out. Using the drawing and photo as a guide, remove the top and bottom protrusions that seat it in the bottom of the machine. Using the drawing and photo as a guide, cut out a hole for the power supply and cut 4 t-slots. (a rotozip on the dremel works if you are careful). Test fit your bottom and make a note of where the cables come out of the acrylic layer. The wood seats right on the bottom of the Y stepper motor. Mark the points where your new t-slots are. Drill out the new holes for the t-slots. Re-mount your electronics. (sorry, I marked A on the photo twice on accident.) X/Y on the left and Z/A on the right. The extrusion control on the right with the row of inputs facing right. Wiring is tight, but doable. Pull the cables through the new corner holes in the bottom. Tuck all the unused power couplings up under the electronics board and mount the bottom with the electronics facing the bottom of the machine using the screws and bolts that held the bottom on before. Rewire everything. If needs be carefully remove some or all of the strain relief plastic from ethernet cable that comes out of motherboard allowing it to bend sooner and clear the bottom. 14a. If you printed the feet, put them on. 14b. If you didn't print feet, cut slots in the existing feet and put them on the corners. Test the machine, and live happier knowing your electronics are accessible if you need to get at them.
With this file you will be able to print Thing-o-matic accesible electronics with your 3D printer. Click on the button and save the file on your computer to work, edit or customize your design. You can also find more 3D designs for printers on Thing-o-matic accesible electronics.