Thing-O-Matic Upgrades
thingiverse
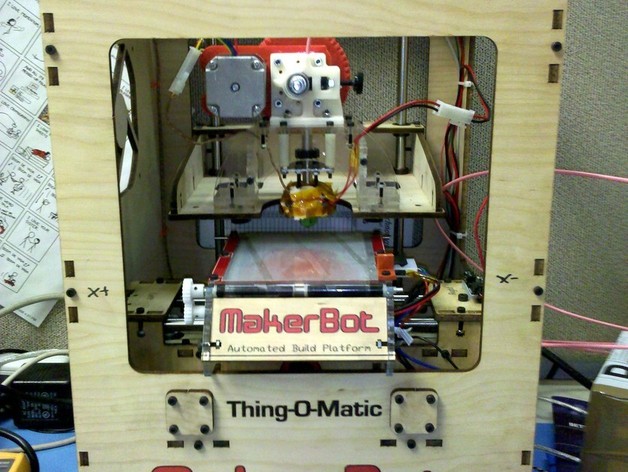
The Thing-O-Matic has been out long enough that there are now several upgrades out. This is a collection of the best and most important upgrades for your ToM to improve its performance and keep it running well. Go even further in the future by maxing out your ToM! Unless otherwise noted, I didn't come up with any of these upgrades. I'm just compiling them into one place. Please let me know if there are any that I have missed. Looking for Cupcake Upgrades? Check out http://www.thingiverse.com/thing:8636 CHANGELOG:4/4/2011 - Realized I should keep a changelog when I update this thing. Most recent updates included adding several filament drive options and the Y-Axis idler pulley support.4/8/2011 - Added length for Z-axis mod if you are using a HBP4/12/2011 - Added wire clips and Y-axis idler guard4/29/2011 - Added X-axis follower5/10/2011 - Added X tensioner and sprung build platform leveler5/26/2011 - Added cable hole plugs6/29/2011 - Added new X follower, removable ABP mod, HBP Quick Leveler, HBP Quick Release and HBP power connector Instructions Stepper Extruder A stepper based extruder will improve your print quality, make it easier to tune for different plastics and provide a major fix to the "dead extruder motor" problem. You have three major options: 1) A MK6 from Makerbot Industries. Get the upgrade kit if you have a MK5. http://http://store.makerbot.com/toolheads/stepstruder.html 2) A Stepper Plastruder from MakerGear. http://www.makergear.com/products/plastruder 3) Print your own MK5 adapter plate and gears using http://www.thingiverse.com/thing:5795 and instructions at http://www.thingiverse.com/thing:5797 DC Gearhead Extruder While you are waiting to get your stepper upgrade done, here are a couple of mods for the old DC gearhead extruder. 1) Worst case for the Kysan motor is a catastrophic failure that can damage your boards. Protect them with an inline lamp. http://softsolder.com/2011/01/18/thing-o-matic-mk5-extruder-dc-motor-safety-lamp/ 2) Some people have problems with the drive bearing falling out. Print a bearing retainer with http://www.thingiverse.com/thing:5789 Filament Drive There are a number of new filament drives out there that offer improvements over the standard MK5/6 pusher. Also, overtightening the standard MK5/6 drive can cause it to crack and put unnecessary wear on the motor/bearings, so print yourself a spare! You have several options to choose from: 1) Print a spare MK5 with http://www.thingiverse.com/thing:5169 . This is a very simple drop in replacement for a MK5/6 that doesn't require any parts that your MK5/6 didn't come with. It has all the advantages and disadvantages of a stock MK5. 2) Make a Wade's style MK5 and save yourself the difficulty of adjusting the tension with http://www.thingiverse.com/thing:6402 You'll need a few extra bits (spare bearing, 4 springs) to put this one together, but the tensioner works much better than the old plunger. 3) Make a 1 spring tensioner with http://www.thingiverse.com/thing:7113 This is what I am now using. 4) If you have a spare NEMA23 motor, go for this http://www.thingiverse.com/thing:7037 and get all the advantages of a sprung bearing idler and direct drive steppers. Hot End The hot end of the extruder can be a dangerous place. Lets make it safer. 1) Protect the Thermocouple - http://softsolder.com/2011/02/06/thing-o-matic-mk5-extruder-protecting-the-thermocouple/ X Axis The X axis belt is often too tight, straining the motor and causing it to skip steps. 1) Swap out the bolts to low profile heads. Several people have come up with this independantly, but there is a good writeup at: http://softsolder.com/2011/02/05/thing-o-matic-x-axis-motorbelt-adjustment/ 2) The X-axis bearings are over constrained, so the axis can have a binding problem. Fix it with a new follower at: http://www.thingiverse.com/thing:8158 3) Adjusting the X belt tension can be a pain. Make it easier with http://www.thingiverse.com/thing:8189 4) Use a X-follower on the idler side for better motion with http://www.thingiverse.com/thing:8625 This requires more disassembly than #2 above, but in theory is the better way to do it. Y Axis The Y axis works really well, but there is a bit of preventative work you can do. 1) Give the idler pulley some more support with http://www.thingiverse.com/thing:7022 2) Keep wires from getting caught in the idler with http://www.thingiverse.com/thing:7682 Z Axis The Z axis is often noisey due to the spacing of the bearings. 1) Space them apart using http://www.thingiverse.com/thing:6184 and make your Z axis smooooth. Note: If you are using a HBP instead of the ABP, cut the long tube to 135mm. In fact, do it anyway as it is a pain to change later. General Wiring and Build There are a few things that can be done to make the wiring neater and easier to deal with during maintance. 1) Connectorize your print heads and X-axis motor. I haven't made a writeup of this yet but all of the wires, including the thermocouple, going to the extruder and the X-axis should have inline connectors put in them to make mainance and upgrades easier. 2) Also no writeup, but there are small slits in the edges of the ToM body for zipties to hold the wiring out of the way. 3) Add some LEDs to brighten up the build chamber while you print. There are several write ups around here, but http://www.thingiverse.com/thing:5771 seems to have the most detail. 4) If you don't like the look of zipties, use http://www.thingiverse.com/thing:7673 and/or http://www.thingiverse.com/thing:7705 to tidy up your wires. 5) Plug up the extra cable holes with http://www.thingiverse.com/thing:7693 Automated Build Platform The ABP is a cool piece of technology that no other 3D printer has, but it can be a bit finicky. 1) Replace the belt with a less warpy one from http://www.thingiverse.com/thing:5648. 2) Make your ABP quick swapable with http://www.thingiverse.com/thing:8878 Heated Build Platform The heated build platform is simpler than the ABP and is considered by many the way to go if you want simple raftless printing. 1) Make leveling the platform easier with http://www.thingiverse.com/thing:6558 2) Another, easier to use platform leveler http://www.thingiverse.com/thing:9094 3) Make your HBP surface quick removable with http://www.thingiverse.com/thing:9525 4) Make your HBP connector heat-safe with http://www.thingiverse.com/thing:9090 Electronics Ed from http://softsolder.com has a series of small modifications to the electronics that should improve their reliability and lifetime. 1) Static Control - http://softsolder.com/2011/01/09/thing-o-matic-mk5-extruder-static-control/ 2) Stepper Logic Control - http://softsolder.com/2011/01/08/thing-o-matic-stepper-driver-logic-supply/ 3) Extruder MOSFET supplies - http://softsolder.com/2011/01/07/thing-o-matic-extruder-controller-mosfet-supplies/ 4) Extruder Power Supply - http://softsolder.com/2011/01/06/thing-o-matic-extruder-controller-power-supply-improvement/
With this file you will be able to print Thing-O-Matic Upgrades with your 3D printer. Click on the button and save the file on your computer to work, edit or customize your design. You can also find more 3D designs for printers on Thing-O-Matic Upgrades.