Thing-o-Matic Y-Axis tensioner
thingiverse
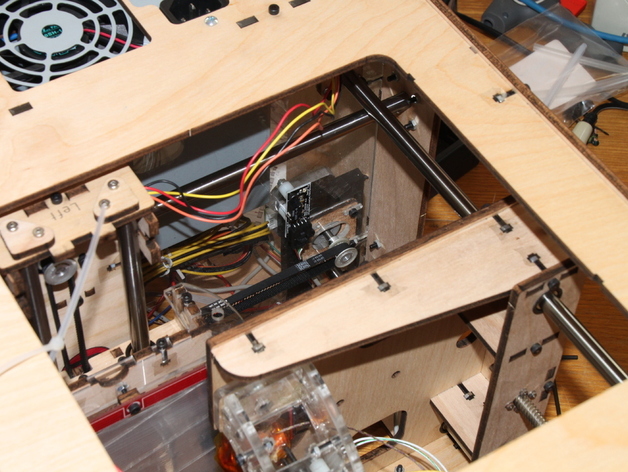
Provides a girdle for the y-axis servo motor. Goes underneath the perspex. Tension is increased by turning a pair of bolts on the back side of your Thing-o-Matic. Instructions Forgive the code; I've printed and am using the product so I'm lacking enthusiasm for code cleanup :-) Print the object Locate: 2 M3x16 bolts, 2 M3 washers, 2 M3 nuts 3.5 Loosen the y-axis stepper Open up the bottom of the 'bot. Disembowel it. Unplug the y-axis stepper Place the nuts in the t-slots. Sticky-tape them into place. Place girdle over the stepper, nuts down. The bolts will wedge the girdle against the perspex. The girdle fits around both the stepper and the bolts/endstop for the nearby z-axis rod. Take a breath, and drill some holes through the back of your makerbot. I just eyeballed this. You might find a clever way to judge where to put the holes - you know, measuring and stuff like that.... Washers on bolts, bolts through hole into nuts. Tighten. 8.5. recable stepper re-tighten y-axis-stepper bolts. Actually, I don't seem to have done that.... Reembowel your makerbot Bottom on, and hope your makerbot still works... Notes: I "stripped" one of the nut-holes; I added glue and all is well. Possible improvements: nut-holes could possibly have their tolerances tightened thin plane of plastic to be wedged between stepper and perspex; may make fitting easier.
With this file you will be able to print Thing-o-Matic Y-Axis tensioner with your 3D printer. Click on the button and save the file on your computer to work, edit or customize your design. You can also find more 3D designs for printers on Thing-o-Matic Y-Axis tensioner.