Think Fun Maker Studio Electronics Expansion
thingiverse
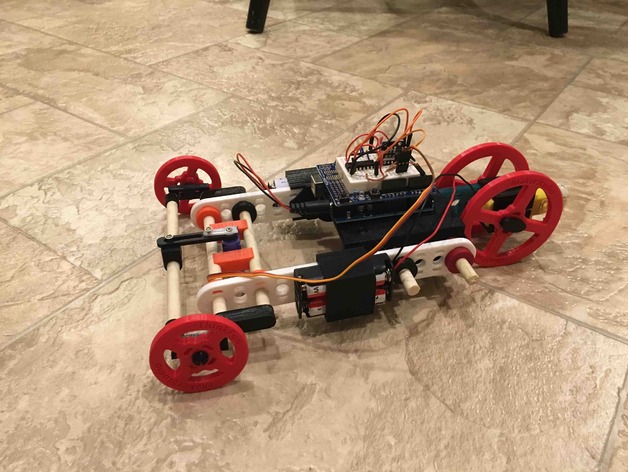
This is an electronics expansion for the Think Fun Maker Studio kits. Using these parts, you can add Arduino control, battery power, LEDS, motors, and servos to your Maker Studio creation. To make the robot featured in the pictures, print the following: 2x Servo mount (9) 1x Servo arm and bumper (10) 2x steering hub (8) 1x Servo arm attachment (11) 1x Ardiuno mount (4) 1x geared motor mount (6) 2x geared motor hub (7) As many LED brackets as you can fit! (3) Battery mounts that fit what you have (1,2 or 4) You also need the following Maker Studio parts: 2x large wheel 2x small wheel 5x 5.5" axel 16x hub 1x large connector 2x extra long connector In addition, you will need: Arduino Uno prototype shield SG90 servo 3V gear motor (search yellow gear motor on Amazon) LEDs The battery mounts and motor brackets have pieces on the inside to latch onto the maker studio connectors, and then can be slid in and will hold in place with friction. The Arduino mount has holes to mount an Arduino uno on either side. It also has holes to fit a 2xAA battery holder, or a 4xAA battery holder. You can use 2 of item 5 (the gear coupler), a small Maker Studio wheel, and two Maker Studio gears, to couple two gears together. UPDATE (12/30/15) - I edited the files for the battery mounts, so that they could be removed without taking the creation apart. This way, when batteries need to be replaced, they can be done so quickly, without the need to rebuild from the beginning. The reason the battery mounts have the diagonals in one of the faces, is so that the corners do not interfere when connectors are assembled at angle. https://youtu.be/NuI0nDLQyCUhttps://youtu.be/ooxOu8XA6Ww Print Settings Printer Brand: MakerBot Printer: MakerBot Replicator 2 Rafts: No Supports: No Notes: All pieces are designed to print on a MakerBot Replicator 2 using default settings. Post-Printing The steering hubs have tabs I added to avoid warping, that should pull off easily. I have had a little trouble with the power source because most of the batteries I have are not suitable for this usage (I usually buy the cheapest batteries). I have had success powering with a rechargeable Lithium battery. In the process of constructing the robot, I used the following resources to learn how to create the code, and to learn how to wire the circuit. To use a TV remote: http://www.instructables.com/id/Arduino-Infrared-Remote-tutorial/?ALLSTEPS To program and wire a servo: https://learn.adafruit.com/adafruit-arduino-lesson-14-servo-motors/overview To control motor speed and direction: https://learn.adafruit.com/adafruit-arduino-lesson-15-dc-motor-reversing/overview I have also uploaded the Arduino sketch I created. I have never shared an Arduino file before, so I also added a .rtf version to paste into your own sketch if it doesn't work.
With this file you will be able to print Think Fun Maker Studio Electronics Expansion with your 3D printer. Click on the button and save the file on your computer to work, edit or customize your design. You can also find more 3D designs for printers on Think Fun Maker Studio Electronics Expansion.
