Threeup Twoup Oneup Y-Axis Endstop
pinshape
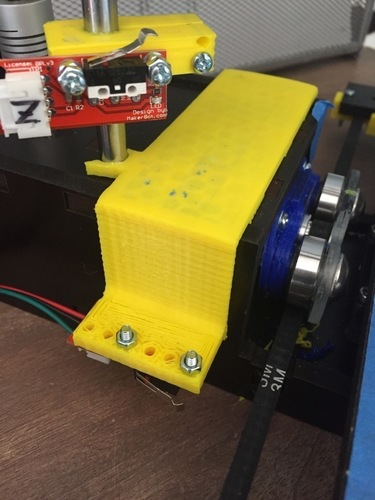
This is how I decided to install and activate the Y-axis endstop on my ThreeUp V2 Printer. The installation adds extra support to the body housing the Y-axis and second Z-axis steppers. This is the first version of this, and I will probably be updating this soon. So far I've done several short prints with these in place and one 9-hour print with these in place, so I know they work. UPDATE 2/21/2016: Modified the bracket to snap onto the metal rod, added extra supports, and made room for the soldered pins sticking out on the underside of the endstop's pcb. Changed the "trigger" to no longer need a screw. Print Settings Printer: ThreeUp v2 Rafts: No Supports: Yes Resolution: .15 Infill: 100% Notes: Supports set at 30-degrees. 1.75mm filament 196/194C 100% infill, but still finished the "trigger" in about 16 minutes and the bracket in about 1.5 hours. Post-Printing How I Designed This Software used to design this DesignSpark Mechanical 2.0 - hobbyist freeware license.
With this file you will be able to print Threeup Twoup Oneup Y-Axis Endstop with your 3D printer. Click on the button and save the file on your computer to work, edit or customize your design. You can also find more 3D designs for printers on Threeup Twoup Oneup Y-Axis Endstop.