Thule Roof Rack Riser
prusaprinters
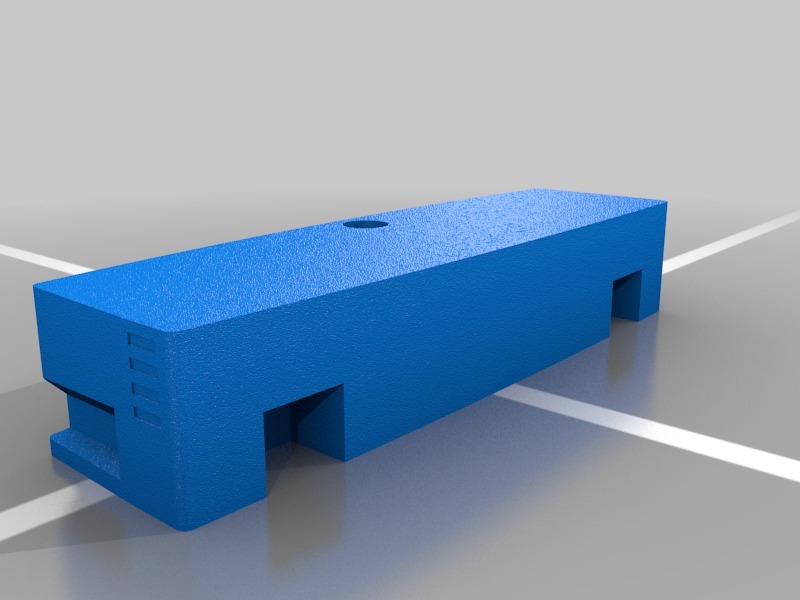
<p>Here’s my photolog of how I solved a sunroof-meets-Thule problem with 3D printing and mold making. My wife’s Mazda 5 has a Thule roof rack mounted on factory hard points. When she tries to open her sunroof, the window hit the rack bar. So, I created a part using the 3D printer she got me to raise the rack up .5 inches. This probably the most useful thing I’ve created with a 3D printer to date. You can see in the photos how the window hits the bar, how I made the silicone mold, and then cast the parts.</p> <p>The boots for the roof rack are Thule Fit Kit KIT3080.<br/> <a href="https://www.thule.com/en-us/us/support/spare-parts?p=3080999&sc=%7B8E447224-06C8-4AB8-B07B-A5367BB55EB8">https://www.thule.com/en-us/us/support/spare-parts?p=3080999&sc={8E447224-06C8-4AB8-B07B-A5367BB55EB8</a>}</p> <h3> Print Settings</h3> <p><strong>Printer Brand:</strong></p> <p>MakerBot</p> <p><strong>Printer:</strong></p> <p>MakerBot Replicator Mini</p> <p><strong>Rafts:</strong></p> <p>No</p> <p><strong>Supports:</strong></p> <p>No</p> <p><strong>Resolution:</strong></p> <p>0.02</p> <p><strong>Infill:</strong></p> <p>20%</p> <p><strong>Notes:</strong></p> <p>With the Mini, you can get great prints if you pre-heat the build plate with a heat gun (or blow dryer). Use an infrared thermometer to measure the temperature. I found that if I heated it to about 60 deg C, at the time the print head started, then I got good part adhesion without much warping. A little warping is okay in this part because the final part will mold to the Thule rack (if cast using urethane).</p> <h3> Post-Printing</h3> <p><strong>Here are the test parts. The one on the left is the actual size I needed: 0.5 inches tall. The other two are for making the mold. I made the mold versions taller so I could make different heights of parts if needed, just by filling the mold with more resin.</strong></p> <h3> How I Designed This</h3> <p><strong>Here's the problem: The sunroof on this Mazda 5 hits the Thule rack using the factory hard-points. This prevents the window from opening all the way (this image is as far as it goes). When the window hits the rack's crossbar, the motor stalls (which can't be good for the motor).</strong></p> <p><strong>Another view of the window hitting the Thule cross bar.</strong></p> <p><strong>Deconstructing the rack. Note the steel, with only one bolt, holding the system together.</strong></p> <p><strong>Here's the bare factory hard-point, with the bolt sticking up. I didn't remove the bolts.</strong></p> <p><strong>Test fit of the PLA part in the Thule rack foot boot.</strong></p> <p><strong>Tall part, ready for the silicone mold pour.</strong></p> <p><strong>The mold box was 3x3x6</strong></p> <p><strong>The PLA printed parts were made into a mold using Smooth-on OOMOO 30 silicone casting liquid.</strong></p> <p><strong>Detail was pretty good for the part. Note the undercuts. This photo was taken after I'd cast 4 parts and the mold started to degrade a little: note the chunk missing from the lower-right undercut. Release agent: silicone lubricant (</strong></p> <p><strong>I added 4 registration marks so I could easily tell how thick the part was, as I was pouring resin into the mold.</strong></p> <p><strong>Cast parts, using Smooth-on ONYX Slow casting resin. It has a Shore D hardness of 80 if heat cured at 250 deg F for 4 hours (I didn't do this, yet). Note that the resin climbed the sides of the silicone mold, so I used a metal file to flatten the edges after demolding.</strong></p> <p><strong>Here's the final cast part being test-fit.</strong></p> <p><strong>Putting the rack back together, with the .5</strong></p> <p><strong>Note that the bolt was long enough to completely engage the nut, despite being the original Thule part.</strong></p> <p><strong>Fully installed.</strong></p> <p><strong>You can see the rise clearly here.</strong></p> <p><strong>Victory! The window opens!</strong></p> <p><strong>Fully open position, with the rack up 0.5</strong></p> Category: Automotive
With this file you will be able to print Thule Roof Rack Riser with your 3D printer. Click on the button and save the file on your computer to work, edit or customize your design. You can also find more 3D designs for printers on Thule Roof Rack Riser.