Thunder Tiger Phoenix GT Electric Conversion Kit
thingiverse
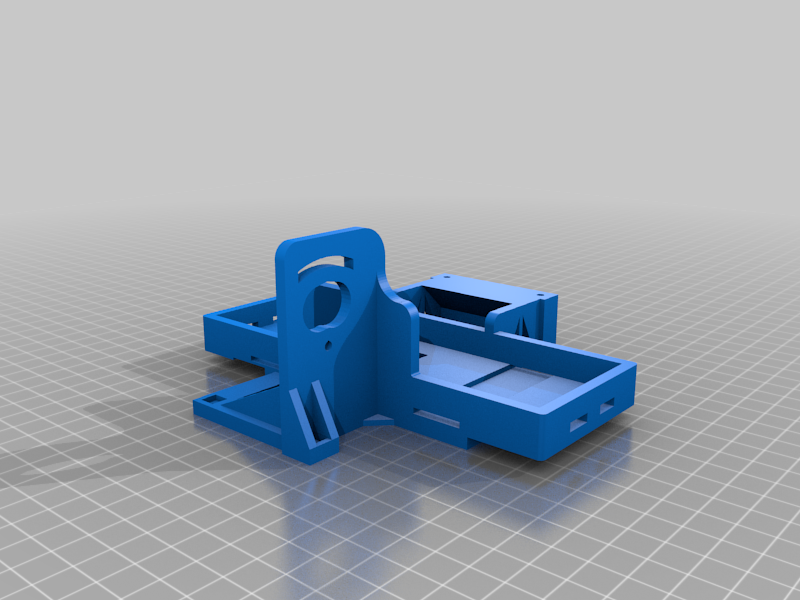
Made this model to convert my old Thunder Tiger Phoenix GT 1/10th scale RC truck to electric. One model serves as a motor mount, ESC mount, and battery tray. Posted here in case anyone else who has this RC, a 3D printer, and a desire to convert it to electric may attempt to do so. <b>Disclaimer:</b> This model was made for a Thunder Tiger Phoenix GT 1/10th scale truck. I cannot guarantee it will will work for any other of Thunder Tiger RC models, or even other Phoenix models. I won’t be offering any support on this electric conversion model. Be prepared to get your hands dirty. <b>Battery Tray Size:</b> 146mm x 49mm Most 2 & 3 cell Lipo batteries should fit just fine but double check the size of your batteries just to be sure. <b>Needed to complete:</b> 1x Thunder Tiger Phoenix GT RC Truck. 1x ESC & Motor Combo (Most 1/10th scale 36mm diameter motors should mount just fine) 1x Pinion Gear (14T to 22T+) You'll have to figure out what pinion would work best with your motor & ESC. 1x Compatible Spur Gear – I was able to replace the existing spur gear with one I had from old Losi electric RC’s. (86T/90T - LOSB3437/LOSB3439 - Recommend 90T) Unfortunately these spur gears have been discontinued for quite a long time. If you can’t find one you’ll have to find a similar part. It might be easier to just get a pinion gear that’s compatible with the existing spur gear on the car. But then you might run into issues with the motor mount position. 2x 200mm Battery Straps. 2x M3\*16 (Button Head Cap) Screws 11x M3\*6 (Button Head Cap) Screws 4x M3 Washers 13x M3 Square Nuts (5.4\*5.4\*2.4mm) Make sure you have all of the parts you need before printing. <b>Recommend Before Printing the Real Deal:</b> Please print “Motor_Mount_Test.stl” first and mount it to the car to verify that your motor is able to mount properly, your pinion/spur gears mesh well, and that there are no clearance issues. Since this print is just for test fitting I recommend using the following print settings to save on plastic: Layer height 0.2mm, perimeters 1, top & bottom horizontal shells 3, infill 5%. <b>Assembly:</b> 1. Prepare the car – Remove the nitro engine, throttle servo, & fuel tank. Replace spur gear if necessary. 2. Insert M3 Square Nuts into the 7 slits around the printed model, drop in the remaining nuts into each of the 6 square holes. 3. Mount the ESC in front with 2 M3*16 screws, with a M3 Washer for both screws. 4. Mount the Motor in back on the motor mount using 2 M3*6 screws with a M3 Washer for both screws. 5. Route the motor wires under the battery tray along the indentation, connect them to the ESC. 6. Mount the printed model with the Motor & ESC mounted to the chassis of the car, using M3*6 screws through the bottom of the chassis. Careful not to pinch the motor wires. 7. Mount the pinion gear to the motor shaft. Loosen motor mounting screws and adjust the gear mesh between the pinion and spur gear. Tighten motor mount screws once gear mesh is satisfactory. 8. Route & plug in steering servo/ESC wires to the receiver. 9. Add battery straps. At this point, you should be ready to go. Charge up a battery and take the car for a drive.
With this file you will be able to print Thunder Tiger Phoenix GT Electric Conversion Kit with your 3D printer. Click on the button and save the file on your computer to work, edit or customize your design. You can also find more 3D designs for printers on Thunder Tiger Phoenix GT Electric Conversion Kit.