Tick Remover
thingiverse
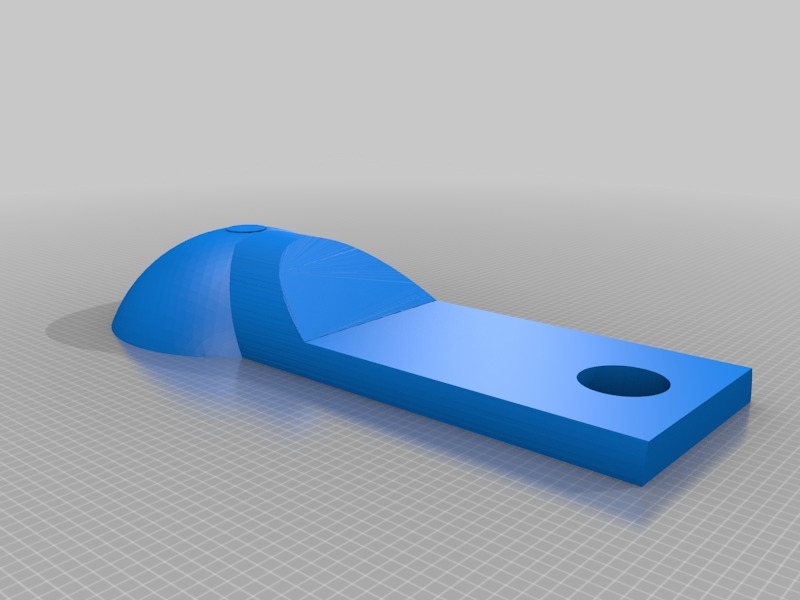
**Disclaimer** I want to make it clear that I do not make any claims at this being the best way to remove a tick or the safest. I also do not make any claims that this has a 100% success rate at removing ticks. Please use at your own discretion and after doing your own research. Consider contacting a medical professional who is more suitable for these tasks if you do not feel comfortable doing this yourself. I made this for my own personal use and am sharing it with anyone else who is interested in using it or improving on the design. **Disclaimer** Best design is version 3 as a remix to this. This design is now defunct but you are more than welcome to improve upon its design or print it to use yourself. It works, it's just not great with the unintentional hole in the base of the bowl. For most ticks, you shouldn't have to worry about the hole, but it's best to just not have that hole at all which is why I recommend printing Version 3 instead. It is best printed upside down on most printers. I have added my first design which includes an unintentional hole just for anyone who is curious about my progress or may prefer this design. Ticks are dangerous and nasty little creatures and they hurt the ones we love, sometimes even ourselves. Only thing more dangerous about them than what they actually do is also in how you remove them. If you remove them improperly, you can create additional problems such as infection due to not completely removing the tick and possibly leaving the head behind. With a design such as this, it is my hope that you do not have to directly come into contact with the tick and you can remove them in addition to disposing of them as safely as possible. This design is most like a modified spoon that has a triangular shape to it to aid in removing the tick easily and safely. To use this, put the spoon down on the skin and move towards the tick with the tick in the path of the open triangle. Once the tick is in between the triangle, pull upwards and in the same direction you were traveling and the tick should come right off the skin. Blood may appear once the tick is removed which is natural. Tend to the area appropriately to cease the blood flow; possibly consider using some type of cleaner such as hydrogen peroxide around the area to help in reducing any chances of infection. The bowl design is to ensure that the tick is held so that it cannot fall and be lost or force you to come into contact with the tick. I usually flush the tick down the toilet but you can also throw them into a fireplace or dispose of them by other means, perhaps release them elsewhere if you do not want to kill them. The pictures above show a hole in the bowl. That hole is not intentional but occurred during my first print after designing. The problem was that my design was sitting beneath the "floor" and that part was unintentionally cut off. I didn't realize until the printing had finished. The new design, which is the second and most current, fills this hole. I have added my first design in this anyway for anyone who may want it or to see my progress. Additionally, the first version is bigger, 25% to be exact. I do not feel that it is necessary to be this large and have reduced the size by 25% in the second version. Scale up or down depending on how you feel you will use this. I have used a tool that resembles this with ticks on my dog and also fleas and have had great success. My intention with this design was to recreate that object as close as I could as I lost it. I hope this helps you as it has helped me. **Update**: The reason for the holes in the basin of the bowl design is due to me not printing using supports. The best possible way to print this object is upside down with supports. You can print rightside up but you will still need supports and this method will use a lot more filament than if you printed upside down. If you do not print using supports, you will have a hole in the basin if printed upside down. If printed without supports rightside up, you will have many other issues. Best printed upside down with supports to get the best possible results. Also, there is a sizing issue I am seeing in the second version. I believe this is due to slicing software not differentiating between mm and inches which yields a much larger print than is needed. I recommend allowing your slicer to auto resize the object but if that is not an option, reduce the size by scaling down to approximately 25% or lower. Any size should still work, but 25% seems to be a good size from what I've printed on two different printers. My apologies for these issues. I'm still very new to the designing process.
With this file you will be able to print Tick Remover with your 3D printer. Click on the button and save the file on your computer to work, edit or customize your design. You can also find more 3D designs for printers on Tick Remover.