TIG Monster Claw - TIG Rod Guide
thingiverse
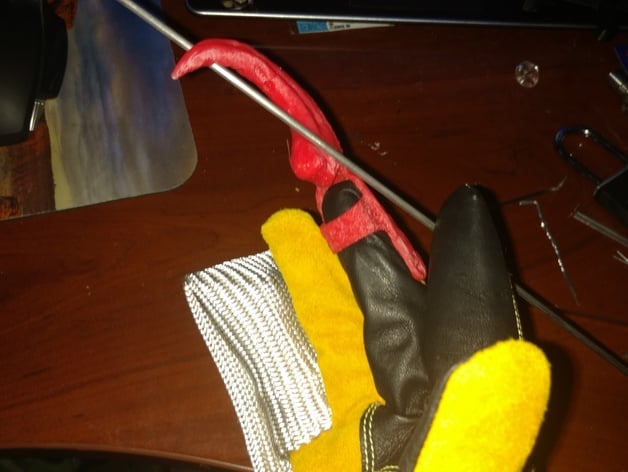
This is my TIG Monster Claw! It's purpose is to aid in feeding rod for TIG welding. There are 5 total paths for rods to ride on. I think it's perfect for the n00b all the way to the expert but I'm hoping to get feed back on just how well it helps your TIG life. I'm a n00b but we'll see just how quick this might make me an expert :P While you're at it, check out the TIG Tungsten Grinder for a rotary tool I got:https://www.thingiverse.com/thing:1905626 The main reason I really needed this was because I type 80-120 WPM and do a lot of security development i.e. my wrists are trashed with carpal tunnal. Add lock picking and all the other precision maneuvers I do with my hands with all my craft/mechanic/design/yard work and running a TIG rod just sucks. So this let me lay the rods in a more natural position so I'm not having to strain as much to guide the rod where I need it especially while keeping it consistent and straight. I was gonna design a much more hoaky contraption but then I thought about the claws and they seem to be perfect! This claw really only works on the middle finger which was a bonus convenience. You can use your ring finger but it's not as functional IMO. So let the hand gestures roll and now you've got a legitimate excuse to flip the bird, cuz you're just TIG'in! I demonstrate the various angles that can be used in this Youtube video and you can see the various rod angles I used in CAD to cut the paths out in some of the thumbnails.https://www.youtube.com/watch?v=xa1KH_aA9d0 The rod paths work perfectly for a 1/8 rod with my large finger scaling for prints I recommend below. There are rod guide paths in each cut that accommodate said 1/8, and then a separate rod path logically aligned that accommodates pretty much any smaller rod you could imagine but hey prove me wrong, and edit the .blend file if you'd like ;) When printing, I set the model to scale up 1.08 which fits perfectly on a large BSX TIG glove that is a little fatter than my fingers need. Scaled at 1.00, it fits my bare fingers perfectly but who wants to TIG bare handed? For the larger meat hooks out there, I recommend a 1.2 or higher scale. I recommend 3mm walls minimum and 40% infill minimum. I also use ABS and since that's what most TIG torches are made out of (from what I believe is true...?) and it's about the best melting point you'll get, but feel free to test out those fancy metal filaments and if you do, post a pic! I print this thing slow too, but slower is better and is kinda fast for the sharp corners and small islands. The model that can be downloaded is a left handed only model, and must be used on the middle finger unless you want cramps but feel free to experiment! To print a right handed claw, just mirror the image usually on the X axis. My original model was meant as a Halloween costume piece and you can now find the original Monster Claw here:http://www.thingiverse.com/thing:1684638 Special credit go to:http://www.thingiverse.com/thing:1070477 The key piece to this was based on the Jurassic Park raptor claw which was re-imagined into CAD thanks to kvrtiska! Who knew 65 million years later, the raptor claw would still prove a useful precision killing tool!http://www.thingiverse.com/thing:962185 This model provided the base for the finger cover which I used to build out a full on glove for other purposes which I'll upload later. Thanks petergross3! Print Settings Printer Brand: LulzBot Printer: TAZ 5 Infill: 40 Notes: Place these claws upside down as in the backside of the claw, not the tip, goes to the platform. The tip points straight up, and honestly I set a slight angle upwards so just the backside of the finger plate is sitting on the plate while the rest angles slightly upwards. The top side is the least functional part and with good support and print speed will come out pretty nice looking. If you want it perfect, then you've hopefully printed 3d a few times and know how to make that happen since it requires some clean up too ;) You can try printing on the sides but my original models without guide paths (and when I was printing too hot and too fast) came out bad. Slow down and it might turn out fantastic! I recommend 3mm walls to make this tough and more heat resistant. I recommend .5mm spacing on your supports to make it sturdy and take out the spaghetti which usually occurs if you print too fast, print too hot, or don't build good support on small detailed parts that require detail all around. 20-30 print speeds with 1.08 up scale to the model before printing gives great results for a TIG Monster Finger going on a Large size glove that's a bit loose on a Large size wearer with thin fingers. Upscale to 1.20 or higher for those larger meat hooks.
With this file you will be able to print TIG Monster Claw - TIG Rod Guide with your 3D printer. Click on the button and save the file on your computer to work, edit or customize your design. You can also find more 3D designs for printers on TIG Monster Claw - TIG Rod Guide.