Tiler T Minion, 3D printer
thingiverse
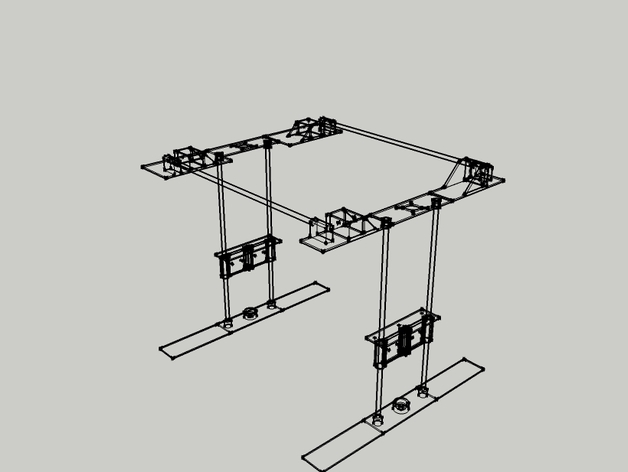
My latest Minion is Tiler T Minion, so named because the parts install edge to edge like tiles. I have included the original Sketch-up files if you would like to adjust the size for custom, or larger, cases. It is also easy to assemble. This set is designed for an 18"x18" inside dimension box, made from .5" plywood, that is 19"wide, 19" long and 15.75"tall outside dimensions. This easily accommodates a standard 8"x8" heat bed. Every printed part for a simple cube printer. For the extruder, I have included the files for the jonaskuehling Guidler in 3mm and 1.75mm. one of these should work for you or go to thing:18379 UPDATE: 11-12-14 I believe this is complete. Please ask (comment) if there is anything further you feel needs to be included or if you have questions. UPDATE 11-7-14: Full reload of all files. X axis 1, 2 and 3 still show manifold errors when sliced in slic3r but display all layers as good when the gcode is viewed in Pronterface. They print fine but I'm still looking for the error. All other files should slice error free now. All files should print without problems. If you previously downloaded this thing then you will want to update at least the Z axis traveler (Z1, I believe) that file was definitely previously corrupt and will not print properly, or just re-download the set... Instructions Assembly instructions for Tiler T minion. Lengths and sizes of rods, bearings etc. will appear later in the BOM. I have stayed with “reprap standard” for the most part. Case: Open the .skp file tilerCase in sketch up. Sketch-up is a free download by a trusted company, in case you do not have it. The dimensions are labeled in the drawing. Each groove is .5” wide and .25” deep. The entire case is made from .5” plywood. Simply follow the dimensions provided. Z axis: First assemble the 2 z axis in place in the case. Do not screw them down. I prefer to leave the motors off and place them later. Place the bottom inside the case with the bearing installed. Slide the 2 smooth rods into the bearings on the z traveler (the part the table will bolt to). Place the 2 upright smooth rods into the bottom holder. From above, push the top onto the 2 smooth rods. Next x and y. X and Y must be assembled at the same time in order to place them into the top of the case. Y axis: Put the 2 linear bearings in each end of the Y carriage holders. Place 2 bearings on one of the 2 smooth rods and one on the other for the carriage to ride on then push them into the ends. Glue the 2 rectangular parts in the slots for the Y axis. These are your belt attachment points. Also one of the spots I would like to tweak. Set aside. Install 6 rod bearings in x axis holders. Place the 4 X corner pieces in the top of the case with the end with the rod holder to the outside. The 2 which are narrow on one end and the other set across from them. Install the drive rod and gears, do not tighten gears yet, in the wide set. Install the motor and single belt gear in the narrow set. You will often need to lift them out to assemble the unit. Slide the 2 x smooth rods into the bearings on the y assembly and then push the smooth rods into the x end holders. This should give you the full assembly but nothing should be attached firmly. Take the x corners closest to the front and push them solidly into the corners and screw them down. If your cube is square, this will align your parts. Next push the z tops securely against the side wall and against the edge on the front corners you have already secured. Do not secure the final edge until you test the slide of the Y carriage. If any adjustment is needed, this is where you can make it. With proper construction, the parts meet edge to edge. If it is necessary to ease this a bit to get the slide rods perfectly parallel you will be able to do so. Finally, tighten the gears on the drive and idler rods Next go inside the case and either install the spacer plates or hold them in place while you secure the bottom of the z axis. This will align the z axis to the face plate which the top is also aligned to. Install the motors. Z threaded rods must be installed with Z motors. Install the cork and heat plate on the spring table. Install the table inside, and the spring bed, between the Z travelers. Install motors and belts. 3 belts, 5 motors. The locations should be obvious. Install the extruder. The carriage is designed for a standard Rep Rap extruder. I recommend the Guidler, thing:18379 by jonaskuehling. Install endstops. The endstops you choose will be related to the controller you choose and I have so far not included endstop holders in this project because of the variety and availability already on thingiverse. Install controller. I use RAMPs myself. Customizing: If you want to use a different size case for any reason (I have some really nice old phonograph cases I have considered using ) Simply open the sketch-up (skp) file for the X axis. You will be able to drag the ends of the corner holders to about any custom size. Just remember to keep them even. Bill of Materials: Printed parts; NOTE: 3 endstop holders not included. You will need them to match the type of endstops you select. There are a variety available on thingiverse. Printed Parts: XAxis1, 2, 3 and 4 1 each yTiler1 2 yTiler2 and 3 1 each printer-carrage1 and 2 1 each tilerZ1, 2 and 3 2 each TilerZcoupler 2 TilerZspacer 1 if used as guide, 4 if . installed in base Select extruder size (3mm or 1.75) 1 assembly. xTilerOptional 1, this replaces xTiler1 (The idler mount) with another motor mount. Experimental to drive the y assembly on the x axis with 2 motors. Bearings 6 - 3/8" OD x 3/16" ID for drive rod and X idler. 15 - lm8uu linear Rods 4 - 3' x 5/16" smooth 1 - 3 x '5/16" threaded rod 1 - 18" x 3/16" smooth Misc 9- 5/16" nuts 4 belt gears to match belt type. 1 box of 1/2", Philips, pan head, wood screws, for case and securing parts. Less than 50, I bought a small box. 3 endstops mechanical or optical 1 controller RAMPs, Gen6 etc. 1 12v power supply 25A or better recommended. 1 hotend to match extruder/filiment size 1 heated print bed cork gasket for below print bed. 6 springs for print table and bolts/nuts. 2 are for extruder extruder grooved bolt 2 bolts for exruder springs 20 bolts to mount motors 2 thermistor for hotend and print bed Kapton tape to secure thermistors in place 1 1/4" x 16" x 9" plexiglass Other materials for bed table optional 1 1/4" x 9" x 9" plexiglass Other materials for bed table optional
With this file you will be able to print Tiler T Minion, 3D printer with your 3D printer. Click on the button and save the file on your computer to work, edit or customize your design. You can also find more 3D designs for printers on Tiler T Minion, 3D printer.