Time-Lapse Rail

Time-Lapse Rail

thingiverse

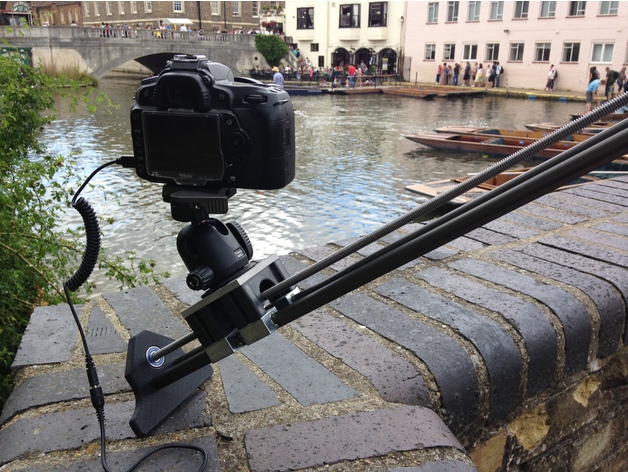
This project is a variant of the Chronos Project. The time-lapse rail is based on an Igus WS-10-40-10 and carriage which uses polymer bearings for smooth movement. With this as the platform a stepper motor, lead-screw and anti-backlash nut (for greater accuracy) can be used to turn it into a time-lapse system. By using a lead-screw and not a belt to move the carriage means when the rail is oriented vertically, the motor doesn't need to apply much extra torque in order to move the carriage. The lead-screw locks the carriage in place whereas a belt system needs to keep the motor energised to stop the camera falling. Only a small stepper motor is needed to run the rail and the system I have made is based on the Chronos Lite. The controller is powered by an Arduino Uno with a custom shield made from the Chronos Controller's open source schematic. I tested out the circuit after soldering in a RJ45 to link up with the stepper motor and limit switches, it worked well and didn't take up much space so decided to use it in the enclosure. Controller Hardware Features Bosses inside the enclosure allowing 3mm threaded brass inserts to be used to screw the Arduino Uno down The 3mm inserts were used again in order to mount the laser cut face plate Ledge allowing the laser cut acrylic to sit flush with the top of the enclosure A mounting feature inside the enclosure allowing an RJ45 socket to be mounted (It is a very snug fit but can also be held in using a zip tie) Features with allowed the inlay of Sugru (my favorite mouldable silicone rubber) on the corners of the box for added durability and grip The time-lapse rail uses a stepper motor to move the camera which makes it unsuitable for use shooting video. To get the camera from one end to the other takes around 3 minutes. However as the Igus slider and linear bearings are very smooth, I created a clamping feature which allows the carriage to be released from the anti-backlash nut on the lead screw. This means it can be used as a manual slider very quickly just with the use of a hex key. The end plates are designed to accommodate the other RJ45, stepper motor, limit switches and bearing. They also are just wide enough that the rail is stable on a flat surface such as a bench or desk. Time-lapse Rail Hardware Features Sugru has been incorporated into both the end plates for as much grip as possible! It's not terribly heavy either Copper tape is used to connect the limit switch from the other end of the rail, much better than thick wire.  Wide Feet By using the wider feet it allows the rail to be used on uneven ground as it can be adjusting each of the four legs. They are easy to take on and off, they just unscrew. To get the threads in the feet heli-coils have been used with 8mm threaded bar. Sourcing Parts When sourcing parts, Ebay is your friend, you need to search for some of the items listed here: Controller Parts 2.5mm Stereo Jack Socket Panel Mount (x2) Black knobs (x2) Momentary buttons (x4) RJ45 8 pin connector (x1) Short Ethernet cable (3ft) 3mm push fit threaded inserts (x8) Sugru M3 screws (x8) Time-lapse Rail Parts Igus WS-10-40-10 Rail and carriage bearings 8mm lead screw 1 meter (which Igus sells: PTGSG-08x1,5-R) Anti-backlash nut suitable for lead screw (which Igus sells: JSRM-AB-2220-TR8x1,5) 5mm to 8mm coupling Copper tape Limit Switches (x2) RJ45 8 pin connector (x1) M8 Heli-coils for feet (x4) M8 threaded bar mall stepper motor  8mm bearing Sugru Long M6 screws M8 Tap to mount wide feet Tripod head bolt M3 screw 3mm push fit threaded insert

Download Model from thingiverse

With this file you will be able to print Time-Lapse Rail with your 3D printer. Click on the button and save the file on your computer to work, edit or customize your design. You can also find more 3D designs for printers on Time-Lapse Rail.