Tiny Toy Blaster V2 (6mm Airsoft Toy Gun) No Glue, No Fasteners: Just Rubber Bands and Prints
prusaprinters
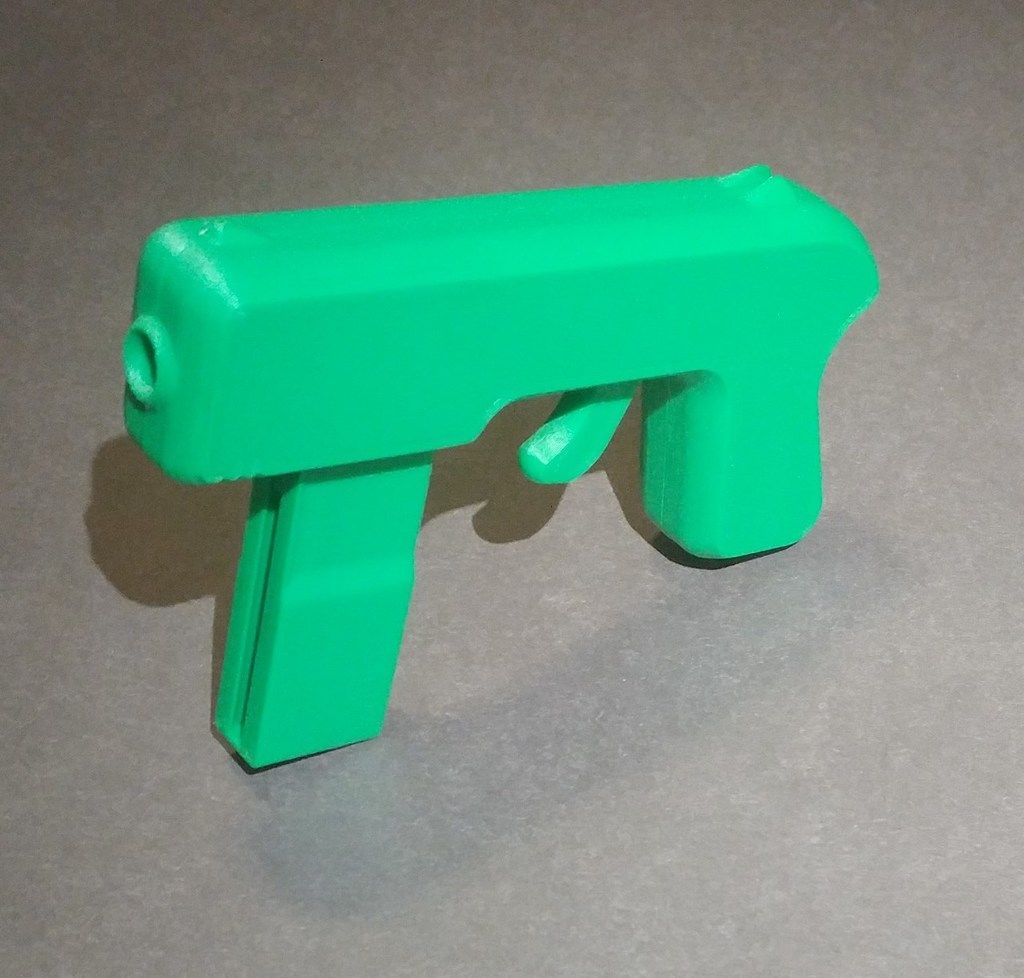
<h3>Summary</h3><p>Dinky little toy blaster. it shoots about 30 feet, is pretty small and is made out of purely printed plastic and two rubber bands (One for the trigger and one for the magazine).</p><p>It requires no fasteners, or glue, and just uses printed tabs to connect the clam shell case.</p><p>It uses about 45 grams of filament, can be printed in PLA and has only one part that uses supports, (that are easy to remove and on the trigger).</p><p>The magazine clicks in and is pulled out the same way</p><p>It fires 6mm airsoft bbs</p><p><a href="https://www.thingiverse.com/thing:4926619">Exported from my original post on Thingyverse</a></p><h3>Update V2</h3><ul><li>Increased Range</li><li>Easier to print (no barrel section)</li><li>Smaller in size (due to no barrel and 8 rounds in magazine instead of 9)</li><li>Easier to assemble (More space for bands, looser tolerances, and easier to insert clips/tabs)</li><li>Easier trigger pull (I realized I had a misconception of what was caused the bbs to go faster and added a relief for the magazine lips flexing.<br/> </li></ul><h3>Print and Assembly Instructions</h3><ul><li>Below with pictures and diagrams</li></ul><h3>Print Settings</h3><p><strong>Printer:</strong></p><p>Creality CR-6</p><p><strong>Rafts: </strong></p><p>No</p><p><strong>Supports:</strong></p><p>Yes - In one place only</p><p><strong>Resolution: </strong></p><p>0.2mm Layer Height, 0.4mm Nozzle</p><p><strong>Infill:</strong></p><p>15% (whatever you usually use is probably fine)</p><h3><strong>Filament:</strong> </h3><p>Kexcelled PLA K5 Green (but anything works (the more springy and stiff the pla the better for ball velocity) </p><h3>Post-Printing</h3><p>Rubber band follows the path shown. Make sure to pull the trigger halfway or more so that the Bolstracikter (Thing that hits the bbs) is seated properly and inside its rail.</p><figure class="image"><img src="https://media.prusaprinters.org/media/prints/103314/rich_content/08f60652-2577-4b18-850f-0ebf3e878624/launcher_assembly_edit.png#%7B%22uuid%22%3A%223fd536ae-21e4-41c1-bcab-6f9dfb52b3d7%22%2C%22w%22%3A1723%2C%22h%22%3A1083%7D"/></figure><figure class="image"><img src="https://media.prusaprinters.org/media/prints/103314/rich_content/306818a6-b4e5-4eff-9625-377dce71e5f5/magazine_assembly.png#%7B%22uuid%22%3A%22976ce1af-773e-4813-b227-1dba24b13413%22%2C%22w%22%3A1732%2C%22h%22%3A1021%7D"/></figure><p>You'll want to clip the 1 layer thin bit of plastic on the follower to allow the band to go through. Next you get the band around the nub on the follower, and let it dangle through the magazine body. Third you get the band onto the bottom band point on the rear cover, then rotate it to get it to run over the top. Lastly you push it in with the clips holding it in place.</p><h3>How I Designed This</h3><figure class="image"><img src="https://media.prusaprinters.org/media/prints/103314/rich_content/25afff59-c0da-456b-8206-2645918c7de2/creation_photo.png#%7B%22uuid%22%3A%22e62ba9c8-ce73-4a1d-9efb-243461f54282%22%2C%22w%22%3A1070%2C%22h%22%3A732%7D"/></figure><p>Designed using F360.</p><ul><li>Created the flat case shape with a sketch</li><li>Extruded flat shape</li><li>Cut profile to make it easy to hold</li><li>Made sketch for most of the internals</li><li>Made sketch to support most of the internals</li><li>Split it in half</li></ul><p>Created Tabs as one part with Male rough, Male, and Female tab components with make added to one side, female to the other, and the male rough used to cut out the female half. These were all the various prototypes made trying to arrive at the conclusion.... I need to get better at failing fast and frequently.</p><figure class="image"><img src="https://media.prusaprinters.org/media/prints/103314/rich_content/82628f3b-215c-4fc9-8b8b-a9241263077a/comparison_v6.png#%7B%22uuid%22%3A%22532c392a-10c0-42c8-a703-c1ce7196a684%22%2C%22w%22%3A2560%2C%22h%22%3A1440%7D"/></figure><p>These were all the various prototypes made trying to arrive at the conclusion.... I need to get better at failing fast and frequently.</p><h3>Parts</h3><p><strong>The rubber bands used</strong></p><figure class="image"><img src="https://media.prusaprinters.org/media/prints/103314/rich_content/267f6d5a-77b4-4326-819e-6369da60b114/band_photo.png#%7B%22uuid%22%3A%22c41b1cf6-b2c4-45b4-a04c-6b82cae3ae9d%22%2C%22w%22%3A399%2C%22h%22%3A414%7D"/></figure><figure class="image"><img src="https://media.prusaprinters.org/media/prints/103314/rich_content/317b9627-08a0-4e05-bcbc-7ce95494bf05/band_photo_2.png#%7B%22uuid%22%3A%223666b29d-299f-4dd1-af85-0c177f75bb04%22%2C%22w%22%3A399%2C%22h%22%3A437%7D"/></figure><figure class="image"><img src="https://media.prusaprinters.org/media/prints/103314/rich_content/1104d06f-8a78-4189-a0b8-27fab08d8453/band_photo_3.png#%7B%22uuid%22%3A%22c2e251cc-83a6-44bb-b8fe-2be79f4a3d1a%22%2C%22w%22%3A398%2C%22h%22%3A373%7D"/></figure><p>The rubber bands used for both the trigger and the magazine is pictured, though you can wrap a larger rubber band around twice for the trigger, or the magazine (this will be tricky so just using a smaller one is better than bigger)</p><p>I bought a pack of these labeled as 2.5cm: <a href="https://www.aliexpress.com/item/1005001872435921.html">https://www.aliexpress.com/item/1005001872435921.html</a>?</p><p>Those are used in both the blaster and the magazine.</p><p>I like 2 bands in the blaster to make it more springy.</p><h3>Print Instructions</h3><p><img src="https://media.prusaprinters.org/media/prints/103314/rich_content/39fe4bfe-390f-431b-a526-15fe43d8f876/bed_setup.jpg#%7B%22uuid%22%3A%22393bbc57-5b31-4d9c-96f5-5f1cd1628ad9%22%2C%22w%22%3A1717%2C%22h%22%3A1068%7D"/></p><ul><li>Print orientation as shown (So the grain runs along the blaster and bridges print fine without any specific bridge settings).</li><li>Supports are only necessary on the trigger. Everything else is printed without supports.</li><li>This assumes your printer is ok with a tolerance of 0.3 - 0.4mm on the XY and 0.4 on the Z.</li><li>Adjust Horizontal expansion as necessary and initial horizontal expansion/z-offset for elephants foot, but it should work on any stock ender 3, prusa or similar. If you have stickage problems try glue stick and or a lower initial layer print speed.</li><li>The magazine follower has a sacrificial 1 layer thick section that can be broken away with some pliers or a cutter.</li></ul><p>Category: Mechanical Toys</p>
With this file you will be able to print Tiny Toy Blaster V2 (6mm Airsoft Toy Gun) No Glue, No Fasteners: Just Rubber Bands and Prints with your 3D printer. Click on the button and save the file on your computer to work, edit or customize your design. You can also find more 3D designs for printers on Tiny Toy Blaster V2 (6mm Airsoft Toy Gun) No Glue, No Fasteners: Just Rubber Bands and Prints.