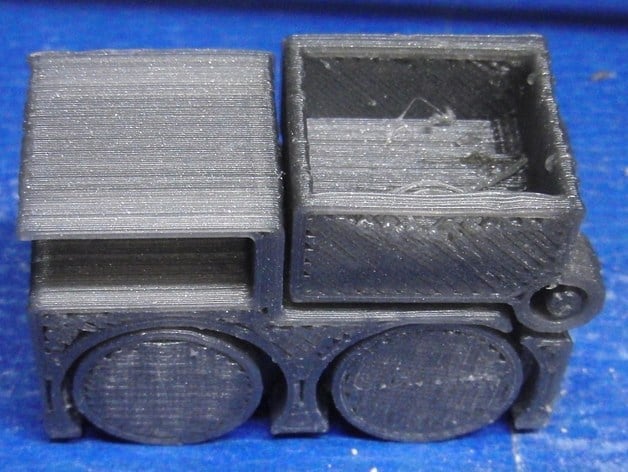
Tiny Toy Dump Truck with Cam Action Bed
thingiverse
This is a variation of the Tiny Toy Dump Truck that does require support in order to print. The use of support allows cylindrical wheels, a bed axle sleeve that is no longer sliced, and the addition of a cam and rod that lifts the bed once per rotation of the back axle. It can be printed as a single piece on a standard Reprap/Makerbot by manually introducing support material during the print. See http://www.youtube.com/watch?v=47iEXR6xXnE for a video of a working copy that was printed on a standard Reprap. Instructions See http://reprap.org/wiki/Manual_Support for a more detailed description (with images) of how to print using manual support. La Doll clay can be use as support material. Skeinforge should be configured so that comments are kept in the generated GCODE file. Export -> Comment Choice -> Do Not Delete Comments A tall skirt should be generated in Skeinforge. This can be accomplished by activating the Skirt module and setting the layers to a large value: Skirt -> Layers To (index) -> 100000 Examine the Skeinlayer window and determine the z-depth of the layers that need support. Assuming you are printing with 0.2mm layers, the layers for this object are: 4.0 (body bridges the lower pair of wheels) 7.2 (cam and rod appear) 11.8 (body bridges cam and rod) 13.2 (upper bed axle sleeve appears) 15.2 (upper pair of wheels appear) Split the GCODE file into 6 pieces, where the first file includes everything up to but not including the start of the first layer that needs support. Again, assuming 0.2mm layers, the first file should stop just before the line: ( 4.0 ) The second file should start with the line that starts the first layer that needs support and include everything up to but not including the second layer that needs support. Continue with this pattern until you have six files. It is useful to put a G1 Xa Xb line at the end of all but the last file in order to move the extruder off the body of the print (replace a and b with appropriate values - in my case 25 worked well for both values). Print the first file. When complete, move the extruder using the jog functions of your host program so that you object is well clear of the extruder. Fill in the area that needs support using some clay. The clay should rise to the height of the top of the last printed layer of plastic, but no higher. If the support is too high it will get caught up on the nozzle when the next layer is printed which will cause adhesion problems in other areas of the print. If the support is not high enough the next layer of plastic will not stick, or it it will pull away as even higher layers are printed on top. Repeat the the process with the second file, and so on. When all files have been printed remove the skirt and manually remove any external lumps of clay. Then put the object in a container and cover with water. Let it soak for at least an hour. The clay will become very soft and the majority of it will be relatively easy to remove using a brush or a toothpick. Finally, wash the entire object under running water. The PLA wheels are rather slippery and the axles have a lot of friction, so the cam action bed will only work on certain surfaces. Some fabrics work well. The sticky side of a piece of masking tape works very well.
With this file you will be able to print Tiny Toy Dump Truck with Cam Action Bed with your 3D printer. Click on the button and save the file on your computer to work, edit or customize your design. You can also find more 3D designs for printers on Tiny Toy Dump Truck with Cam Action Bed.
