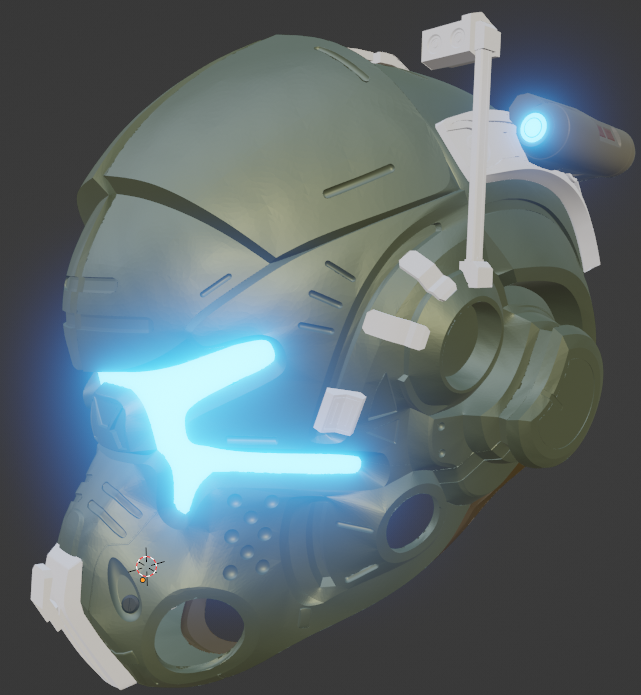
Titanfall MCOR Helmet - High Detail Game Accurate Jack Cooper Helmet V1
thingiverse
###Project Completion This model is complete in the sense that all components required to print the helmet are here! I would like to give a special thanks to those who have helped along the way: Jace1969: For the base model of the helmet here (https://www.thingiverse.com/thing:3175122) to build this off of. laptopluke: For the troubleshooting, support, and advice. amcmann: For the svg files, advice and troubleshooting support along the way. There are still some modifications I'll be making before this project is moved out of a WIP status so please check the To-Do List if you have any questions of what else is left. As always, thanks for the support and feel free to make any requests through the comments section. I check all comments. If you would like to donate to support further work, the link is below. And if you love Titanfall 2 as much as I do stay tuned, as not only do I have a special V2 of the helmet in mind (with fancy opening maneuvers), but I'll also be modeling Jack Cooper's jetpack and BT's Data Core next for all you pilots out there that had to pull that Seer Kit. ### Donations Thank you to everyone who's supported my work on this project. Due to several requests, I have added a tip donation (via paypal) for anyone interested in helping support my long hours with caffeine. You can follow the **Donate Here** hyperlink below or the papyal.com/donate link on my profile page. #### [Donate Here](https://www.paypal.com/donate/?business=223MRWUX47LAQ&no_recurring=0&item_name=Thank+you+for+supporting+all+the+hard+work+I+put+into+this+project+%28and+my+late+night+caffeine+costs+as+well%29%21¤cy_code=USD) ## TITANFALL 2 FANS - Public Service Announcement For all you Titanfall 2 lovers out there who aren't aware: TF2 has became unplayable quite frequently in recent years due to DDoS attacks. However, in December of 2021 a group of developers in the community (not part of Respawn) banded together to develop a custom private server game client for TF2 called Northstar. This is huge as it means by setting up the client you're able to play on private servers, essentially rendering the efforts of the DDoS attackers pointless. It is still under development and not all the game modes are available through Northstar directly, most specifically the ones that have the grunt AI as part of the game mode, but this is a new hope for the community. It's easy to setup and allows for the community to create new games and add mods to the game, developing all kinds of new content that has been missing from the game for years. So go get the client, join the discord, show your support. Welcome back to the frontier, Pilots! The Northstar Client: https://github.com/R2Northstar/Northstar ### DOWNLOAD ISSUES It has come to my attention that a bug with Thingiverse has resulted in none of the new files being properly available through the Download All Files button. That said, if there is a file you want to download that has been mentioned in my updates, I have verified 3 methods that appear to currently work for me. First, you can still download the entire project as a zip folder by simply adding 'zip' to the end of your url for the project. I am providing the link here to download all the files in one go. A big thank you to amcmann to pointing out that this method works. #### Link:* https://www.thingiverse.com/thing:4976431/zip * Second, you should be able to still download the files manually under the Files tab beneath the photos. Obviously, you have to download them one at a time in this method. If you download the file via a mobile phone on the app 3D Geeks on the Google Play (Android) store it does in fact see and access the correct files. Unfortunately, this has to be done via a single file at a time(unless you pay for premium access) and you will have to copy it over via either a google drive, dropbox, or some other means of file transfer to your computer or printer. I do apologize for any inconvenience this may cause. I have contacted Thingiverse on this issue multiple times and received no feedback. Sadly, I suspect this may never get fixed. ## TO-DO LIST 1. Hollow out the Arc Rail flashlight, IR Targeting Module, Temple Cavity Insert and the Temple antenna for electronics. 2. Add the missing Jaw Seam. 3. Modification of the visor mesh to create both a frame for a visor in the helmet as well as a mold for molding the visor. 4. Flatten uneven surface between ear plate and ear piece. 5. Add missing Hex screw at back of Jaw. 6. Enhance details on Arc Rail Flashlight so that they stand out better on printed parts. 7. (UNDECIDED) Finish modeling the straps and cloth as 3D printable parts that go across the skullcap for those who would rather use printed parts over real cloth. ## CURRENT UPDATE 2022/04/29: **IMPORTANT UPDATE** Sorry for the delay on this one. If you downloaded these files before this update, **PLEASE REDOWNLOAD**. This update fixes 2 large issues. - First, I thickened the thin edges on the Skullcap to ensure it prints considerably better and has a significantly reduced chance of print failure due to this. - Second, I manually remeshed/topologized the edges of every core helmet piece. This eliminates the previous issues with surfaces not sitting flush. All new files should print such that they all fit together perfectly with minimal to no sanding of the edges required. This removes the issue that previous makers experienced with not being able to connect the crown and skullcap flush. In addition to this, I also made some minor mesh fixes throughout the various models. *Parts Modified* 1. MCOR Helmet Skullcap 2. MCOR Helmet Crown 3. MCOR Helmet Forehead 4. MCOR Helmet Jaw 5. MCOR Helmet Ear Plate Right 6. MCOR Helmet Ear Plate Left 7. MCOR Helmet Temple Plate Right 8. MCOR Helmet Temple Plate Left 9. MCOR Helmet Nose Guard # What's Different That said, this helmet was a lot of work and is still a work in progress but the progress I've made here is significant. *Changes*: 1. Massive amounts of details were added to the helmet to match the details of the in game version. This was a monumental task as all the details you see added were originally textures and not physical components. That said, anything that isn't finished or is in progress can be found in the TO-DO LIST section. 2. I have removed both the built in Arc Rails and the buckles at the top/back of the helmet. The Arc Rails have been remodeled from scratch and are now fully functional and separately attachable part. The buckles for the buckle strap system that goes across the center of the Skullcap are finished. These can simply be glued onto a real strap installed on the helmet. I am not modeling the strap or cloth patch at the back base of the Skullcap at this time, as I intend on using actual cloth and straps for these on my helmet. They may be added as printable components at a later date though. Check the TO-DO LIST section for updates. 3. Massive overhaul to the mesh. The original mesh was absurdly dense and practically impossible to work on even with my rig when I first started. I think some 1.6 million triangles or something (not exact on the count). I reduced the mesh enough to make it workable but not so much as to lose detail. I additionally fixed TONS of issues in the mesh, some in the original and some caused by my decimation of the mesh complexity. I won't say it's perfect but the mesh is clean enough that it slices very nicely in my slicer ideaMaker. 4. Halved the model and mirrored it. This ensures that both sides of the helmet are perfectly symmetrical. All the details are symmetrically placed on both sides and everything lines up cleanly. This really made a big difference as the mesh was actually not symmetrical and had various different defects from one side to the other. This method ensures that many defects in the model were removed entirely and ensures that both sides of the helmet are matching now rather than littered with minor discrepancies had I simply repaired both sides. 5. Custom sliced the helmet at seams where the helmet actually opens in game. This makes many of the components easier to print, even on smaller printers. It also means that aside from the jaw and skull cap that may still need to be cut depending on your printer bed size, most of the seams on the helmet will look completely natural and won't need to be hidden or filled. This cuts down on post-processing work. I have also severed off the leather bands from the bottom of the helmet that were an solid component in Jace's model. This again is because I intend on replacing this with actually cloth padding but I have still provided these leather pieces with the model nonetheless. As was done with helmet body, all accessory attachments and secondary components to the helmet body itself have been updated with highly accurate details pulled directly from in-game reference images. # Scaling/Sizing for your head The first thing to consider when scaling the size of the helmet to your head is whether you intend on printing the Leather Neck Cover for the Jaw and Rear of the helmet. On the in-game helmet, these parts would be leather and flexible to fit over the head but if you print them you are drastically limiting the space available to fit your head into the helmet. This is important to consider because this space is significantly more narrow than the inside of the rest of the helmet and will result in more open space within the helmet after assembly if scaled relative to the leather parts. This means you will have to add thicker foam, padding, and/or a head attachment assembly of some kind to get tight a fit. The Neck Cover parts are labeled as seen below in the print files. 1. Titanfall Helmet Jaw - Leather Neck Cover 2. Titanfall Helmet Rear - Leather Neck Cover If you do not intend on printing these, then you can use the dimensions provided in the photo. If you intend on using these parts, I recommend cutting a small ring from the Leather Neck Cover and testing this to fit over your head. At the very least, print this part first as if this doesn't fit over your head, you won't be able to put the helmet on. All parts of the helmet would have to scaled to match the scale of the Leather Neck Cover. I plan to replace this with a cloth covering for my own helmet so I did not print this part. **Important Note:** This is a slightly large helmet and be aware that it may seem large for your head, even after scaling. You should expect this, even when scaled properly, and especially so if you print the leather parts and scale based on them. This helmet's happy place should be smaller than the Vanguard helmet that Respawn provided back in the day, but still fit your head without issue. The more measurements you can verify of your head against the helmet and the more comfortable you are with the measurements, the more likely you will get a proper scale first try. **Head Measurement Calipers** If not printing the leather cover parts, there is a photo provided that shows the dimensions of the helmet. I actually sized my head using a pair of 3D printed Cosplay Calipers. Uncle Jessy has a nice pair with a video on them (link below). There is also a nice remix that works quite well for printing on smaller printers. Uncle Jessy Calipers: https://www.thingiverse.com/thing:2892755 Uncle Jessy Calipers Remix: https://www.thingiverse.com/thing:4096595 Once you have the dimensions of your head compare them to the dimensions of the helmet. I measured ear to ear and jaw to the crown of my head. These are going to be the two most important measurements to make sure you can get your head inside. I recommend having someone help just to be sure you're getting accurate measurements. Uncle Jessy's video will show how to do this. **Scaling** Once you have your measurements, find which measurement of the helmet thart matches up with the portion of your head you measured. I recommend giving yourself 1cm(10mm) of extra space minimum (**AFTER SCALING**) on your head measurements to account for any slight discrepancies. This is also useful if you plan on putting any kind of cloth padding hanging down from the base of the helmet as I am as this cloth will also take up a small portion of that gap. For adjusting the scale of your helmet simply multiply the measurement you are attempting to adjust by desired percentage until you get it scaled down to a measurement you are happy with. **See example below.** On another note, always check more than one measurement. Just because you've scaled the length or width of the helmet correctly does not mean that changes to other dimensions will still match to your head. Everyone has different size heads. You might scale on the width of your head only to realize that now the helmet is to short for your head to fit through or vice versa. **Scaling Example (without leather parts)** *Narrowest part of helmet:* Helmet Ear to Ear (Bottom): 174.4mm This means that I can scale my ears directly to this measurement as they will still fit through at a slightly wider part of the helmet closer to the back of the helmet at the base of the skullcap (190.3mm), which just some minor angling of the helmet. Realistically, I could scale the helmet down so that the Ear to Ear (bottom measurement is at 162.4mm, a width decrease of 12mm. This would be a very tight fit but this is still wide enough to fit my skull through the ear plates with a 10mm buffer and still fit my ears through the gap (with just a little bit of squishing and wiggling) at the base of skullcap, now at a width of 178mm. For a slightly more comfortable fit I could size up another 5 or so mm but we'll use these measurements for this example. **Important Note** Also keep in mind when scaling that you want to make sure you have some space on the inside of the helmet as well for any padding your adding as well as if you intend on installing any form of electronics. **Scaling Example Math** Width Difference: 174.4->162.4 (12mm) *Going to round these numbers for easier math* (162*100)/174 = 93.1% *This will give us the percentage of 162mm of 174mm.* To verify: 174.4 * .931 = 162.4 (*rounded*) So for this example, I need to scale all my parts to 93.1%. Now, just to verify, all my other measurements. Chin to Skull Crown (351.4 * 93.1%): 326.7mm > (ME): 230mm *Plenty of space there* Forehead to back of Skull (289.9 * 93.1%): 269.9 > (ME): 199mm *Plenty of space there* Top of Crown to back of Jaw (236.5 * 93.1%): 220.2mm > (ME) 202mm *Still a good amount of space.* I've now verified the width, length, and height of my head against the helmet. At this point, you would possibly want to add an additional 1cm(10mm) to these measurements to give yourself some wiggle room to work with. You could compare other measurements as well for further confirmation if desired. If still nervous, you could round up further, say an even 94%. ## Notes: The entirety of my work was done with Blender. I didn't really know Blender at the beginning of this and could probably do this faster now as I've learned a lot but I'm extremely happy with the results so far. I will update the model further as I continue to finish various upgrades but in the meantime, if you decide to print this, please post the make so I can see and thank you. I will be starting on my print this week as soon as I've verified that I have it scaled properly for my head and will post the make once finished. If anyone has any questions or requests, please comment and I'll get back to you as soon as possible. Happy printing! ## PREVIOUS UPDATES LOG 2022/03/06: This is a post I have long excitedly anticipated. I can finally say, the helmet is done in regards to the vision I had for it in Version 1. As stated elsewhere, this version does not include straps or patches as 3D printable parts because they was never intended, but there is still a good chance I might model them further down the road after more pressing issues. As of now, all parts of the helmet are 3D printable and in high quality, extremely accurate detail to the actual Titanfall 2 Jack Cooper in-game helmet. I do not intend on modeling any new parts for this helmet other than the potential options straps down the road (again, if I get to it at all). In fact, this helmet is actually more accurate even than Respawn's released Vanguard Special Edition as some of my details match exactly to the in game version while things such as screws and shapes or appearance of accessory pieces on the Vanguard helmet do not. Thank you all for your support along the way on this project. This helmet is complete as far as V1 goes and I will not promise any new modeling but I may still modify ones existing. I do intend on alternate hollow components to better facilitate lights and such but due to my life being more busy this year these may take longer to produce than previous components. Check the to do list for parts of the project I am still working on, such as fixes in the models, the PDF assembly guide and a handful of other various projects before I am completely done with version 1. I will remove the WIP tag once I am completely finished with the project. This final component is really a style part but it looks fantastic. I have printed it via FDM at .1 and the part looks great. I do however believe that it would look a bit more crisp if done so in resin. It does not require mirroring as the part's natural symmetry will work on both sides of the helmet. Just print 2. *Parts Added*: 1. MCOR Helmet Temple Cavity Insert 2022/01/29: Not much has happened these past couple of weeks. Unfortunately, my family all caught covid and even vaccinated, that virus hits hard. Everyone's okay though and I'm almost back to normal and will be back to working on the project soon. *Current projects:* 1. Temple Ear Insert 2. Assembly PDF 3. Begin working on knocking out the To-Do list, which also includes updating it with some more needed fixes. Thanks for all the support! 2022/01/20: Fixed some minor defects in the Arc Rail Targeting Module Illuminator components that caused issues/failures during printing. 2022/01/19: A big thanks to amcmann for this one! They were awesome enough to develop some *.SVG* files of the MCOR Prowler and text logo and provide them to me for the helmet. These could be used to print out for stencils or make stickers using something like a cricut. I may look into making a stencil for painting them onto the helmet later, once everything else is done but we'll see on that one. In addition to the *SVG*, I have re-uploaded the Targeting Module V1 - Full Unit and V2 - Body Unit after some making minor changes to enhance the details on the printed versions. I have also uploaded a V2 of the Flashlight after realizing how difficult it is to print without significantly using supports or slicing through details. This one is 3 parts, the body of the flashlight as well as the attachment component on top and the screw that goes into the front of the attachment. This version should be overall slightly easier to print. I'm not entirely happy with its details after printing so I may go back later and update the details to cut slightly deeper into the model and make them pop more on the printed part. *Parts Added*: 1. MCOR TEXT LOGO.svg 2. TRIANGLE EDIT.svg 3. Titanfall full logo.svg 4. dragon logo 2.svg 5. MCOR Helmet Arc Rail Flashlight Left V2 - Body Only 6. MCOR Helmet Arc Rail Flashlight Left V2 - Attachment 7. MCOR Helmet Arc Rail Flashlight Left V2 - Attachment Screw 2022/01/14: The IR Targeting Module for the Arc Rail on the right side of the helmet is finished and I'm very excited about it. This part was remodeled from scratch as the dimensions on the original were a bit uneven and some of the missing details required updating the base shape. There is essentially 2 versions here. One is the full unit with both the laser unit and dial attached. This would require some minor supports to print. The Version 2 has these 2 parts separate from the main body and there is connector for the dial that allows it to spin. You could technically glue it in place but I liked the idea of being able to turn it. It's the little details that count. The Illuminator is the top part that attaches to the body unit. There is a version without the band on top and one with. The Illuminator piece can be slightly difficult to print in FDM with the band so I provided it separately and it can be glued on. Enjoy! *Parts Added*: 1. MCOR Helmet Arc Rail Targeting Module V1 - Full Unit 2. MCOR Helmet Arc Rail Targeting Module V2 - Body Unit 3. MCOR Helmet Arc Rail Targeting Module V2 - IR Laser 4. MCOR Helmet Arc Rail Targeting Module V2 - IR Laser Peg 5. MCOR Helmet Arc Rail Targeting Module V2 - Laser Dial 6. MCOR Helmet Arc Rail Targeting Module V2 - Laser Dial Connector 7. MCOR Helmet Arc Rail Targeting Module Illuminator Unit 8. MCOR Helmet Arc Rail Targeting Module Illuminator Band 9. MCOR Helmet Arc Rail Targeting Module Illuminator Unit - No Band 2022/1/8: ALRIGHT! The Arc Rail Flashlight is done. This one was a pain. After taking a closer look at the original low detail one I discovered that the shape was all kinds of distorted. I ended up having to remodel this entire part from scratch, which due to its weirdly shaped nature proved a lot of work. Additionally, it had tons of hidden details and getting screenshots of it in game was a bit challenging but I did it and man does it look good! Next is the laser module on the right Arc Rail and then the ear inserts. Then I'll make hollow versions to wire up with electronics. *Parts Added*: 1. MCOR Helmet Arc Rail Flashlight Left 2022/1/3: Finished the high detail antenna. I will also be working on a hollow version for installing LEDs after I finish the other missing components of the helmet. Stay tuned! *Parts Added*: 1. MCOR Helmet Temple Antenna Base Left 2. MCOR Helmet Temple Antenna Staff Left 3. MCOR Helmet Temple Antenna Top Left 2022/1/2: Hit a bit of a delay over the past month between my family getting sick and the holidays as well. I am ramping back up on the final parts of the helmet so they should be done by the end of January. However, for those of you waiting for the remaining arc rail components, amcmann did a really nice update to the right hand side arc rail laser module. As he's put this effort in and made a fantastic high detail version of the module I'll be pushing mine off to last, instead focusing on the antenna and left side arc rail first, as well as the inner ear plate insert. As always, I'll be modeling my part to in-game accuracy when I get to it but in the meantime, take a look at his model. It's absolutely gorgeous! And a big thank you to amcmann for the contribution to this project! Link: https://www.thingiverse.com/thing:5178820 2021/11/21: I'll start by mentioning that I went ahead and added the mirror of the skullcap canisters and made a minor adjustment to shrink the insert as my first print came out too thick. Secondly, I'm excited to provide the updated high detail Chin Latch at the front of the jaw. This piece turned out to be more work than I anticipated but came out looking great. There are 2 holes cut through it for lights as well. *Parts Added*: 1. MCOR Helmet Jaw Chin Latch Component 2. MCOR Helmet Skullcap Canister Base Hollow Left 3. MCOR Helmet Skullcap Canister Base Solid Left 4. MCOR Helmet Skullcap Canister Cap Left 2021/11/15: Finished the Skullcap canister at the back. This has also been designed with lights in mind. As this canister lights up on the helmet in-game, there is both a solid and a hollow version for those who wish to add lights to the inside of it. For lights, print the Canister Base Hollow Right component. The Cap Insert Right component is optional. You could print the insert in a clear or translucent blue filament so that light shines and diffuses through and glue it into the cap or leave it out entirely. The cap is hollowed so if you want a solid part, you will need to print the insert along with the solid base. The insert simply glues into the cap. *Parts Added*: 1. MCOR Helmet Skullcap Canister Base Hollow Right 2. MCOR Helmet Skullcap Canister Base Solid Right 3. MCOR Helmet Skullcap Canister Cap Insert 4. MCOR Helmet Skullcap Canister Cap Right 2021/11/10: This piece was quite a lot of work but man am I glad with how it came out. This one requires some supports to get the details though I suppose you could slice the part in two to get around that. This is modeled for the left side and will need to be mirrored for the right. Either way, at this point, the MCOR Helmet Jaw canister accessories are finished. I'll be working on the chin attachment next in the hopes of finishing the jaw completely. *Parts Added*: 1. MCOR Helmet Jaw Side Canister Left 2021/11/4: Pretty excited about this update. Introducing the High Detail version of the Jaw's front canisters. I'm only providing the left side so be sure to mirror it. This canister comes in two parts to more easily print the parts odd shape. This is a full replacement of the original front jaw canister but if you don't wish to reprint the canister you could always measure your canisters end width, scale the end cap to match and simply glue it on. Although, your canister would be noticeably longer this way. The side jaw canisters and rear skullcap canisters are next. *Parts Added*: 1. MCOR Helmet Jaw Front Canister Base Left 2. MCOR Helmet Jaw Front Canister End Cap Left 2021/11/2: Per request, added a Scaling/Sizing section (see further below) as well as 2 new scale photos, showing measurements of the bottom of the helmet as well as the measurements of the leather parts that attach to the bottom of the helmet for those who wish to print them rather than use cloth. 2021/10/31: Added the two buckles on the top of the helmet where the Crown meets the Skullcap. I have not modeled a strap or the cloth pad at the back of the helmet. The intention behind these buckles is you would use a real strap which you would glue these buckles to, in addition to a cloth patch that you would stitch to your strap. I will model a 3D printable rudimentary strap and cloth patch as well at some point but these are low priority and will only be done after I have finished updating the details for all other parts of the helmet first. At this time, you could print the entirety of the helmet as long as you manually added in the strap and a cloth patch at the back of the skullcap. The High Detail Accessory Parts are next on my to do list. *Parts Added*: 1. MCOR Helmet Skullcap Buckle Small 2. MCOR Helmet Skullcap Buckle Large 2021/10/28: Added the screw for the Jaw and Skullcap indents. These are slightly different in size with the jaw screw just slightly smaller so I'd recommend not mixing them up. *Parts Added*: 1. MCOR Helmet Jaw Flathead Screw 2. MCOR Helmet Skullcap Flathead Screw 2021/10/26: Not as major an update as I wish it was. Haven't added any detail to the new accessories yet but I did clean most of the remainder of the accessory components up for printing. I also replaced the little band on the Laser sight as the previous version would not print. The Light staff is now split into 3 small parts that you glue together. This just allowed me to cut out most of the supports. This update adds in the remaining parts, though some still have some mesh defects. All that is left is to model the buckle system for the top of the helmet and to clean the last couple of remaining parts but all of this will print cleanly. Once the last few parts are cleaned, I'll finish the buckle strap system and then get all the accessories updated for their High Detail versions. Right now I'm just trying to get everything printable. *Parts Added*: 1. MCOR Helmet Jaw Side Canister Left/Right 2. MCOR Helmet Jaw Front Canister Left/Right 3. MCOR Helmet Side Plate Vertical Light Staff 4. MCOR Helmet Side Plate Vertical Light Staff Top 5. MCOR Helmet Side Plate Vertical Light Staff Base 6. MCOR Helmet Skullcap Arc Rail Flashlight Left 7. MCOR Helmet Skullcap Arc Rail Sensor Laser Right 8. MCOR Helmet Skullcap Arc Rail Sensor Lights Right 9. MCOR Helmet Skullcap Arc Rail Sensor Unit Right 10. MCOR Helmet Side Cable System Crown Mount Left/Right 11. MCOR Helmet Side Cable System Forehead Mount Left/Right 12. MCOR Helmet Side Cable System Left/Right 13. MCOR Helmet Skullcap Rear Leather Flap with Buckles 14. MCOR Helmet Skullcap Strap Buckle 15. MCOR Helmet Skullcap Strap Right/Left 16. MCOR Helmet Visor 2021/10/19: Did some mesh adjustments to the sliced_parts.zip file MCOR Helmet Ear Plate Right for better printing. Also updated and repaired other various parts of the model. Most notably, designed a fully functional Arc Rail for the Skull cap. The attachments for the arc rail have not been updated yet, but will be attachable and removable as desired with the new functional model. For the current time being, the arc rail components can be glued directly onto the sliders. *Parts Added*: 1. MCOR Helmet Left/Right Side Skullcap Canister 2. MCOR Helmet Left/Right Side Bottom Slide Block 3. MCOR Helmet Left/Right Side Mid Slide Mount 4. MCOR Helmet Left/Right Side Upper Slide Mount 5. MCOR Helmet Chin Latch Component 6. MCOR Helmet Skullcap Arc Rail Left/Right 7. MCOR Helmet Skullcap Arc Rail Slider 2021/10/10: Fixed a thin wall that would cause print failure issues on the Side Plates. Also separated the Full Side Plate into 3 parts for easier printing. Due to the increasing segmentation of parts, the Halves.zip has now been renamed to Sliced_parts.zip. The three parts can be found in the Sliced_parts.zip and now consist of 'MCOR Helmet Side Plate Right (Ear Piece/ Ear Plate/ Temple Plate). This split makes printing the side plate much easier and removes a noticeable amount of support requirements. I did not provide a left and right plate in the halves folder. These parts would need to be mirrored. All changes have been tested through meshmixer and sliced through ideaMaker. 2021/9/30: The forehead half model was missing its details. I have corrected this. Additionally, I split the original 'MCOR Helmet Skull Cap.stl' file up so that the dome portion is now separate from the side panel. This makes this piece easier to print. 2021/9/28: Added photos with accurate measurements. This should help with scaling so you can compare your own head measurements with those of the helmet.
With this file you will be able to print Titanfall MCOR Helmet - High Detail Game Accurate Jack Cooper Helmet V1 with your 3D printer. Click on the button and save the file on your computer to work, edit or customize your design. You can also find more 3D designs for printers on Titanfall MCOR Helmet - High Detail Game Accurate Jack Cooper Helmet V1.