TO DO List - Chore Board
thingiverse
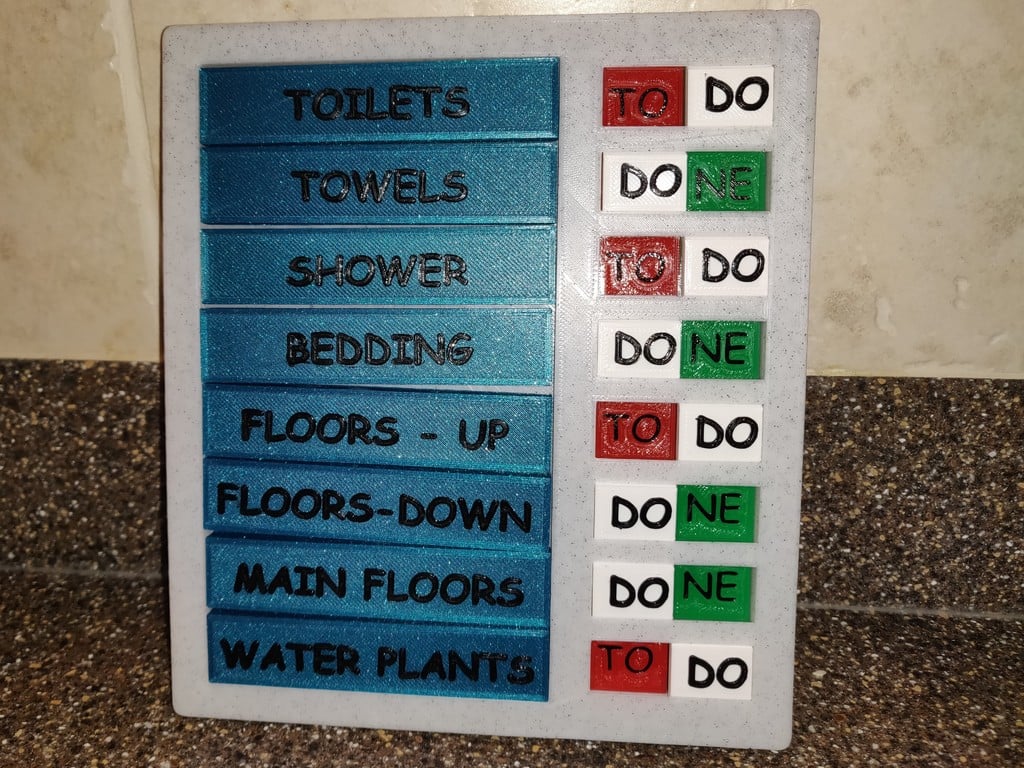
TO DO List – Chore Board Designed to be printed entirely without supports, this TO DO list helps organize your busy life by providing a solution for managing conflicting household schedules. With a blank tile included, you can easily add new tasks or chores as they arise. As your typical TO DO list changes, no problem arises since the tiles are individually printed and attached using 8mm diameter x 3mm magnets, allowing for effortless swapping. Sliced using Cura with pause at height script to add definition to the text, this design enables you to easily switch between colors and resume printing after a pause. If you're new to pausing prints, check out this video - https://youtu.be/pEbnix5wZP4 Pauses used with 0.2 mm layer height and 0.3 initial layer: TO Panel – Pause at Layer 10 NE Panel – Pause at Layer 10 DO Panel – Pause at Layer 30 Chore/List tiles – Pause at Layer 32 Print list and settings: All – I used 0.2 mm layer height with 2 walls and 4 top and bottom layers, along with 20% infill which can likely be lowered since there's no need for structure. TO Panel X8 – Simply print without support needed, using the pause listed above if desired. NE Panel X8 – Print without support needed, using the pause above if desired. DO Panel X8 – Print without support needed, using the pause above if desired. Chore/List Panels X8 – Print without support needed, using the pause above if desired. Main Body X1 – No support is required, but I recommend a brim due to the large flat size to prevent corners from curling. A 5mm brim was used for this part. End Cap X1 – No supports are necessary if printed on its side, although I did use supports to match the pattern on the face with the Main Body. Assembly: Glue magnets into Chore/List Panels and Main Body using Super Glue. Ensure magnet polarity is aligned properly for attraction. Slide TO Panel into Main Body from left side. Slide NE Panel into Main Body from left side. Place DO Panel on top of TO and NE Panels. Insert dowels from End Cap into Main Body, securing with a small amount of Super Glue to allow free movement of the DO panel.
With this file you will be able to print TO DO List - Chore Board with your 3D printer. Click on the button and save the file on your computer to work, edit or customize your design. You can also find more 3D designs for printers on TO DO List - Chore Board.