Tom Tom Rider sole plate / mount
thingiverse
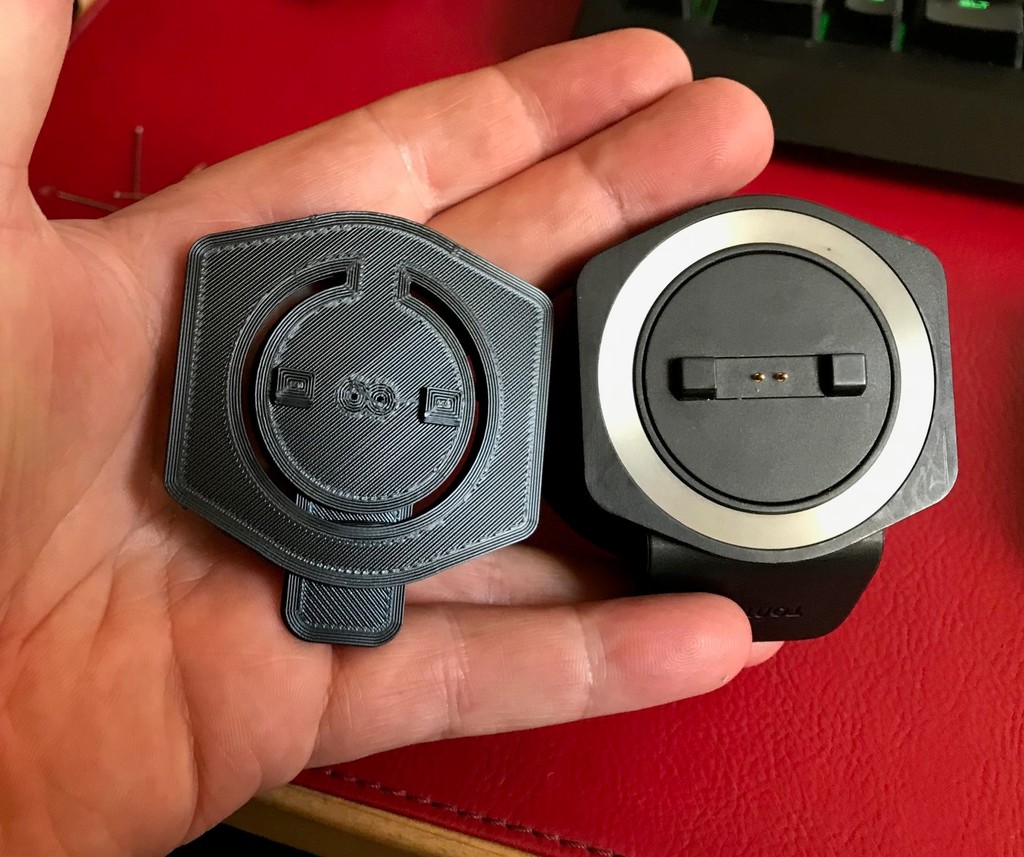
Rom Tom Rider sole plate / mount. A print in place bracket that slides into the Tom Tom Rider and latches, just like the Tom Tom sole plate mount. Refer to the photographs. In the first one, i am holding the printed sole plate next to the Tom Tom Rider handlebar mount for comparison. In the second picture, the printed sole plate has been fitted to the Tom Tom Rider unit in exactly the same way the factory plate is fitted. Fitting is the same as with the stock sole plate. Insert with the tab pointing to the top of the Tom Tom. The tab will click and the sole plate will be locked into place. To remove, lift the tab a little and slide the sole plate down (or the Tom Tom up). There are two pinholes in the centre of the printed sole plate. These are for pins to make contact with the litle gold plated charging terminals on the back of the Tom Tom. My intention is to use sewing pins to implement this but I haven't got there yet. Please be aware that you connect power to the back of the Tom Tom using these holes at your own risk. The Tom Tom sole plate supplies 5v via these pins when fed 12v via its trailing lead. Therefore, it must contain a voltage regulator or buck converter to perform a DC-DC conversion from 12v to 5v. Do not apply 12v directly to the contact points on the back of the Tom Tom Rider. Use a buck converter (search Amazon for "12v 5v converter") and wire appropriately. Regarding polarity, refer to the photograph showing the sole plate on its own. With the release tab pointing up, the +5v terminal is on the right (marked with a red dot) and the -5v terminal is on the left (marked with a yellow dot). ** Please double check voltage and polarity on your Tom Tom sole plate with a meter before connecting the printed sole plate to the Tom Tom unit. I'm not infallible. ** If you are not sure what you're doing, use the USB port on the Rider to power it instead. I designed this so as to be able to mount my Rider to the dashboard of my Lotus Elise. As such, it requires a dash mount of some sort to be printed and attached. There are two grooves in the rear of the sole plate to facilitate fixing a pair of Elise dash clips: https://www.thingiverse.com/thing:4788577 ..or you can use the grooves to attach your own mount. If you are replacing a broken Tom Tom mount, you can attach a RAM mount ball to it, but you'll have to find a suitable ball and attach it to the rear of the sole plate using rails in the slots provided (so that the release tab can still move back a little). *** UPDATED *** An additional STL has been added which is the full mount, print in place, with a ball joint ball and collet incorporated. Must be printed with supports. It may or may not work, untested at present. It is designed to attach to the updated Elise folding dash mount: https://www.thingiverse.com/thing:4796179 But you can also use it with your own designs, if you incorporate the cup of the ball joint: https://www.thingiverse.com/thing:4739696
With this file you will be able to print Tom Tom Rider sole plate / mount with your 3D printer. Click on the button and save the file on your computer to work, edit or customize your design. You can also find more 3D designs for printers on Tom Tom Rider sole plate / mount.