Tool Roller Individual Drawer Latch
prusaprinters
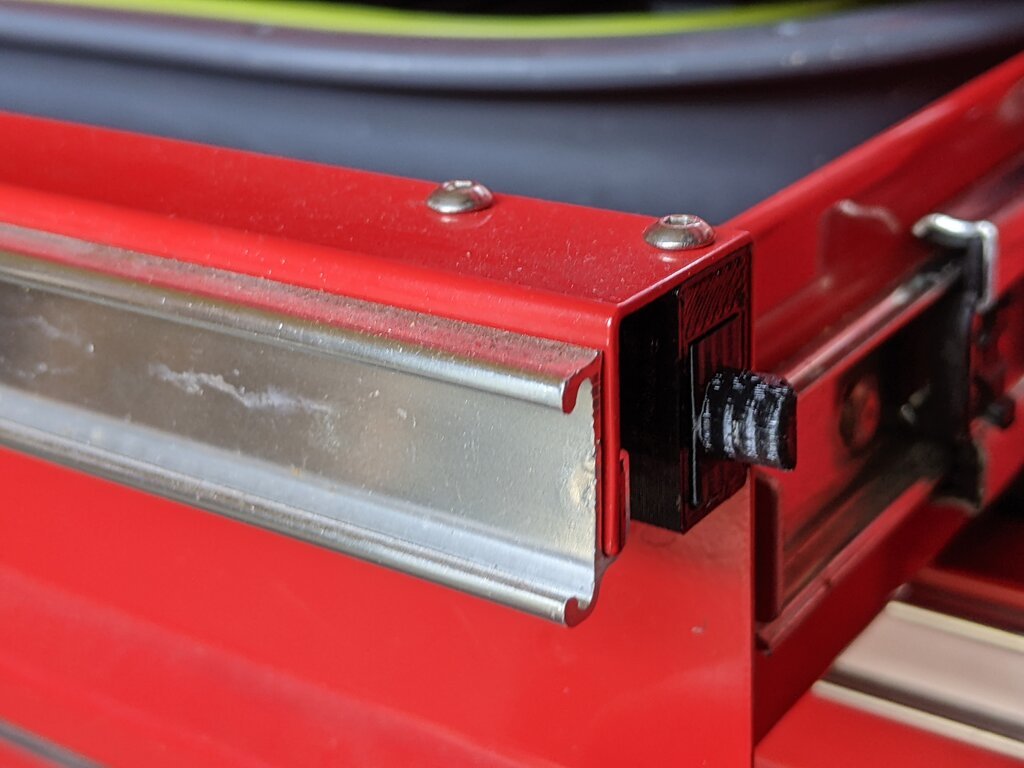
<p>Individual Drawer Latch (IDL) for Harbor Freight US General Tool Rollers.</p><p>The latches mount on the right side of the drawers. To mount on the left side, you will have to mirror the housing and the drill jigs.</p><p>I think I saw a similar design on Thingiverse that inspired me to design this, but it didn't have any usable source files.</p><h3>Post-Printing</h3><h4>Hardware needed</h4><ul><li>1x <a href="https://www.mcmaster.com/1986K78/">19mm L, 7.6mm OD, 6.5mm ID, 0.6N/mm compression spring</a></li><li>2x <a href="https://www.mcmaster.com/92095A471/">M3 4mm button head screw</a></li><li><a href="https://www.mcmaster.com/8305A52/">M3 bottoming tap</a></li><li>3.5mm metal drill</li><li>8mm step drill</li><li><a href="https://springtools.com/collections/metal-working-tools/products/28r45-2">Spring Tools Hammerless Center Punch</a></li></ul><h4>Drawer holes</h4><ol><li>Take drill jig 1 and align with the drawer so that the body sits flush against the drawer wall and the top lip.</li><li>Mark hole locations using the center punch. Drill holes with 3.5mm drill (possibly pre-drill with 2mm)</li><li>De-burr holes on top and bottom.</li></ol><h4>Latching hole</h4><ol><li>Tap holes in drill jig 2 to M3.</li><li>Temporary mount drill jig 2 using M3 screws.</li><li>Close drawer all the way and hold in the position the latch is supposed to engage. Mark hole location using the center punch.</li><li>Remove drill jig.</li><li>Drill latching hole using step drill to 8mm (possibly pre-drill with 2mm). You will have to remove the drawer to be able to drill the hole.</li><li>De-burr hole.</li></ol><h4>Latch assembly</h4><ol><li>Tap holes to M3.</li><li>Insert rod into plunger and secure with adhesive (I used <a href="https://www.jbweld.com/product/plastic-bonder-syringe">JB PlasticBonder</a>).</li><li>Let adhesive cure and remove squeeze-out.</li><li>Put spring over rod.</li><li>Insert rod-plunger-spring assembly into housing with the chamfered plunger side in closing direction.</li><li>Push handle on rod sticking out of the back of the housing and align in parallel with the housing. Optionally use adhesive to permanently secure the handle (take care to not glue the handle to the housing.)</li><li>Mount housing using M3 screws.</li></ol>
With this file you will be able to print Tool Roller Individual Drawer Latch with your 3D printer. Click on the button and save the file on your computer to work, edit or customize your design. You can also find more 3D designs for printers on Tool Roller Individual Drawer Latch.