Tool storage for Ender tools plus extras
thingiverse
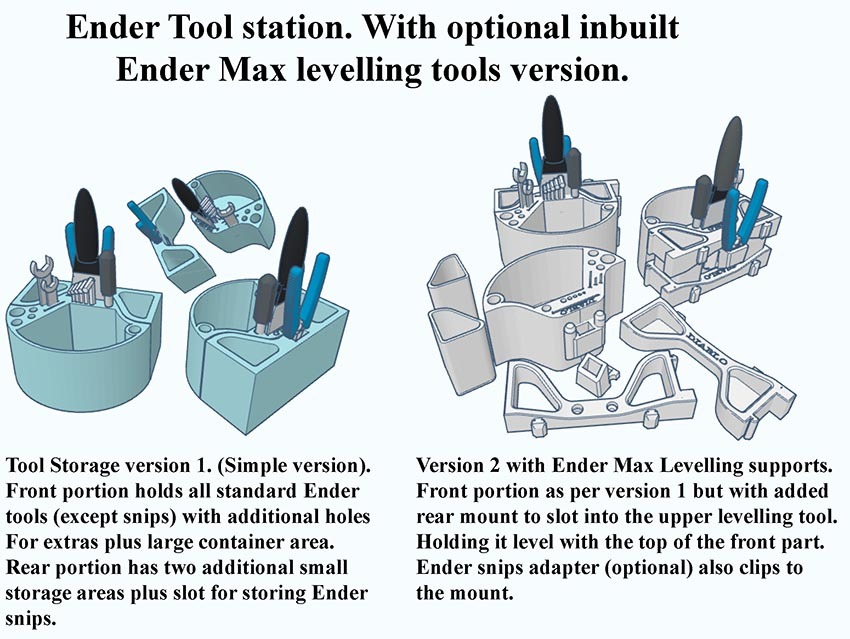
Two different versions of a tool station. One super simple, the other with additional purpose. Version one is in two parts, but you don't need both if you just want it really simple. The front portion holds all the ender tools in their own slots and holes. If you only do that single print you would have to store your snips in the main container area as the snips adapter is built into the rear container unit. (or you could just print the front V2 part if you want the snips option but not the rear storage part). There are separate storage containers included in this set in both regular height and tall versions. They were created for use in the second version of the tool storage (V2) but will also fit this first versions rear segment. The regular height version would just take away space, but the taller versions may be something you prefer and were sized to fit both tool stations. The second tool station has more parts to it. It was designed for the Ender Max users. I previously uploaded a tool station for the max that sat on top of the PSU. This desk version is far more versatile than that. The main (front) unit of this version (V2) has an extra protrusion at the rear that both connects it to the rear portion/s and also serves to attach the adapter that holds the snips. The adapter stays in place on the front portion and does not interfere with the Max tool section on the back. Main front piece of v2 has the holder for the snips included in the print as It helps as support for the rear clip segment during printing. The snips bracket is made to be snug. It may need a small amount of filing to fit depending on your print quality settings, but it should be easy to fit within a minute of snapping it free of the main unit. The Ender Max levelling tools (X2) form part of the frame in this second version. The lower tool when used as part of this unit sits on the desk, the two small containers fit into that, then slide it in place behind the main unit. Finally slot the second levelling tool on top of the containers and onto the main units location pins. This holds them all together on the work surface so they can be slid around as a full unit without coming apart. To quickly access the levelling tool? Because my containers are chock full of tools. I just lift the first levelling tool enough to disconnect from the main tool unit, slide both containers out and you are left holding the levellers. It takes around 4 seconds total and is just as easy to return to where they were. The 2 Ender Max levelling tools are in another upload here :- https://www.thingiverse.com/thing:5235419 The only parts needed from there are the two tool parts as the containers there are identical to the standard containers supplied here. I would print in the obvious 'flat bits to the bed' orientation. Use tree supports everywhere It will only likely add supports for the two tiny overhangs on the rear next to and above the snips adapter. I included the snips adapter stl solely in case you break the one printed with the main unit.
With this file you will be able to print Tool storage for Ender tools plus extras with your 3D printer. Click on the button and save the file on your computer to work, edit or customize your design. You can also find more 3D designs for printers on Tool storage for Ender tools plus extras.