Touch Mi For Artillery Genius FR-EN
thingiverse
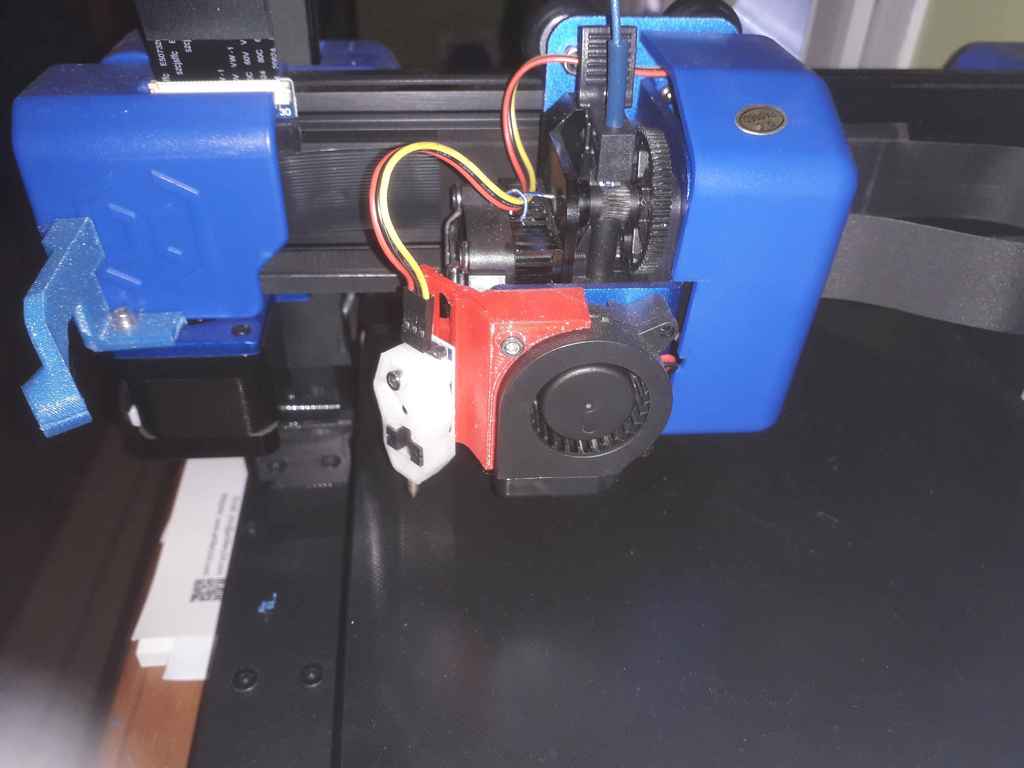
Nouveau: Le créateur (Fourmi) du Touch-Mi a sortie une version du firmware accompagner de son firmware TFT adapter. Ceci est un version adapter pour la Genius. Elle est donc imparfaite. Le plus gros problème étant le contrôle pas l'écran TFT de la lumière RGB qui ne fait plus que le vert (Elle fonctionne toujours correctement si vous utilise des Gcode). Attention: Pour compiler vous ne pourrez pas le faire sous windows (problème de référence trop nombreuse). Utiliser Linux ou mac (pour une fois que mac à un avantage MDR) A part cela, il fonctionne très bien. Pour l'utilisation de l'interface voici une vidéo du créateur originale: https://youtu.be/D0RdhJpjRpU New: The creator (Fourmi) of the Touch-Mi has released a firmware version with its TFT adaptor firmware. This is an adapter version for the Genius. It is therefore imperfect. The biggest problem is that the TFT screen doesn't control the RGB light which is now only green (it still works properly if you are using Gcode). Warning: To compile you will not be able to do it under windows (too many reference problems). Use Linux or mac (for once mac has an MDR advantage). Other than that, it works very well. For the use of the interface here is a video of the original creator: https://youtu.be/D0RdhJpjRpU Update: IMPORTANT, Remember to disconnect the Z origin sensor located on the right side of the gantry. it is normally connected, disconnect it. mise à jour: IMPORTANT, Penser à déconnecter la capteur d'origine des Z situé à la droite du portique. il est normalement connecter, déconnecter le. [FR] Bonjours, Je vous présente cette amélioration pour la Evnovo/Artillery Genius. Ce nivellement de plateau automatique utilise le TouchMi de l’entreprise https://www.hotends.fr. Ces Modèles modifier proviennent du projet originaux de TeachingTech. Pour l’installation je recommande d’abord changé le micrologiciel de la carte d’écran TFT. Je vous recommande celui-ci qui fonctionne très bien : https://www.thingiverse.com/thing:4498609 Cela vous permettra par les menues de l’écran le déconnecter de la carte mère de l’imprimante, sans la démonter et perdre la garantie. Par la suite imprimer les 2 modèle et installer les sur l’imprimante. Pour le capteur positionné le en mode rétracter et faite touché la buse et le plateau. Puis placer la clé allen de 2 mm (environ) fourmi avec l’imprimante entre la pointe du capteur et le plateau puis visser la vis de réglage. Récupérez le câble fournis avec le capteur et retirer les pins du connecteur dupont et passer sur les connecteurs dupont séparé. Branché le comme sur les photo (vous pouvez vous aidez des informations dans le manuel sachant que la sortie du capteur digitale (D0 sur le circuit du capteur doit être connectés à D19/W). Évidement le rouge sur le rouge et le noir sur le noir. Après l’installation des pièces, mettez à jour le micro logiciel de la machine via le port usb (type B). Bien sur avant Déconnecter la connexion entre l’écran et la carte mère par les menues. Si vous n’arriver pas à vous connecter depuis votre ordinateur essayer un autre micrologiciel pour l’écran ou déconnecter les câbles entre l’écran et la carte mère physiquement (attention à colle chaude, risque de cassure). Après, faite le nivellement du plateau manuellement. Et enfin configurer le baby step et/ou le Zoffest. [EN] Hello, I present this upgrade for the Evnovo/Artillery Genius. This automatic bed leveller uses the TouchMi from https://www.hotends.fr. These Modified Models are from the original TeachingTech project. For the installation I recommend to first change the firmware of the TFT display card. I recommend this one which works very well: https://www.thingiverse.com/thing:4498609. This will allow you to disconnect it from the motherboard of the printer, without disassembling it and losing the warranty. Then print the 2 models and install them on the printer. For the sensor set it in retract mode and touch the nozzle and the bed. Then place the 2 mm (approx.) allen wrench supplied with the printer between the tip of the sensor and the bed and screw in the adjusting screw. Retrieve the cable supplied with the sensor and remove the pins from the dupont connector and switch to the separate dupont connectors. Connect it as shown in the pictures (you can use information in the manual knowing that the digital sensor output (D0 on the sensor circuit must be connected to D19/W). Obviously red on red and black on black. After installation of the parts, update the firmware of the machine via the usb port (type B). Of course before Disconnect the connection between the display and the motherboard via the menues. If you are unable to connect from your computer try another firmware for the display or disconnect the cables between the display and the motherboard physically (be careful with hot glue, risk of breakage). Afterwards, level the bed manually. And finally configure the baby step and/or the Zoffest.
With this file you will be able to print Touch Mi For Artillery Genius FR-EN with your 3D printer. Click on the button and save the file on your computer to work, edit or customize your design. You can also find more 3D designs for printers on Touch Mi For Artillery Genius FR-EN.