Touch probe for measuring / digitizing
thingiverse
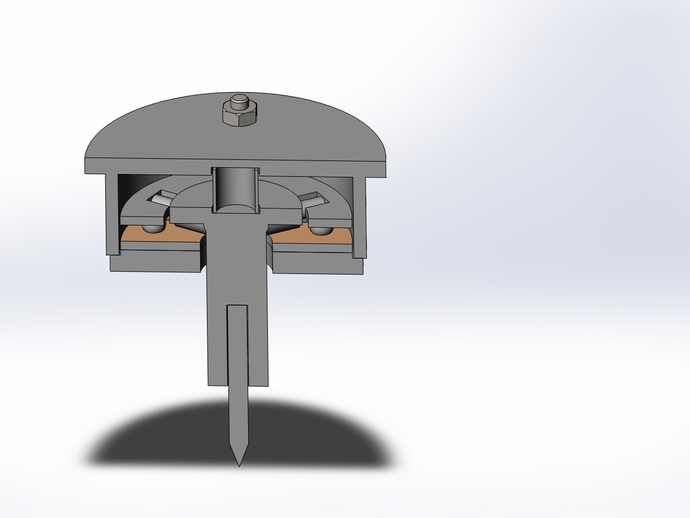
I moved! All the files are now here: https://www.youmagine.com/designs/touch-probe-for-measuring-and-digitizing This is a sensor probe inspired by Bertho's work as well as other people's work, old patents and some original ideas.It is used to measure and digitize / scan objects by detecting when and where the probe touches the object. You will have to print 3 parts (could be made with a cnc mill or a lathe as well) and make 2 pcb plates. (could be done by hand if you are good at it).It requires no soldering on the steel balls (it can be difficult) This one is made to be used in a hobby CNC mill (43mm collet mount) but the concept can easily be adapted to any kind of CNC machine (3d printers, mounted in the spindle, measuring rig...)The electrical contact is cut as soon as the probe touches something from any direction. Here is how it works: -The lower PCB hold the balls in place -The upper PCB presses the balls and makes sure they go nowhere, -The probe holder has 3 steel pins that rests each on a pair of steel balls. That way there is only one position where the 3 pins touches the steel balls. -The balls form a loop that is electrically closed only in the situation aboveThis means that the circuit is opened as soon as the probe is moved in any direction, even the slightest distance. It also means that the circuit is closed as soon as the probe is not touching anything.From what I can see you can reach a precision of 20 microns (0,02mm) which is the most accurate my CNC is. You might get even better accuracy with yours! I use it with my Profiler CNC and Galaad to run it, Mach3 supports it as well.It gives quite good results scanning at 0,1mm resolution (plunge probing). Instructions -Print the parts from the STL files -Cut 3x 3mm drill bits to use the shanks as contact pins (length 13mm) -Make the PCBs (I milled mine, but etching would be fine as well). -Find some springs -Find 6x 4mm steel balls (I got mine from Conrad Electronic) -Solder two wires on the PCB (in the "C" areas is easier) -Assemble -Connect to your CNC input -Enjoy ! -To adjust how vertical the probe is, slightly unlock the 3 nuts on top and turn the 3 screws until you get the right position. Then tighten the nuts again. I use an old 3,2mm mill bit as stylus, it works quite well. This design requires no soldering on the steel balls. The parts are printed but can be done with conventional machining tools (lathe, drill press). In the Zip file you will find all my source files (Solidworks) and also the Galaad files I used to mill the PCBs (best file is "PCB Both") Some parts reprenseted as small tubes are actually the springs.
With this file you will be able to print Touch probe for measuring / digitizing with your 3D printer. Click on the button and save the file on your computer to work, edit or customize your design. You can also find more 3D designs for printers on Touch probe for measuring / digitizing.