Tough RasPi Camera mount for Printrbot Simple Metal
thingiverse
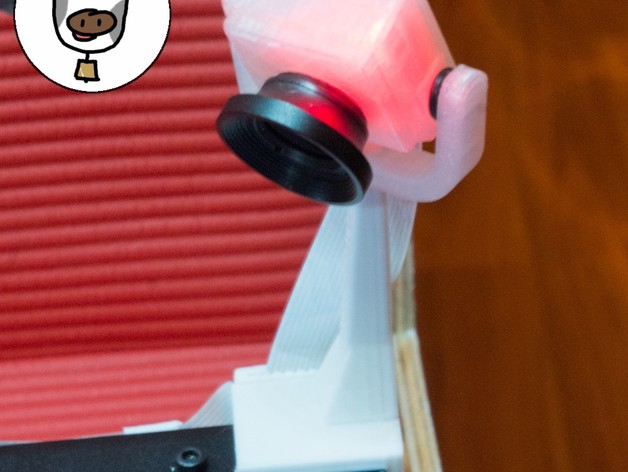
Don't use this, I designed a better one! Click here to look at it! I liked Doppledutch's RasPi camera swivel mount, but found that the bed attachment was too tight and the swivel arm was vulnerable to snapping off during assembly. So I mashed the mount arm onto ekidd's generalised webcam mount to create a sturdy press-fit swivel mount for adding Jerware's RasPi camera enclosure to your Printrbot Simple Metal. I've taken the liberty of beefing up the transition between the bed mount and the swivel arm to remove that stress concentration. The Tinkercad source file is here. Print the following: This swivel mount (1x) Three files from Jerware's RPi camera mount project: tiltArm.stl (1x) caseFront.stl (1x) caseBack.stl (1x) You should also print 4x of my ribbon cable clips. Stick one onto the side of this mount and three onto the side of the Simple's bed to route the camera's cable away from the print area. Print Settings Rafts: No Supports: No Resolution: 0.2 Infill: 10 Post-Printing Fit and tolerances This swivel mount should be an easy press-fit onto the Simple Metal's bed. Attaching Jerware's tiltArm object to the top of the swivel arm requires some force, so do it while the part is not attached to your printer. Do remember that PLA can be thermoformed with heat; Just dip the part into boiling water for a few seconds and you will be able to make things fit. Camera improvements You should also add a wide-angle lens to your RasPi camera so that it can capture the entire build plate of the Simple Metal. I bought a "3-in-1 camera lens kit" for mobile phones, which came with a fisheye 180° lens and a combined macro/0.67x wide lens. The 0.67x wide is perfect! I used a needle file to enlarge the existing hole in Jerware's caseFront.stl so that the lens would be a tight press-fit. The RasPi camera should also be focused appropriately. How I Designed This Why document the design process? Because there's a lot of resources on the net that tell you how to use design software, but fewer that actually show the process of design. Even write-ups for simple objects like this one would help new makers see what goes into a practical design. Remixing There wasn't much involved in this design: I simply grabbed the two parts that I needed, used Hole boxes in Tinkercad to cut off the stuff that I didn't want, and then combined them together. The only thing I did was beef up the part where the arm and the base meet, which I always thought was a weak section of the original. I used a pyramid on its side and again used Hole boxes to cut off the excess. Version history v1, 29 Sep 2015 Initial release.
With this file you will be able to print Tough RasPi Camera mount for Printrbot Simple Metal with your 3D printer. Click on the button and save the file on your computer to work, edit or customize your design. You can also find more 3D designs for printers on Tough RasPi Camera mount for Printrbot Simple Metal.