Toyota Aygo dashboard phone clip
prusaprinters
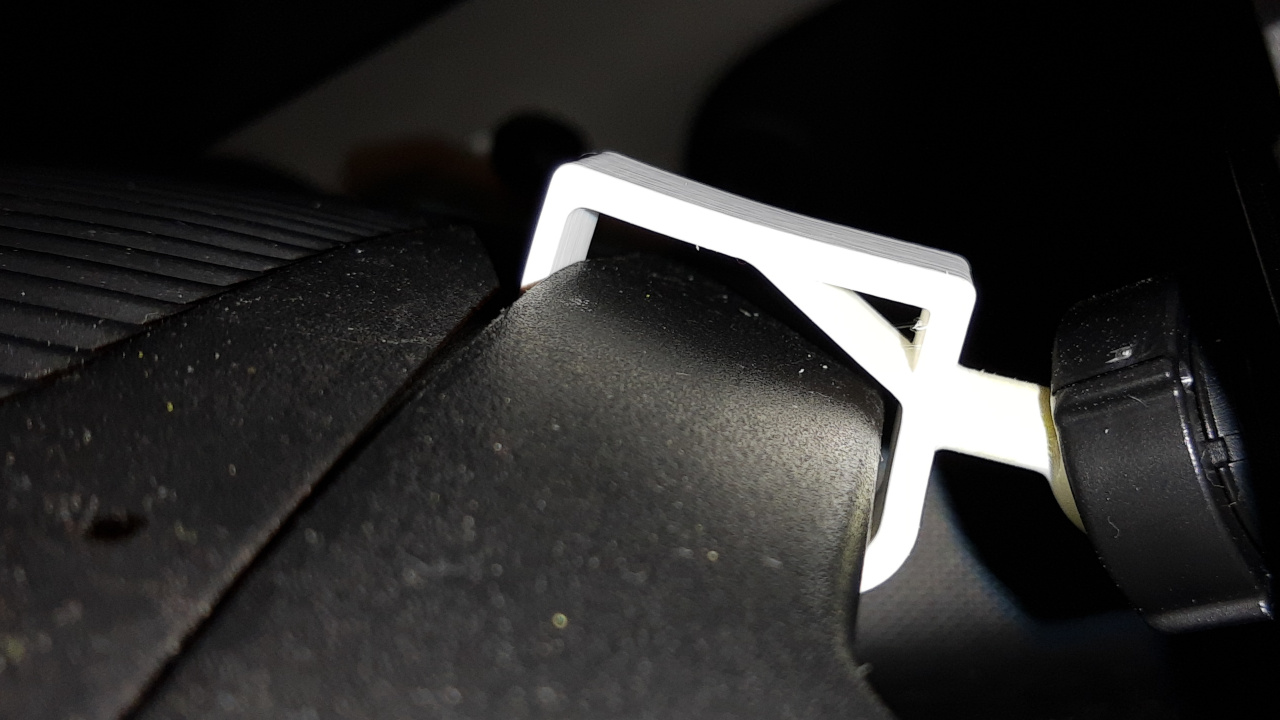
<h3>Toyota Aygo dashboard phone clip</h3><p>This adapter clips onto the dashboard of a Toyota Aygo. At the end is a ⌀17mm ball that can snap into the common ball joint socket used on many car phone holders (not included).</p><h4>Inspiration</h4><p>This design was based off <a href="https://www.thingiverse.com/thing:4914499">Phone Stand for Toyota Aygo</a> by <a href="https://www.thingiverse.com/Fredrick-gbrl">Federico Gabrieli</a>. His version ends in a shape that can fit a phone holder designed to clip onto a dashboard vent.</p><h4>Files included</h4><ul><li>The FreeCAD file for your remixing pleasure</li><li>An export of the clip. PrusaSlic3r says it has many errors, but those are all auto-repaired.</li><li>The PrusaSlic3r project file, load it, slice it, print it.</li><li>The gcode I got from PrusaSlic3r</li></ul><h4>Printing and post processing</h4><p>I sliced at <i>0.2mm SPEED</i> setting with <i>Detect bridging perimeters</i> enabled, supports <i>On build plate only</i> and a <i>20% gyroid infill</i>. Note that I used PrusaSlic3r 2.4-alpha1 which claims to make better bridges over support than PrusaSlic3r 2.3</p><p>Printed it on my Prusa Mk3S+</p><p>After printing, I removed the supports, and gave the ball a quick sanding. First with FEPA P80, then with FEPA P240 grit sandpaper. This was mainly to clean up the bridge over the supports which has some ugly ridges.</p><h4>Assembly</h4><p>First, take your phone holder with ball socket, in general it will have a locking ring, which must be loosened first (but not removed). Push the ball end of the printed clip into the socket. It should snap into it in a satisfying way. Be careful hold the clip close to the ball when pushing it in. The weaker parts of the clip are not designed to withstand the force required to snap it into the socket. Now move the assembled ball joint a bit, and verify it doesn't require a lot of force. If it does, you might need to sand the ball a bit more. Then tighten the locking ring and verify that the joint doesn't move. If it still moves easily with a fully tightened locking ring, you might have sanded the ball too much. It will have to be reprinted. Finally loosen the locking ring slightly so the joint can move again.</p><h4>Installation</h4><p>Take the assembled unit to your car. Find the groove in the top centre of the dashboard where the top centre pocket is set into the rest of the dashboard. Put the thin hooked end of the clip into the groove, and carefully, but firmly press down. If the hook seems to catch on something, slide it a bit to the side in the groove, and try again. Once in a suitable position, the hook should slide into the dashboard. The last part might require quite a bit of force. However do not hammer it in. At some point it will snap in place, and the hook at the front can hook under the front of the dashboard pocket. Check the included cover photo to verify your installation.</p><h4>Final configuration</h4><p>The locking ring on the phone holder should still be loose. Sit in you the car. Put your phone in the holder. Rotate the holder so your phone is best visible, and no important features (e.g. power socket, buttons) are obstructed. Finally tighten the locking ring on the holder to fix it in place.</p>
With this file you will be able to print Toyota Aygo dashboard phone clip with your 3D printer. Click on the button and save the file on your computer to work, edit or customize your design. You can also find more 3D designs for printers on Toyota Aygo dashboard phone clip.