TP3.5 toothpick drone
thingiverse
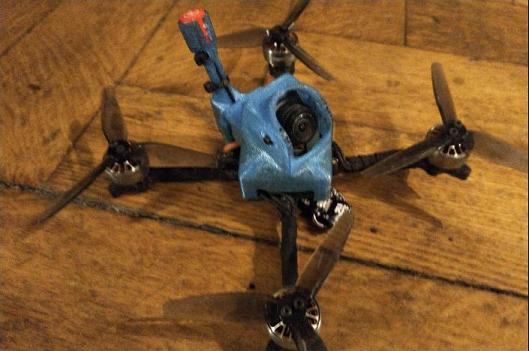
About ===== This is a 3.5" quadcopter loosely based upon the FPVCycle TP3 Same arm interlock pattern as the TP3, same clinch nuts, same spacing of arm mounting bolts - ie a TP3 arm would fit this design, and an arm from this design would fit a stock TP3 frame. However, the ethos is quite different to the TP3 in many regards. I HAVE NOT gone all-out to conserve weight, in fact quite the opposite in some places. The design goals are DURABILITY and EASE OF MAINTENANCE. This design IS NOT DESIGNED for standard ultra-minimalist canopies / camera mounts. It is designed such that the canopy attaches directly to the frame, and somewhat encompasses the whole stack. This is because the frame is designed for the HDZero (Shark Byte) video systems (Specifically the TX5.1S whoop VTX), and I don't like a canopy stacked on top of a Flight Controller stacked on top of a frame - it's too flimsy. As it stands, this frame is designed for a HappyModel EP2 ELRS receiver with the on-board SMD antenna, keeping the receiver antenna inside the canopy and thus less external parts to get damaged. A crossfire would probably just about fit, with some minor hacking at the holder, but currently there is no provided way to route the antennas Stand-out features ============== Full source CAD files available ----------------------------------------- The Fusion360 projects are available to download, and for many aspects of the design, you do not really need to understand Fusion360 to make slight adjustments. Where possible, I have used Fusion360's "User Parameters" feature for dimensions - meaning for example if you want a 4" arm version, all you need to do is go into Fusion and edit the parameter in the table and the design will automatically update to the new size. Modification and collaboration is highly encouraged. Perfectly tailored to camera ------------------------------------- Canopy comes in variants specifically tailored to various HDZero cameras - this allows no canopy in view whilst maximizing how far back inside the canopy that the camera can sit, for maximum protection. This also means that the canopy can have external markings for angle (0-60deg, in 10 deg increments), to allow for sitting a precise and consistent camera angle.  Optimal VTX cooling --------------------------- Whilst the VTX is entirely enclosed, there are no parts (RX etc) sitting on top of the VTX Rear Bays -------------- Sundry components (Capacitor, RX, Buzzer) sit in their own bays at the back of the frame, keeping everything neat, tidy, protected and secured in place. Buzzers at the bottom, Capacitor above, EP2 receiver above that.  Canopy independent of antenna mounts or rear bays ---------------------------------------------------------------------- The canopy can be removed whilst leaving the rear bays in place (Remove the front 3 screws, loosen the rear two screws so that they no longer bite into the canopy top), meaning you can service the FC/VTX/Camera without having to pull everything apart.  Well secured VTx antenna ----------------------------------- On top of the rear bays is a stalk for securing the VTx antenna to - again this remains in place when you remove the canopy. There are generic versions, plus a specific version for the Foxeer Micro Lollipop which completely surrounds the antenna head to stop it from being able to be ripped off Dedicated PigTail mount -------------------------------- A minor feature, but I love it. You do not need to secure the pigtail to one of the arms for strain relief - there is a hole in the frame specifically designed for this.  My Build ======= 2mm top/bottom plates, !!6mm!! thick arms (Absolute TANK) JHEMCU F411 Pro 35A FC Panasonic 470uf capacitor HappyModel EP2 ELRS receiver Shark Byte TX5.1S VTx HDZero Micro camera Motors: BetaFPV 1404 3800kv or Diatone Mamba 1505 3800kv (Not really sold on these as bells seem to keep coming off) Foxeer Lollipop Micro antenna 660mAh GnB HV 4S battery Fullspeed Lucky Box battery backed up buzzer HQ 3.5x2x3 props Dry weight: 145g (1505) / 132.5g (1404) Frame (Carbon fibre) parts ==================== Arm ----- 145mm wheelbase, 4mm wide. I cut in a stonking 6mm thick for insane durability, but anything above 3mm would probably work, depending on weight Bottom Plate ----------------- Sandwiches arms and provides holes for battery strap. 1.5mm or 2mm thick Top plate ------------ Mounting point for electronics stack and bays 1.5mm or 2mm thick 3D Printed parts ============ Unless otherwise stated, use TPU. I recommend TPU 98A rather than 95A as it provides more rigidity. 2 walls, 2 top bottom layers, 20% infill Canopies ------------- All canopies have slightly thicker feet than needed by default and M2 screw holes, but I drill mine out to 3.2mm to enable insertion of thread inserts. To make the angle markings more visible, I flood the little holes using a black acrylic paint pen. I am getting an IDEX printer soon, and when I do I will release a multi-material version with the markings using a different filament. Canopy - HDZero Micro: For HDZero Micro cam Canopy - Digisight v2 Nano: For Foxeer Digisight V2 Nano Canopy - Runcam Nano: For Runcam Nano (Stock) Canopy - Runcam Nano + HDZero lens: For Runcam Nano with HDZero lens mod Capacitor Holder ---------------------- Holds up to 10.5mm diameter x 16mm long capacitor (Size for Panasonic 470uf 25v) EP2 Holder --------------- Holds HappyModel EP2 reciver EP2 Clamp --------------- Clamps EP2 receiver in place (Use ~1.5mm self tapping screws) Frame insulator --------------------- Fit betwen FC and top plate. Stops any FC component / Capacitor wires from being able to touch carbon and short. Also holds central clinch nut in place and stops it from being able to come unseated - ie you can remove central screw completely and the clinch nut will be sat in place under the FC and cannot move Foot Protector ------------------- Skid pads for feet. Use if flying over concrete Battery Pad Riser ----------------------- Ideally print in something lighter than TPU. I use Nylon. Keeps head of central arm mounting screw from poking through battery strap and making battery prone to wobbling or getting dented by head of screw. Has space for 2x strips of silicone anti-slip pad. Buzzer holder 9.5x5 --------------------------- Holds buzzer 9.5mm wide by 5mm deep (eg BetaFPV small ones) Buzzer holder 12x9 --------------------------- Holds buzzer 12mm wide by 9mm deep (eg BetaFPV larger ones) Fullspeed buzzer holder -------------------------------- Holds Fullspeed Lucky Box buzzer (Battery backed up buzzer). Has button on outside to make pressing off button easy VTX antenna cupped holder ------------------------------------- Generic antenna holder, Makes some attempt to stop head of antenna from being bent around VTx antenna micro lollipop holder --------------------------------------------- Bomb-proof holder for Foxeer micro lollipop antenna - completely encases head (Yes I know that affects signal slightly, but a tradeoff I am willing to make for durability) Shark Byte clamps ------------------------- Use these instead of normal nuts on the top of your stack to protect against the UFL connector or MIPI getting ripped off. Print in something rigid such as Nylon or PETG, TPU will not work! Use brass threaded inserts too to make sure you have a secure fit  Other needed parts =============== * 5x M2 Clinch nuts * 5x M2 arm mounting screws in <Arm Thickness> + Top plate Thickness + Bottom plate thickness + 2mm (ie for 6mm arm, 2mm top + bottom, use 6+2+2+2 = 12mm) * 2x 25mm M2 screws (For rear bays and canopy) * 3x 6-8mm M2 screws (For front 3 canopy mounting holes) * 3x M2 threaded brass inserts are recommended for the front 3 canopy mounting holes (Allows you to tighten down canopy hard and minimize any vibration) Fusion 360 Source CAD files ====================== TP3 Frame --------------- https://a360.co/3ALPe75 Bottom plate and arms Also includes parts for my version of the 3" TP3, with various arm styles etc Parka v2 Canopy ---------------------- https://a360.co/3GilD7r All 3D printed parts except foot protector Top plate specific for the Canopy
With this file you will be able to print TP3.5 toothpick drone with your 3D printer. Click on the button and save the file on your computer to work, edit or customize your design. You can also find more 3D designs for printers on TP3.5 toothpick drone.