Trackimo Mount for Blade Chroma
thingiverse
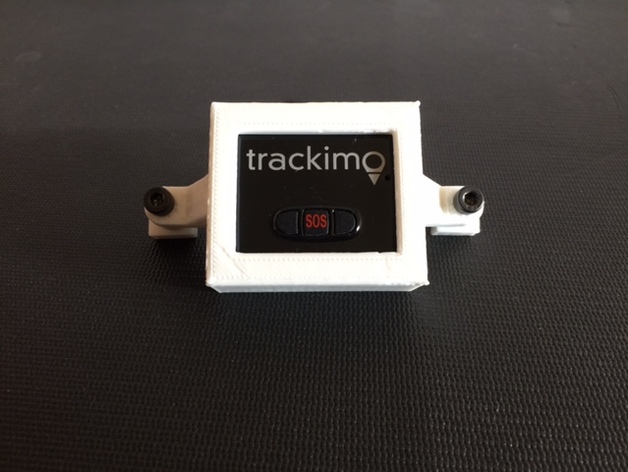
This is a mount for attaching a Trackimo GPS tracking device to your Blade Chroma. The mount hangs below the body and attaches to the landing struts without drilling or cutting your expensive drone. This cradle has a hole for the power button and USB charging cable. So you don't even have to remove it from your drone to charge the Trackimo. To assemble, you will need: (2) M4x25 bolts (2) M4 Nylocks To assemble, place your Trackimo in the cradle with the power and USB on the same side as the cutouts. Place the strap over the underside of the case with the risers "up". Thread the M4 bolts through the case ears and the strap and into the nut traps. Tighten until there is about 2mm of space left between the nut trap and the strap. Orient the the nut trap so that the "narrow" side slides into the landing strut. You will see a cavity that the nut trap will fit into (see photos). Be sure to turn the nut trap so that the longer end goes into the strut first. Once both landing struts are in place, insert the unit into your drone until the struts click into place. Then tighten the M4 bolts until they just start to grip the struts and that the case doesn't wobble. You're done! See note about battery access and camera cover below. Print Settings Printer Brand: MakerBot Printer: MakerBot Replicator 2 Rafts: Yes Supports: Yes Resolution: 0.30 Infill: 20% Notes: Print the main case with supports and a raft. You can print the strap and nut traps without supports. The bolt holes are tight intentionally. You may need to ream them out a bit depending on what size bolts you use. Post-Printing Just clean up the supports and trim off any extra artifacts from printing. Be sure to test fit the nut traps in the landing struts and trim the nut traps accordingly. They should be snug and not expand the plastic on the landing struts in any way. How I Designed This Created in OpenSCAD. I wanted to mount the device close to the body to avoid interference with the camera and flight in general. I also wanted to avoid drilling or modifying my drone in any way. But there wasn't any convenient place to mount the Trackimo. I also did not trust mounting it with velcro or similar restraints as it is far too easy for those to fail. Thus, I compromised. The mount I designed does block the battery release button, but given you don't need any tools to remove the landing struts, and you always land your drone before changing the battery (duh), it is a minor thing I think. Also, the camera shell needs to be removed before you install the struts. Again, a minor thing I am willing to live with for the security in knowing my Trackimo won't fall off in flight.
With this file you will be able to print Trackimo Mount for Blade Chroma with your 3D printer. Click on the button and save the file on your computer to work, edit or customize your design. You can also find more 3D designs for printers on Trackimo Mount for Blade Chroma.