Transformers G1 Soundwave Tape Door and Leg fixes
thingiverse
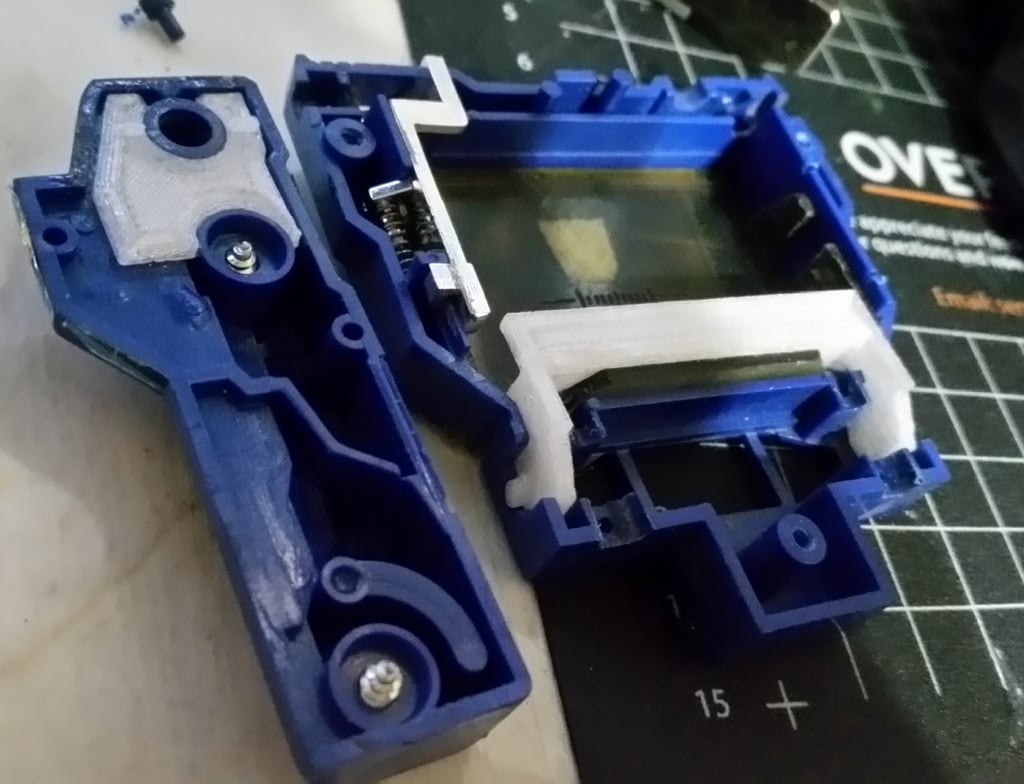
Everyone is out there getting the new Generation One Soundwave reissues. I'm here feeling left out because My store didn't get them. Well, I already have some loosey goosey and broken ones so guess what? TAPE DOOR ----------------------------------------------------------------------------- I needed to fix the tape door but I wasn't willing to sacrifice the old one for a fully printed one. *What I came up with isn't the best I am sure and may not fit all the mold variations. However, everything works perfect on mine now. The broken tape door slides under the bottom_fix_cut part and you can glue it together when you have (TESTED IT, shaved it down etc.) <<----Important.... Or just leave it unglued. If your tape door is only missing one side then you can use the half file. Pay attention to which side you need before you print. If you need the other side, flip it in the slicer. Trim, cut, sand away whatever interferes on the printed part. I had one door with both sides broken (Takara Pre rub) and the whole piece fit great. My other figure (Hasbro Takara with rubsign) had only one side broken but was broken in a way that interfered with the part sliding on so I opted to trim the door instead of the printed part so that the part had more structural integrity. It was already broken so nothing to lose. Works great too. LEG FIX --------------------------------------------------------------------------- There are two different files for the leg fix. One for Hasbro stamped and one for the earlier Takara molds. It could also be either or. The difference is that if you look at the silver thigh part, the "standing" indentations will be either at 45 degrees / or perpendicular --. Tip, For the leg decals you can use a hair dryer to warm up the adhesive, using a knife pull up a corner just enough to grab the decal and while it's still warm you can slowly pull it away ( I use tweezers ) to allow the two sections to seperate. You can also cut your decals along the seem where the two parts come together on the legs. And if you dont care you can just cut them and poke a screwdriver through the back ones. While it's apart you might as well clean the dust out. Study the leg picture, notice the angles and shapes. The little nub at the top of the leg at the nee joint always wears down. This leg fix adds more nubs to grab and keep him standing and in player mode. He passes the gentle shake test. *Spacer goes into the leg cavity and the flat part sits on top. It keeps the pressure on both sides. If the legs are too tight, you can trim down the nubs. Another tip, if your arms are loose at the shoulders, take the shoulder apart. Be careful to not lose the metal rectangle! Clean plastic parts in soap and water to remove the drtt in there and dry. When putting back together, place a piece(s) of paper cut to the same size of the metal rectangle. Put the paper into the shoulder part where the metal rectangle was then replace the metal rectangle. Screw back together and test, if still loose, add more paper. Get's the pop and lock back. Till All Are One!
With this file you will be able to print Transformers G1 Soundwave Tape Door and Leg fixes with your 3D printer. Click on the button and save the file on your computer to work, edit or customize your design. You can also find more 3D designs for printers on Transformers G1 Soundwave Tape Door and Leg fixes.