Tri-ventilation + led CTC I3 Pro B (Prusa clone)
thingiverse
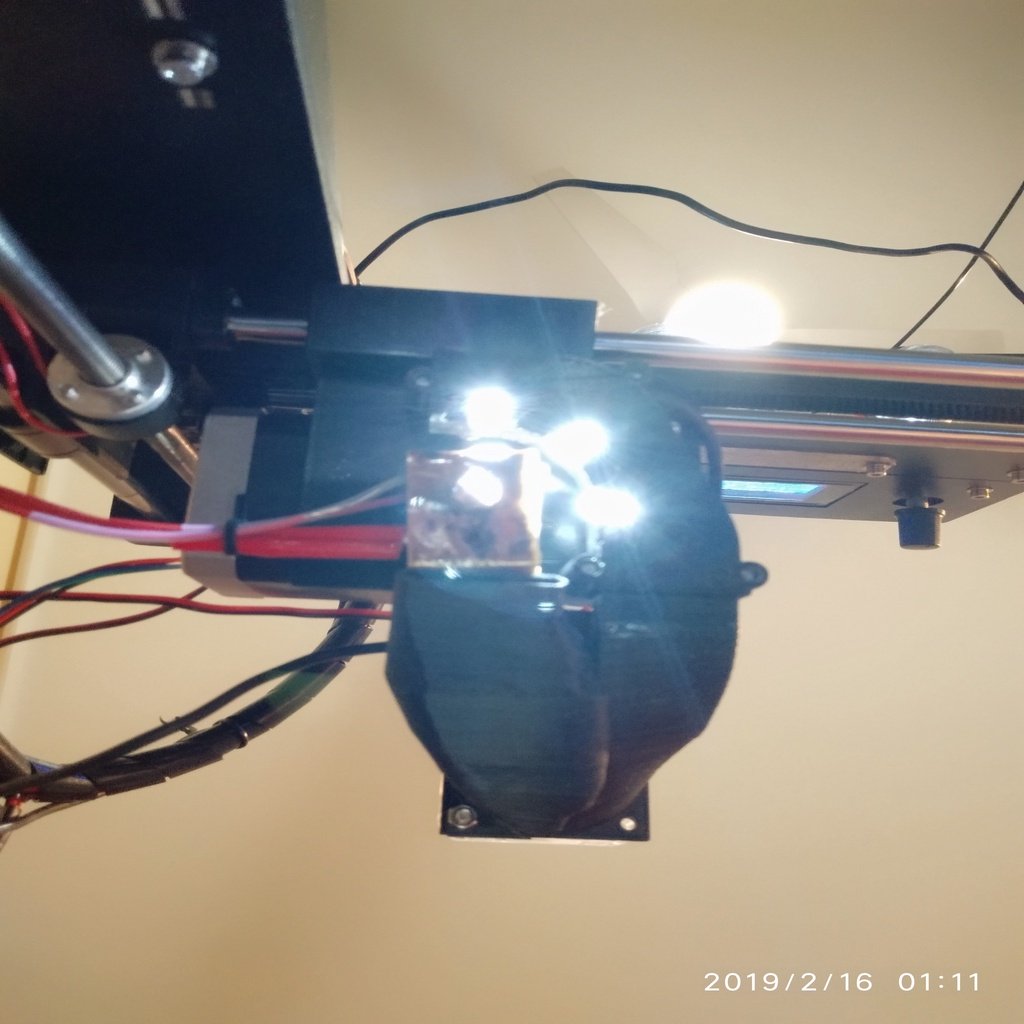
Avevo stampato un condotto di ventilazione che avevo trovato qui su Thingiverse ma non ne ero pienamente soddisfatto così, prendendo anche l'idea di avere un punto luce vicino all'ugello, ne ho disegnato uno nuovo che divide il flusso d'aria in 3 direzioni oltre ad illuminarmi la zona di lavoro. Il flusso d'aria primario finisce in un plenum e da li si dirama in 4 fori diretti sotto l'ugello. Il secondo flusso si dirige sia contro il radiatore che tra il trascinatore ed il blocco di alluminio di montaggio. Il terzo flusso si apre in una bocca stretta e larga sotto l'ugello. Per aggiungere il punto luce ho inserito 3 led bianchi (led standard da mm.5) all'interno del plenum e diretti verso la punta dell'ugello. Le foto allegate spiegano come inserire i led. L'alimentazione dei led l'ho presa direttamente dall'alimentatore a 12V della stampante. Ricordarsi che per i led bisogna rispettare la polarità e che va inserita una resistenza da circa 200 ohm (scegliere una resistenza commerciale compreso tra 150 e 200 ohm). ATTENZIONE: All'interno di "Plenum Coper" ho inserito 2 dadi M3, quindi occorre inserire all'interno del codice G le istruzioni per fermare la stampa quando si arriva 1 layer prima della chiusura sopra i fori previsti, inserire i dadi e riprendere la stampa. I had printed a ventilation duct that I had found here on Thingiverse but I was not completely satisfied with it, taking the idea of having a light point near the nozzle, I designed a new one that divides the air flow in 3 directions in addition to illuminating the work area. The primary air flow ends in a plenum and from there branches into 4 direct holes under the nozzle. The second flow is directed both against the radiator and between the driver and the aluminum assembly block. The third stream opens into a narrow and wide mouth under the nozzle. To add the light point, I inserted 3 white LEDs (standard 5 mm LEDs) inside the plenum and directed towards the tip of the nozzle. The attached photos explain how to insert the LEDs. I took the power of the LEDs directly from the 12V power supply of the printer. Remember that for the LEDs the polarity must be respected and that a resistance of about 200 ohms must be inserted (choose a commercial resistance between 150 and 200 ohms). ATTENTION: Inside "Plenum Coper" I have inserted 2 M3 nuts, so it is necessary to insert the instructions to stop the printing inside the G code when you get 1 layer before closing above the holes provided, insert the nuts and resume the printing.
With this file you will be able to print Tri-ventilation + led CTC I3 Pro B (Prusa clone) with your 3D printer. Click on the button and save the file on your computer to work, edit or customize your design. You can also find more 3D designs for printers on Tri-ventilation + led CTC I3 Pro B (Prusa clone).