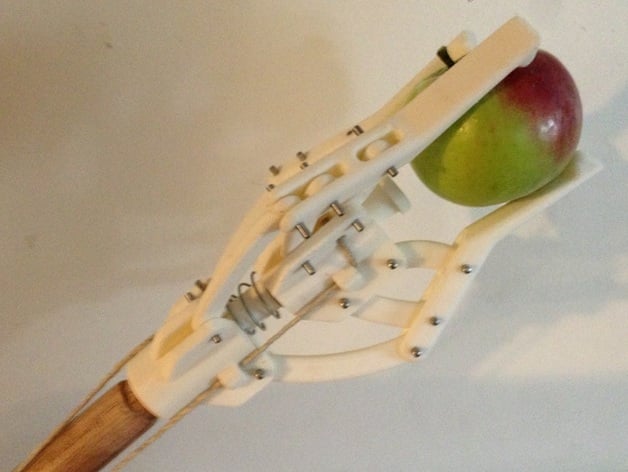
Triclaw Apple Picker
thingiverse
It's that time of year again, and now that my apple tree is finally producing decent fruit, I'd like to be able to get it apple-by-apple without having to go get a stepladder or dropping an entire branch of apples on the ground. They sell two-claw grippers at the local Home Despot, but grabbing a sphere with two fingers requires more dexterity than I'm willing to invest. Also, those grippers are only three feet long at best, and I want the apples dangling six or seven feet from the reach of my hand. This four-bar-linkage claw is driven closed by a sliding collar attached by another four-bar to each of the three fingers. The collar is sprung to return the fingers open, so it can be operated by pulling a cord. For simplicity, the cord has been knotted onto a sliding collar further down the pole to manage it better. At some point I may redesign this collar to a squeeze-grip lever, but for now, I just want my apples. The best part? This threads onto a standard broom handle, which means you don't have to store a six-foot pole outside of apple season... or at all, if you already have a broom. And if you want a sixteen-foot pole, just duct-tape your broomstick onto another pole (or two?) and use a longer cord. Also, a word to the wise- apples are best picked with a twist, not a pull. If you stretch some silicone surgical tubing over the fingers, or wrap them with the professional-grade uncured rubber electrical tape (not the cheap vinyl crap), you should be able to get a good enough grip to twist loose the apple without breaking the spur and hurting the tree. So a few comments after using this thing... it does work, but it's not quite as plug-and-play as you'd hope: -The jaws do not close completely because the first level linkages go vertical at about 1" apart... but that's fine for picking apples. -It takes a good bit of force on the line to get the jaws to close, and the return spring that I used could do with a bit more punch. The apples pick best if you trap the stem between two fingers so you can give it a good twist. -I'm looking for some of that good rubber electrical tape at my local hardware so I can better cushion the fingers, get a better grip and avoid bruising the apples. Instructions Besides the broom handle and an appropriate length of cord, you will also need a compression spring that fits over a 16mm dia rod, and 19 3mm or 1/8" dowel pins, or a similar sized pivot rod. (You might be able to get away with M3 machine screws in the short term, but it will eat your pivots over time.) These parts are kitted into two pallets for an Up! Mini. I have also provided an STL of the assembly for reference only. Deraft all the parts and nip off the two spacer norkers. Ream out the bores on all twelve links to match your pivot rod diameters, so they spin free without wiggle. Ream one side only of the bore sets on fingers and the receiver brackets on the gripper head and gripper mount, so you can insert the pin on the free side and press it in on the far side. If you screw this up, you can superglue it in. Ream out the crossbore on the slide rod and the matching crossbore on the gripper mount, one side only. Load the gripper head onto the slide rod so that the head of the rod sits in the recess of the gripper head. Load the spring onto the slide rod, and then insert the slide rod into the gripper mount bore. Align the crossbores and press in one of your pins to fixture the slide rod into the gripper mount. The gripper head should now slide freely on the slide rod, and compress the spring against the gripper mount. Assemble the links so that they match the illustration, with the numbers correctly aligned. Press in the pivot pins to set the links. Assemble the fingers to the links to match the illustration, pressing in the pivot pins. Thread the cord through the right bushing on the gripper mount, the right bushing on the gripper head, through the crossbore on the gripper head, through the left bushing on the gripper head, and the left bushing on the gripper mount. You can either tie this into a loop below the mount and run a single cord to the slide handle, or you can run both cords to the slide handle. Thread the broom handle into the gripper head. Slide the slide handle onto the broom handle from the bottom, and set it to a comfortable height. Thread the cord(s) through the provided holes and knot it at the appropriate height so that when the claw is shut, the slide handle is still a comfortable distance from the end of the broom handle. Go pick something.
With this file you will be able to print Triclaw Apple Picker with your 3D printer. Click on the button and save the file on your computer to work, edit or customize your design. You can also find more 3D designs for printers on Triclaw Apple Picker.
