TrikeBot - VEX Robotics Chassis
thingiverse
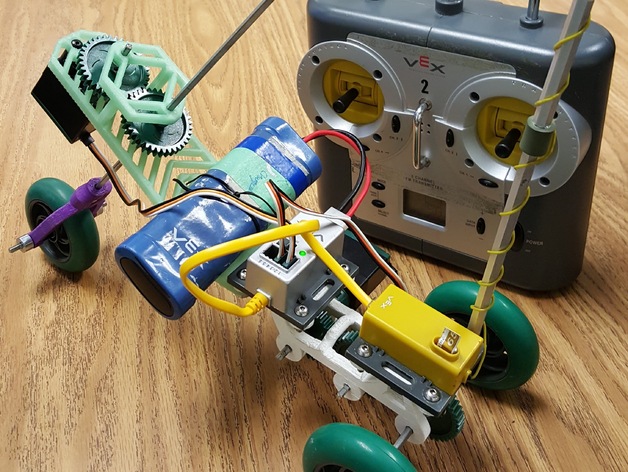
Chassis for a one motor, three-wheeled, remote controlled vehicle using VEX EDR components that utilizes a single servo for steering and acceleration. I only suggest printing version two of this project as it significantly improves the driving experience over version one, which is included here to showcase my design process. This project was my first attempt at completely replacing VEX metal structural components with 3D printed plastic while learning to use SketchUp Make. I chose to focus on using a single motor for acceleration and a single servo for steering to make it manageable, timewise. For control, I opted for a no-brainer with an older-style controller. Version one featured an enclosed chamber for the battery and had the steering wheel at a perpendicular angle. It functioned but steering was quite difficult and shaky. After researching motorcycle steering wheel physics, I learned about rake and added a third piece between the impulse and steering portions to improve steering by adding an angle. After testing, I decided to shift the weight of the battery forward and add a gear between the servo and the steering wheel to help center it in its resting state and allow for adjustable distance from the steering section. I ended up creating version two of both the impulse and steering sections. Print Settings: Printer Brand: MakerBot Printer Model: MakerBot Replicator (5th Generation) Rafts: Yes Supports: Yes Resolution: High Infill: Default Notes: Don't print the version one pieces unless you're curious about my design process. The version two pieces make for a much better driving experience. Print impulse sections or the version one steering section flat along the top. The version two steering section is designed to be printed flat along one side. The rake section intended to be added between the version one pieces doesn't have a great printing angle, so I told MakerWare to "flatten" it for me. Post-Printing: Needed parts: * 1 VEX 75MHz Signal Splitter (AKA 'no brainer') with its accompanying mounting screws and nuts * A couple of metal stand-offs and a rubber link to wrap the antenna around * 1 VEX 75MHz Receiver (also, a transmitter if you wanna control it) with its accompanying mounting screws and nuts * 1 VEX 3-wire motor (or 2-wire with a 3-wire motor controller) * 1 VEX 3-wire servo * 1 7.2V robot battery with a long-enough twist tie * 6 square shafts; 2 2"+ shafts, 2 3"+ shafts, 2 6"+ shafts * 5 36-tooth gears * 15 lock collars * 3 2.75" wheels * 2 black plastic spacers All VEX EDR parts are available through VEX: http://www.vexrobotics.com/vexedr/products/accessories (well, actually, some of these components have been discontinued; this is probably only interesting to people who have old VEX stuff around.) Assembled the impulse gear assembly. Attached the receiver and signal using a little tape to attach the antenna along the stand-offs. Attached the servo to the signal splitter, and had it on and attached to the receiver with the transmitter on and the joysticks left alone. This held the servo centered as you center the wheel and enmesh the gears. Attach the impulse and steering sections using the mounting screws of the signal splitter. Plug the impulse motor into port 3 on the signal splitter and the steering servo into port 1. Be sure to switch channel 3 to be reversed on your 75MHz transmitter, or you'll need to get used to steering backwards. Completely assembled and running.
With this file you will be able to print TrikeBot - VEX Robotics Chassis with your 3D printer. Click on the button and save the file on your computer to work, edit or customize your design. You can also find more 3D designs for printers on TrikeBot - VEX Robotics Chassis.