Trimlbe TS7 Pole Mounted Quick Release
thingiverse
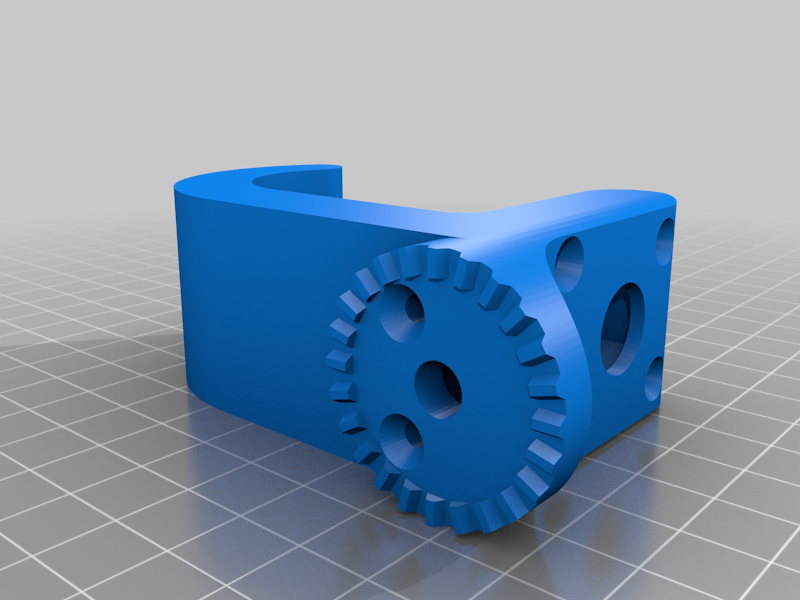
This is a Quick Release Pole Mount designed for a Trimble TS7. The retail price on the market for these was well over $200 dollars so I decided to make my own. The full cost of this including filament couldn't have been more than $25 dollars. Unfortunately the bracket isn't included in this model but if you just need a spare pole mount this is probably a suitable alternative. A few small metal parts are required for this build. They are: 1 x 7/16" Bolt (1.5 inches long) 1 x 7/16" Jam Nut 1 x 7/16" Nut 1 x 1/4" Bolt (1 inch long) 1 x 1/4" Nut 10 x 6-32 Machine Screws (0.5 inches long) 2 x [.36 X .032] Compression Springs (1 inch long) For best results, I would recommend printing all parts in the orientations shown with 100% infill. The extra strength is needed to prevent flexing since the TS7 is so heavy. If you have issues with print quality rotating the parts might help, but I found these orientations to work the best. My prints were in PETG but any other filament would probably work fine as well. - After printing all the parts, clean off any support material. A small drill bit and some pliers helped me free some stubborn screw hole supports. Also disconnect the inner bearing on the clamp plate. It may be a little stuck but pry up the edges with a knife a bit and it should spin as intended. - Once you've cleaned up the prints, begin by placing the knob heads on their respective bolts. You will most likely need a hammer since the fit is pretty snug. Also put the jam nut into its place in the clamp plate. It should sit flush. - Next put the 1/4 nut and 7/16 nut into their respective slots in the smaller piece of the mount body (the blue piece with the teeth). Afterwards, slot on the second piece of the mount body (the piece with the big hook). Use 6 machine screws to secure the two pieces together. You should be left with a solid mount body with a nut trapped in each hole. - Following this, assemble the quick release mechanism by sliding the button into the QR body. The slots in the button for the springs should be facing the side with the large opening. Place the springs into their slots on the button and then place the spring plate onto the springs. Compress the springs and hold them in place while you screws the spring plate to the QR body with the remaining 4 machine screws. - The last step is to thread the 7/16" bolt through the mount body nut and into the jam nut in the clamp plate. Some super glue in the treads and around the plastic behind the jam nut will help the bolt and the clamp plate stay together. Place the spacer and then the QR body onto the 1/4" bolt, then screw it into its nut in the mount body. Adjust angle as needed and then tighten. If desired, rubber tape can be added to the clamp plate and the hook to really prevent sliding down the pole. If you run into any issues during printing or assembly, leave a comment and I will try my best to help.
With this file you will be able to print Trimlbe TS7 Pole Mounted Quick Release with your 3D printer. Click on the button and save the file on your computer to work, edit or customize your design. You can also find more 3D designs for printers on Trimlbe TS7 Pole Mounted Quick Release.