Triple 1/64 Liberty Walk Garage Display
thingiverse
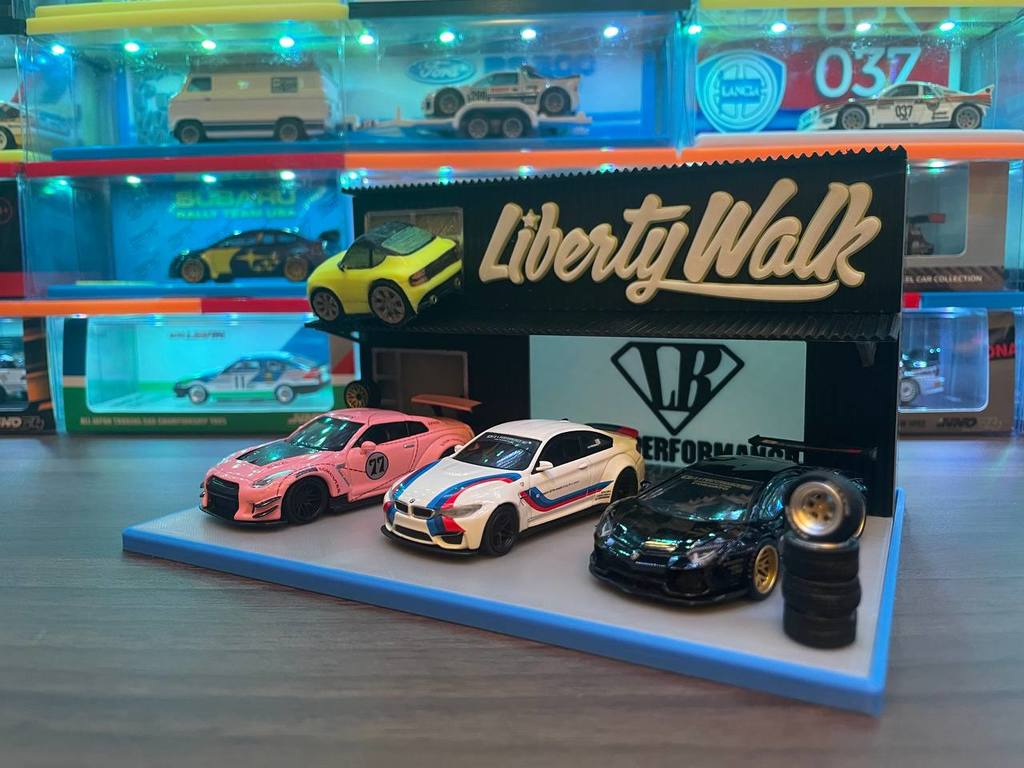
###Any suggestion is welcomed! Feel free to join my Facebook group to let me know what you want: https://www.facebook.com/groups/1115757609295068 ###Or my Telegram channel: https://t.me/+pux0lNikT3E2N2Q9 ###Custom display base are also available at $5! Contact me to discuss what you want! ###Compiled RAR file is available in download section! Description ==================== A Liberty Walk garage display made to fit 3 cars. The design is based on the actual Liberty Walk garage but slightly shrunked to fit into Funko Pop protector box. The chibi Nissan Z on the roof of the building is taken from here: https://www.thingiverse.com/thing:4783316 The cars I used in the photos are all from Mini GT, the cars used are: - Nissan GT-R Liberty Walk V2 - BMW M4 Liberty Walk - Lamborghini LP700-4 Liberty Walk If you wish to have a display base tweaked to fit to a different car from a different brand, please send me these dimension for the display base holes: https://imgur.com/5T6mb2L The display base is separated into many parts for easy printing and colour swap. The base parts are: 1) Base (BaseV1.STL) 2) Flat Base (FlatBase.STL) The following are the parts required to build the garage, as seen in my photos: 1) Front of the garage (Building.STL) 2) Buildind side wall (BuildingSidesLeft.STL & BuildingSidesRight.STL) 3) Building back wall (BoxBackPlain.STL) 4) Lower roof (RoofBuildingV2.STL) 5) Top roof (RoofTop.STL) 6) Pin (Pin.STL) The following are optionals: 1) Door and window glass (DoorGlass.STL & UpperWindow.STL) 2) Roof support (RoofSupport.STL) 3) Internal wall (InternalWall.STL) 4) Garage floor (GarageFloor.STL) Print Settings ==================== Nozzle size = 0.3 mm (Should be printable with 0.4) Layer height = 0.2 mm Filament change layer for colours on "BoxBackPlain.STL": 1) Start (Window and door frame colours, mine is in grey then painted chrome) 2) Layer 6 (Overall building wall colour, mine is in black) 3) Layer 12 (Liberty Walk lettering outline colour, mine is in yellow) 4) Layer 18 (Liberty Walk lettering, mine is in white) Assembly ==================== The car is tied by wires through the hole in the base The chibi Nissan Z on the roof of the building is taken from here: https://www.thingiverse.com/thing:4783316 The 2 sets of wheels seen in my photos are leftover/broken wheels I have from rim swapping cars. Flat base should fit nicely into the base. The building front is held together by the side pieces through the lower roof. It is highly recommended to use some glue to connect the building front to the sides after it is secured with the pin. Window glass piece are printed with transparent filament and double sided tape to the back of the building wall. If you are unsure on how to assemble them, please send me a message or leave a comment. Others ==================== Feel free to send me any feedback on how to improve the design. Suggestion on display base designs are welcomed too. I can be contacted through Instagram or Twitter too: Twitter: https://twitter.com/Giga_Penguin Instagram: https://www.instagram.com/GigaPenguin3DPrinting/
With this file you will be able to print Triple 1/64 Liberty Walk Garage Display with your 3D printer. Click on the button and save the file on your computer to work, edit or customize your design. You can also find more 3D designs for printers on Triple 1/64 Liberty Walk Garage Display.