Tripod mount ring for Canon 100mm macro
thingiverse
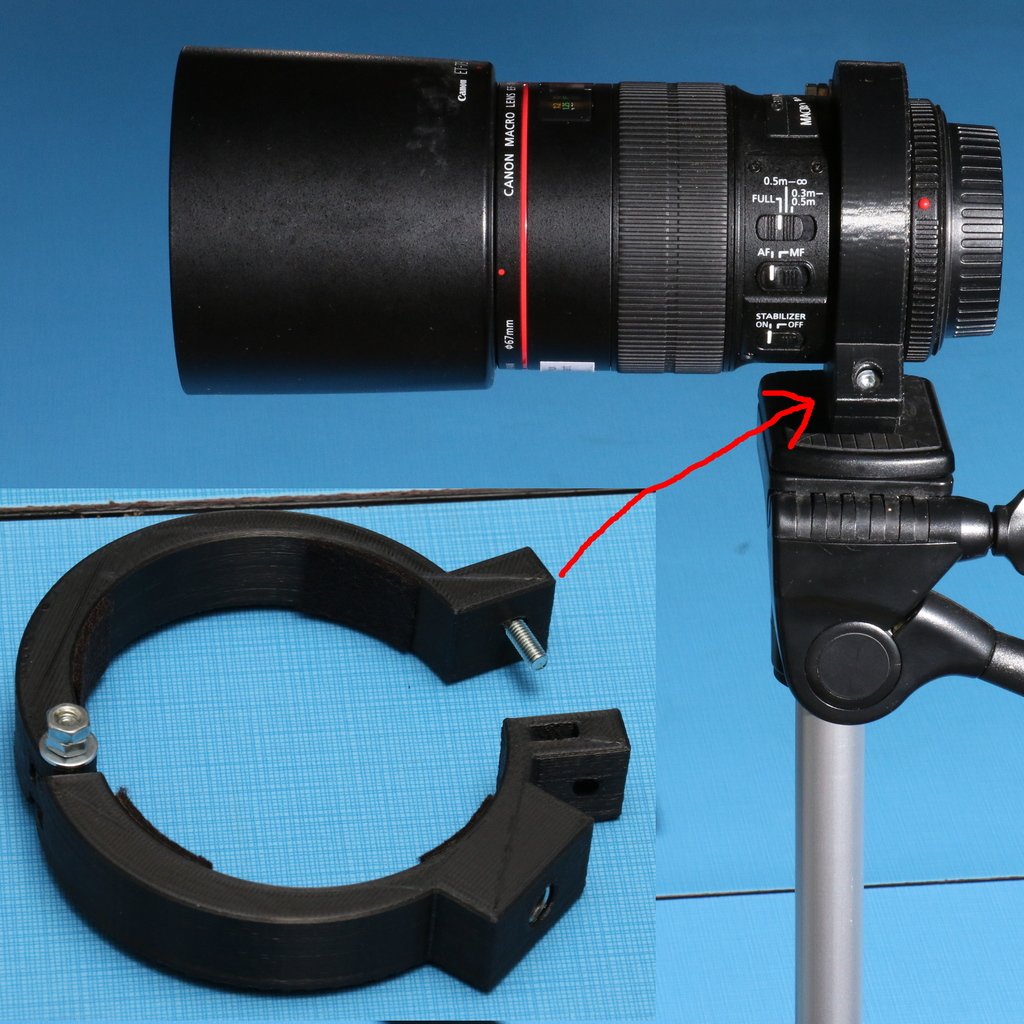
Origin: ====== Canon lens are great but Canon Inc. can be stingy about accessories and deliver it's 100mm marco lens without a tripod mounting ring. Worst they sell it apart more than €200! So this is my solution. Strange shape: ======= You'll find the shape strange... me too, but I can explain! For the hinge, I need 20mm wide. But a 20mm ring does not permit the fixation onto my camera (and I suppose many over). So I just made it 20mm on hinge side 10mm on the over! Done... But there is an other trouble: if I put the tripod fixation on the centre of the part, the collision of the flash with the closing tabs prevent the tripod fixation to be horizontal, so I decenter it. This is why the ring's shape is strange. Hardware you'll need: ========= - 1 × M4 12mm socket screw, - 1 × M4 25mm truss screw, - 3 × M4 nuts, - 1 × M4 washer, - 1 × "photo format" nut, - 1 × "photo format" screw (will not be included in the ring), - 1 × 18mm wide (as large as the ring) band of adhesive felt pad. Support : ======== No support is needed because the two parts are made to be the support of each-over. This is why I supply the 2 parts into a same file (the position of the 2 parts must be precise). About the adhesive felt pad : ========== Note that you'll probably have to reduce the felt pad band thickness. This operation will be the last one before cutting the band in squares and paste it onto the ring because you'll need to evaluate the free space between it and the lens and adapt the felt pad to it. Separating the parts : =========== I recommend to cut as far as possible the bridges formed during the print between the 2 parts before introducing the truss screw in its hole and, only with this screw in its position, finish breaking the bridge by turning parts around this screw. _Be very careful: turn the parts **around the screw** or you'll break it._ Hinge screwing: ============ Hinge must be flexible, the screw must not be tighten but loose so you'll need a jam nut to lock the first nut without compress the hinge and make it rigid. You may also notice that the 2 nuts should be placed in front so that it will not collide with the camera and prevent the mounting of the lens. Adjustment bolt: =========== The nut's space is tight and so the nut's insertion can be difficult (observe the picture to see the good position). When the nut is inside the ring you can use the socket screw to force it into its position. Tripod fixation: ======= The space of the "photo format" nut is de bit loose. Insertion is not a trouble but it isn't hold inside naturally. So you may hold it with a "photo format" screw and glue it (with some filament extruded by your printer by example.
With this file you will be able to print Tripod mount ring for Canon 100mm macro with your 3D printer. Click on the button and save the file on your computer to work, edit or customize your design. You can also find more 3D designs for printers on Tripod mount ring for Canon 100mm macro.