Tripod-mounted Tablet Clamp v01
thingiverse
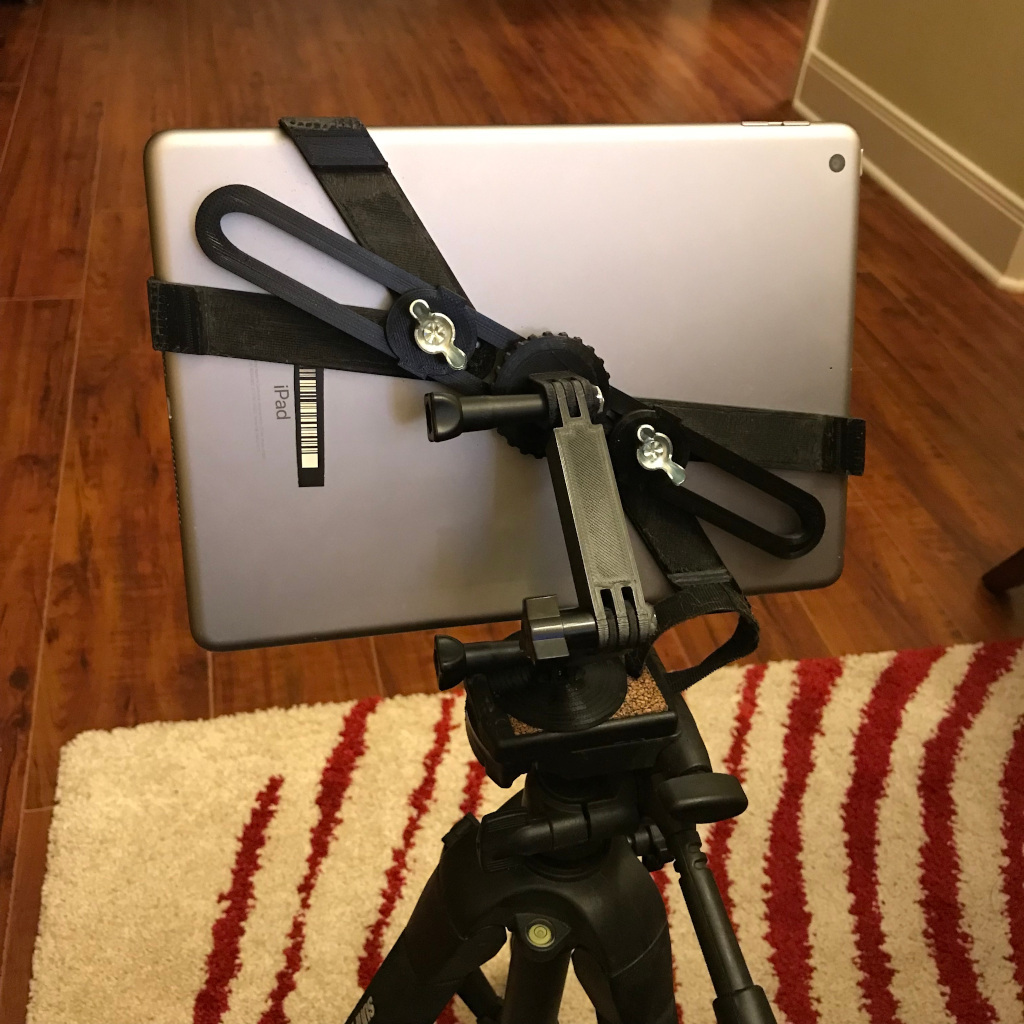
I have an obsession with trying to safely mount my iPad to my tripod for doing things like taking videos of the birds which have nested in my front porch. I know - you can buy stuff like this on Amazon, but since I bought my 3D printer I can't bring myself to buy stuff that I know for sure I can make (sometimes: make better). This design is completely derivative from something I have seen on photo retail sites and also in some other designs, but I have made some of my own modifications to that design. The fundamental bit of the design is the use of the diagonal "mast" to make (labeled "A" in the file list) the whole design functional for almost any size/shape tablet device. Since the grabbing arms (labeled "B" in the file list) can slide longer and shorter, this design can work for the larger iPad Pro or almost any Android pad. Maybe the one thing that needs to be revisited is the size of the grabbing arms so that this design can be used for smaller tablets (or maybe even as small as a phone). ALSO: if you like the "chonky" connectors in this kit, I have a complete set of these heavy-duty upgraded GoPro-style connectors here on Thingiverse: https://www.thingiverse.com/thing:5593105 UPDATED (v02): I came across JuanAto's GoPro adjustable mount here on Thingiverse, and because this design is a great upgrade to the interface to connect to a tripod, I made some changes to the design by adapting from JuanAto's files. He should get full credit for the idea, but we get full benefit for the upgrade. ;-) UPDATED (v03): I have discovered through a lot of use that the "B" arms have a terrible weakness and are prone to break when you print them flat, The grain of the filament causes weakness in the "finger" of the piece which holds the tablet in place. I have just now uploaded a "B" clamp v03 which is printed in 3 parts and allows the "grain" of the filament to run in a direction that makes that "finger" stronger. You just need a little super glue to assemble it and you are good to go. Tips: - I know it's tempting to want to print some of these parts at less than 100% fill to get them printed faster. My experience in assembling this the first time is to say that if you build them at less than 100% you will get breakage. - The only part which needed Ultimaker to build supports to print correctly was "B-Clamp_x_2". I think it's possible I overthought this part's design and that it does not need the taper, but I like the way this fits together in this first version of the project. - Each STL file lists how many of each you will need to print to assemble the device. So for example file "C-FenderWasher_x_2" needs you to print 2 of these, but the file only has 1 fender washer model in it. - The threads in the part "B-Clamp_x_2" are designed to take 1/4"-20 machine screws. I used1/4"-20 x 3/4 in. Zinc-Plated Stamped Steel Wing Machine Screws as the fasteners rather than printing threaded parts. This is mostly due to my own paranoia over this compression fitting failing. - As a sub-pointer, I also cleaned out the printed thread with my 1/4" tap tool to make sure the threads were smooth. If you don't have a tap and die set (you can get a cheap one at Harbor Freight for about $10), just be aware that the threads are super-tight in my experience and you may have to turn the screws you use in these holes a couple of time to get a fit which is easy to assemble/disassemble. - the part "B-Clamp_x_2" also has a slot in the elbow to add a rubber band to add tension to the sliding joint. I wound up not using a rubber band at all, but you may find it helpful in getting these to hold the clamps in place while you tighten the screws. - The center joint which connects to the GoPro-type adjustable arms is fully 3D printed (no metal parts) ("D-TheadedFender_x_1" and "E-CenterJoint_x_1"). I have added a single rubber washer (the super-thin kind you can buy at Home Depot or Lowes) under the "E" part to add friction at the point where the thread is tightening. This allows you to tighten the knob in a way that leaves the connecting "fingers" either vertical or horizontal, depending on how you want to set up the mount. - I have added the part "G-BendyArm_x_2" to the file list in case you don't own any GoPro connectors. You can also find various sizes and shapes of these connectors here on Thingiverse. - the part "F-TripodMount_x_1" connects to your tripod mount via the screw in the center of the plate, and it's the common 1/4"-20 thread that is almost universally used on these plates in the US.
With this file you will be able to print Tripod-mounted Tablet Clamp v01 with your 3D printer. Click on the button and save the file on your computer to work, edit or customize your design. You can also find more 3D designs for printers on Tripod-mounted Tablet Clamp v01.