Triton fanduct for Elegoo Neptune 2 - fanmount 5015 and 5010
thingiverse
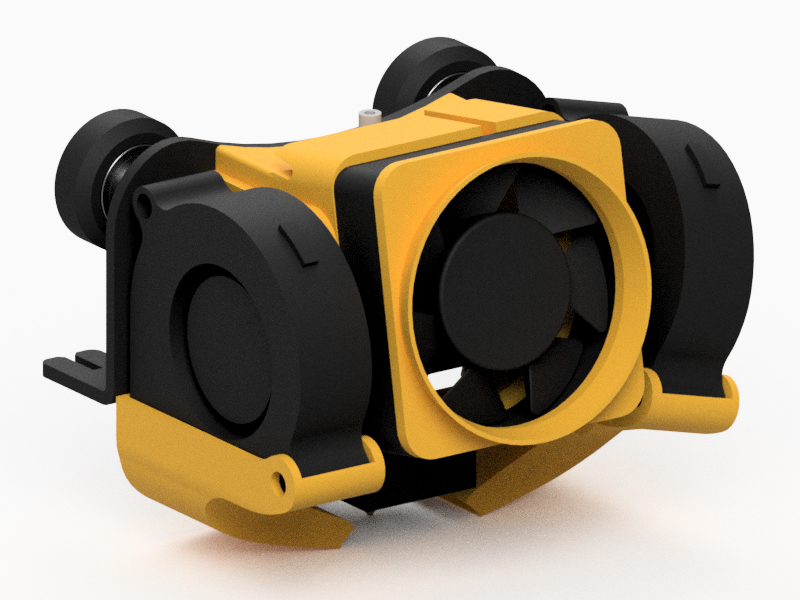
This is Triton *(biggest moon of Neptune)* a Fanduct for the Elegoo Neptune 2. === Information --- **Attention: The cap is still a work in progress and will get an update soon - currently it has to be fixed to the screws with hot glue.** This model was born from the desire to obtain more aeration power for strongly contracting filament. Two **50x15mm blower fans** and one **50x15mm axial fan** are used. The axial fan is not limited in depth, so 50x10mm or 50x20mm fans can also be used. The model is modular. One body and two arms and one cap. The arms can be screwed to the mounting holes or attached with glue. * The body is attached from behind with the supplied screws.The mounting holes for the arms have a diameter of **3.8mm** and are **8mm** deep when the arm is attached. The mounting holes for the axial fan have a diameter of **4mm** and a depth (without fan) of **15mm**. * The mounting holes for the blowerfans have a diameter of **4.5mm**. The outer distance of the two holes in the arm is **18.9mm**. So it should be clear to everyone which screws he can use. Printing === For everything applies: bridging enabled and properly calibrated. --- * The body can be printed without support structure. It should be printed lying on the front side of the bed. *I would recommend using at least 5 walls to give the screws enough material to hold. To get nicer mounting holes on the outside tree support can be used.* * The arms can also be printed without support structure. The arms should be printed on the back side facing the bed. * The cap also does not need a support structure and should be printed with the back side facing the bed. *For a nicer finish, ironing can be used.* Mounting === * After the print, the arms should be slightly tightened to the body. * The body is attached to the roll cage from behind. The outer contour of the body helps here, as it is exactly aligned with the outer contour of the mounting plate. *I recommend using the supplied screws or screws with Allen heads, as it becomes too tight at the back for a normal screwdriver.* * Once the body is in place, the arms are aligned in height so that there is at least one mm of clearance to the print bed when the nozzle is completely in contact. *Note that when tightening the screws, the height can change slightly* * Then the two blower fans are inserted and attached to the front. *The screw head should be on the inside, so that the axial fan still has space* * Then the axial fan is attached with the screws. * At the top of the body is a small gap to store the fan cables neatly.
With this file you will be able to print Triton fanduct for Elegoo Neptune 2 - fanmount 5015 and 5010 with your 3D printer. Click on the button and save the file on your computer to work, edit or customize your design. You can also find more 3D designs for printers on Triton fanduct for Elegoo Neptune 2 - fanmount 5015 and 5010.