Tronxy P802MA Anti Z Wobble Upgrade
thingiverse
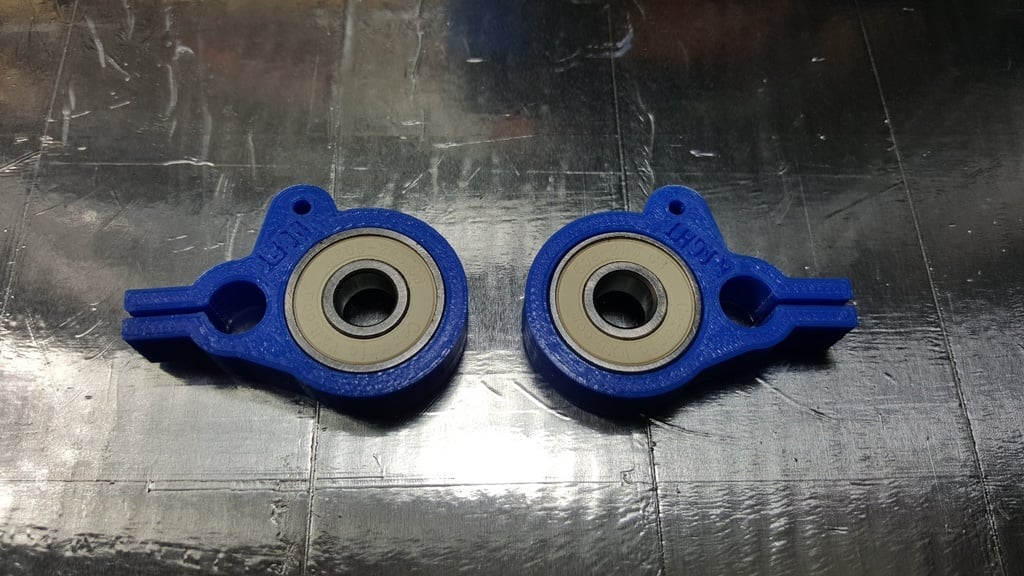
DISCLAIMER* As cncjim4 pointed out to me, "The lead screws are designed without bearings to help prevent wobble if the lead screws are bent at all or if the coupling bores are not concentric adding bearings will increase wobble." He's right and you should ensure that your lead screws are both perfectly straight. I checked by rolling them across a granite counter top and observing for any wobble or signs that the surfaces aren't perfectly parallel along the entire length. Failure to do this will likely result in decreased print quality. I tried several Z wobble upgrades but few fit right and the ones that are close don't secure the lead screw. I designed this based off of my Tronxy P802MA printer and I can't guarantee that it will work for others. There is a piece for the left and right side so be sure you pay attention when adding them. Each piece is 10mm in height and holds a single 608 bearing. It's a tight fit so you'll need to press or hammer the bearing in. The Z wobble upgrade attaches to the 8mm guide rod, the 8mm lead screw and the 3mm screw that holds down the piece on top that secures the guide rod. The center of each of these holes is 17mm apart, creating an equilateral triangle. This fits my printer perfectly but you can use the Tinkercad file to make changes if yours is different. https://www.tinkercad.com/things/7IeIgmBBuYe To install - 1. Press the bearings into the Z wobble upgrade pieces. They need to be flush with the top. 2. Unscrew the 2 screws on each side that hold the top pieces on. 3. Lift each piece up enough to pull the lead screw and guide rods free. 4. Gently press the side with he bearing over the lead screw to test for fit. If it's too tight, use sandpaper on the inside of the bearing by wrapping a small piece of sandpaper around a smaller tube like a screwdriver shaft. I only had to gently sand less than a minute with 320 grit paper. 5. There is a left and right piece! Once the fit is right, press the upgrade part over the guide rod and lead screw. You might have to wiggle it a little to get it to go down. Make sure you press it down far enough so that the guide rod and lead screw can fit back into the top piece. 6.Tighten the screws that hold the top pieces down. 7. Replace the piece that holds the guide rod in place and insert the screw. The upgrade piece should be able to hold this screw tight without a nut. The screw hole is smaller than 3mm so you may need to use a little force to get it started. Don't strip it by over tightening.
With this file you will be able to print Tronxy P802MA Anti Z Wobble Upgrade with your 3D printer. Click on the button and save the file on your computer to work, edit or customize your design. You can also find more 3D designs for printers on Tronxy P802MA Anti Z Wobble Upgrade.