Tronxy X5S Titan Direct Drive Mount
thingiverse
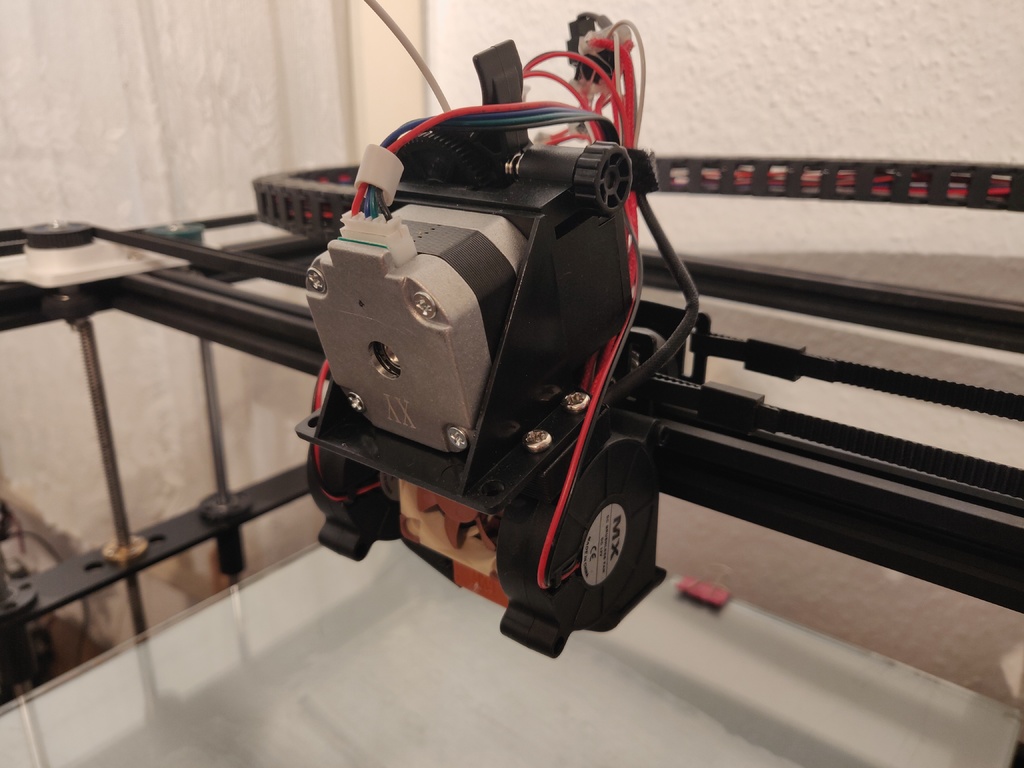
Third model in my "light hotend mount" series. Direct drive allows for many advantages, like reduced retraction, being able to handle more challenging retractions, and better compatibility with features like "Linear Advance" and "Pressure Advance". I bought a cheap Titan extruder clone to give it a try. Thanks to its geared reduction, a smaller stepper motor is sufficient for the extruder. THIS WILL ONLY FIT IF YOUR EXTRUDER PLATE LOOKS LIKE THE ONE IN THE .STL The Titan extruder can be directly connected to the more conventional E3D V6 hotend, but I wanted to retain my Mk. 8 hotend for now. A duct for each side, fitting 5015 radial fans, is included. Parts list: 1x mount.stl Whatever ducts you wish to you for cooling 1x Mk. 8 hotend 1x Titan extruder with univeral motor bracket 1x 4010 fan 2x M3x25 screws for the hotend and its mount 2x M3x20 (or longer) for the 4010 fan 1x M3x20 per 5015 fan 2x M3x16 for the cable chain / upper attachment point 1x M3x6 screw per fan duct 4x M4x10 for mounting the extruder on the mount 4x M4 nut 4x M3 nut (2x for the 4010 fan, 2x for the upper attachment point) + 1x M3 nut per 5015 fan 1x M3 washer (small) per fan duct Some bowden tube Assembly: Insert the M3 and M4 nuts into the printed mount. Assemble the Mk. 8 hotend as usual, leaving around 7cm of bowden tube. From below, run the bowden tube through the mount until the extruder lines up with the holes on the mount. Attach the hotend and mount to the original metal extruder plate. Attach the 4010 fan with the two M3 screws (beware the direction of the air flow). Secure the cable chain to the metal extruder plate, and attach the two M3 nuts from the other side to tighten the mount against the metal plate. Insert the bowden tube into the Titan extruder while lowering it down. The bowden tube will be too long for the Extruder to reach its mounting place. Shorten the bowden tube a few millimeters and try again. Once it fits snugly, screw the Extruder in place using the 4x M4 screws. Attach the fan ducts, if you wish to use them. Remember to insert the M3 nuts before mounting them on the metal printer plate. With this setup, I found a Klipper "Pressure Advance" value of 0.2 to work well, coupled with 0.6mm of retraction (PLA at 200°C).
With this file you will be able to print Tronxy X5S Titan Direct Drive Mount with your 3D printer. Click on the button and save the file on your computer to work, edit or customize your design. You can also find more 3D designs for printers on Tronxy X5S Titan Direct Drive Mount.