TS65 Split Mechanical Keyboard Case
prusaprinters
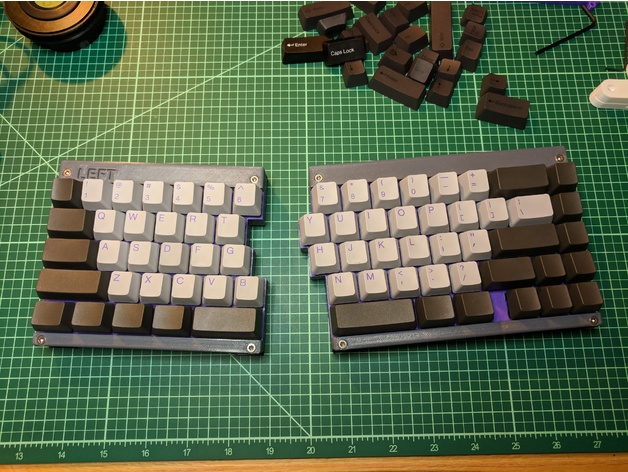
<p>A split keyboard case for the TS65AVR 65% custom keyboard. Can be slid together, or split apart!</p> <h3>Print instructions</h3><p>This is a minimal case for the <a href="https://github.com/mohitg11/TS65AVR">TS65AVR</a>, which is fully 3d printable. It aims to be:</p> <ul> <li>Easy to print and build</li> <li>At the intersection of "small" and "comfortable", and not much larger than the PCB</li> <li>Reasonably good to look at</li> <li>Easy to iterate on</li> </ul> <p>The keyboard's original name was "Sandwich", explaining the filenames. However "Sandwich" tends to have a specific meaning among mechanical keyboard folk—so I wouldn't describe it as such—but it is, in the sense that you sandwich the top, bottom, and key plate. The advantage is you can change the case around the plate without having to de-solder the keys, so long as you're happy with the plate design. This design came out of a conversation with my friend <a href="https://www.thingiverse.com/coddingtonbear">@coddingtonbear</a>, who has also <a href="https://www.thingiverse.com/thing:3080916">designed a keyboard</a> around this idea.</p> <p>The Fusion 360 <code>.f3d</code> <a href="https://a360.co/2Obsk4p">can be downloaded</a> so you can make changes as necessary.</p> <h3>Parts</h3> <p>The assembly and fabrication of <a href="https://github.com/mohitg11/TS65AVR">the PCB</a> isn't covered here; it's assumed you've assembled that (except for the keyswitches).</p> <p>You'll need:</p> <ul> <li>8x M3x16mm socket cap machine screws</li> <li>8x M3 square nuts</li> </ul> <h3>Assembly</h3> <p>The key plate can be used with or without stabilizers—I'd recommend with—and the keys must be inserted through the plate, then soldered. If you want to reprint the plate, you'll have to de-solder the keys, so do some testing to ensure you're happy and save some work.</p> <p>The bottom case has inserts for the M3 square nuts; ensure you clear the inserts and screw holes for any stray plastic after printing, then insert the nuts. They should hold firm enough in place to allow you to work on the rest of the keyboard.</p> <p>Press they key plate into place in the bottom case; you may need to do a bit of wiggling as it's a tight fit. On the right-hand side, it's best to insert the top of the plate first, as the USB 3.0 Micro B port protrudes from the back of the PCB a bit. When pressing down, press on the keyswitches and not the plate itself, as pressing on the plate is likely to dislodge the keys. They "float" somewhat, however hold firmly as a typing surface once the keyboard is assembled.</p> <p>Put the top case in place and insert the bolts, sandwiching the pieces together.</p> <h3>Feet</h3> <p>The keyboard tilt is provided by the feet, which I printed in TPE (eSUN eLastic) to give them some grip. It's sufficient but not great; I'll probably redesign them in the future.</p> <p>They can be attached with superglue; it's not elegant, but it works well.</p> <h3>Firmware</h3> <p>The TS65AVR runs <a href="https://github.com/qmk/qmk_firmware">qmk_firmware</a>, although since it's not a purchasable PCB it is not a maintained keyboard in the firmware. The original author's fork of qmk is very old, but I have a <a href="https://github.com/fardog/qmk_firmware/tree/ts65avr">relatively up to date fork</a> of qmk with support for the keyboard. It's patterned off <a href="https://github.com/coddingtonbear/qmk_firmware/tree/ts65avr">@coddingtonbear's fork</a> although he has a lot more features defined in there. Use either, they'll both work.</p> <h3>Updates</h3> <h3>2018-09-19</h3> <ul> <li>Fix cutouts for Cherry MX Stabilizers</li> </ul> <h3>2018-10-13: v1.0.0</h3> <p>"Final" release version.</p> <ul> <li>Fixed Fusion 360 file by rebuilding the left-hand side; both sides are now in matched drawings/steps, and easier to edit</li> <li>Resolved a number of tolerances to ensure fit is better</li> <li>Rixes to port cutouts to better suit a wider variety of cables</li> </ul> <h3>Print Settings</h3> <p>Printer Brand: Prusa<br/> Printer: i3 MK3<br/> Rafts: Doesn't Matter<br/> Supports: Yes<br/> Resolution: 0.20mm<br/> Infill: 20%<br/> Filament_brand: eSUN<br/> Filament_color: Multiple<br/> Filament_material: PETG</p> <p>Notes:<br/> This was printed in PETG, but you could likely print in whatever you're comfortable with. Flex could be reduced by using PLA, although I haven't found the PETG to flex in any noticeable way.</p> <p><strong>Note:</strong> be very careful when slicing the key plate; using Slic3r PE, it generates some really weird gcode without a top infill layer. I fixed this by upping the top/bottom solid layers to 8.</p> <p><em>Supports are necessary</em> for the plate only; the plate has some cutouts to make the stabilizers fit. For all other parts, they are not necessary and I don't print with them, but the bolt inserts will require some cleanup if you don't use any.</p> <p>The feet are printed in TPE so they're a bit squishy. They were done a bit differently:</p> <ul> <li>eSUN eLastic TPE (Black)</li> <li>0.20mm Resolution</li> <li>30% infill</li> <li>1 perimeter; when I printed with the default perimeters in my slicer (2), they didn't squish as nicely.</li> </ul>
With this file you will be able to print TS65 Split Mechanical Keyboard Case with your 3D printer. Click on the button and save the file on your computer to work, edit or customize your design. You can also find more 3D designs for printers on TS65 Split Mechanical Keyboard Case.