TT Furious Tourbillon
prusaprinters
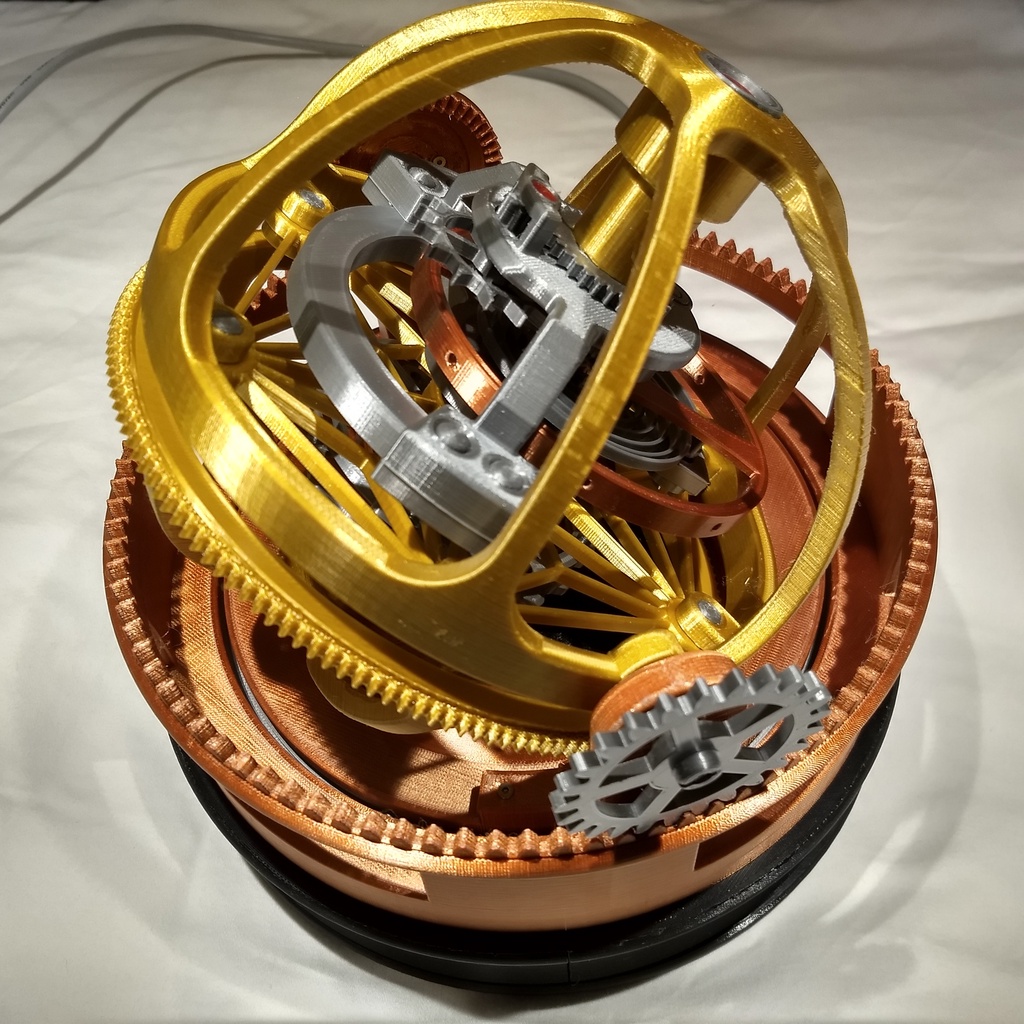
<p>6/10/21<br/> Updated the Base_Drive_Plate.STL, Base_Drive_Plate_a.STL, Base_Drive_Plate_b.STL, Base_Drive_Outer_Ring.STL, Base_Drive_Outer_Ring_a.STL, and Base_Drive_Outer<em>Ring</em> b.STL files.</p> <p>1/21/21<br/> FYI, To keep more up to date with what I'm doing I started an Instagram page @mcmaven.pdx, where I'm posting some of my 3D printing and other designs that I haven't posted here.</p> <p>11/25/20<br/> I uploaded a EASM file of the whole Furious assembly. With an EASM Viewer, you can rotate the Furious in 3D space, highlight individual parts, do blowups, etc. Hopefully the file will answer some of the assembly questions that the Build Notes do not. Please message me if you found this way of documenting the design useful, or if you didn't. Thanks!</p> <p>You can download a free EASM viewer here. You need to 'register' to download the viewer but Solidworks doesn't bother you with emails. And there are other free viewers available if you want..<br/> <a href="https://www.solidworks.com/sw/support/edrawings/e2_register.htm">https://www.solidworks.com/sw/support/edrawings/e2\_register.htm</a></p> <p>11/19/20<br/> I'm pleased to announce that MakerRx is now offering a kit of all the non-printed parts that you need to assemble the Furious, e.g. the Nano, the stepper and driver board, the shafts cut to length, ball bearings, etc.</p> <p>After using their kit to assemble the Flathead V8, I contacted them about creating kits for my designs. I found the cost of their kits very reasonable, especially when you consider that in some cases you only need 2 or 3 screws of a particular size, but you have to order a minimum of 25 of each size, some parts are hard to find, and you have to pay shipping on each of the items that you order. Pulling all the parts together for a complicated make can get expensive and take a lot of time. And in several cases, the parts that I ordered didn't fit and I had to order different ones. The bottom line, is that if you do the math on ordering the parts yourself and include shipping, you will have a hard time beating the price of their kit.</p> <p>You can order the MakerRx Furious kit here:<br/> <a href="https://www.makerrx.com/products/twin-turbo-furious-tourbillon-kit">https://www.makerrx.com/products/twin-turbo-furious-tourbillon-kit</a></p> <p>You can also talk to MakerRx about printing the Furious parts if you don't have a printer. I feel that their prices are very reasonable, especially when compared to a printing service like Shapeways.</p> <p>10/25/20<br/> Posted split versions of largest parts to enable printing on smaller printers.</p> <p>Base Drive Cover Half.STL , only one file is needed because it is symmetric.<br/> Base Drive Plate a.STL<br/> Base Drive Plate b.STL<br/> Base Drive Outer Ring a.STL<br/> Base Drive Outer Ring b.STL<br/> L3 Frame Ring Gear Half.STL , only one file is needed because it is symmetric.</p> <p>Read section 9.1 in the Build Notes on how to glue these parts together. Note: Figure out exactly how the parts are going to fit together, and how you are going to hold them before you apply the Methylene Chloride solvent. Then work quick! The solvent sets in seconds, and it is easy to end up with misaligned parts! Also it can damage surface finishes. I normally glue things on the waxed steel top of my table saw. But I have also used a large sheet of flat cardboard. And as the parts are held together, move them around a little, so the the part isn't glued to the cardboard, otherwise you may have to scape the cardboard off glue joints. You only have to do this for 30 seconds or so, because the solvent dries so fast. Also, the solvent is basically set after a couple of seconds, but the joint is still soft. I normally wait 24 hours before I use glued parts to ensure that the plastic softened by the solvent has hardened.</p> <p>6/6/20<br/> Added new version of L1 Frame Base Bridge Main 2 STL that provides a Balance Wheel alignment slot, to make setting up the escapement easier. See section 7 in the build notes for more information.</p> <p>12/2/19<br/> Added some photos of the Arduino, stepper, and rotary encoder wiring. I bent all the pins on the Nano 90 degrees, to make them easier to access them. In some cases I soldered wires with shrink wrap covers, and others I used Arduino Breadboard Wires, that slip on pins. The ground signal between the Arduino (black) and Stepper Driver board (Orange) is soldered together. The +5V signal between the Arduino (red), Stepper Driver board (Yellow), and the rotary encoder (yellow) is also soldered together. Refer to the schematic for more information.</p> <p>11/16/19<br/> Changed screw lengths to minimize stripping screws.<br/> Posted new zip file (Thingiverse files 110519.zip) that includes updates to the following STL files:<br/> L2 Lower Body<br/> L2 Lower Body Trellis2<br/> Base Drive Cover</p> <p>11/5/19<br/> Posted new zip file (Thingiverse files 110519.zip) that includes updates to the following STL files:<br/> Base Drive Outer Ring a and b<br/> Base Drive Plate<br/> L2 Lower Body<br/> L2 Upper Body<br/> L3 Bearing Race a and b<br/> L3 Bearing Race Lower</p> <p>The files include changes to make assembly easier, e.g. changing dimensions to provide more clearance and reduce the need to sand or file parts to get them to work smoothly.</p> <p>Also, use M2x4mm cap head screws to attach the stepper motor to the Base Drive Plate. If you use M2x6mm screws, they go through the Base Drive Plate, and rub against the L3 Bearing Race Lower part, preventing it from turning.</p> <p>10/19/19<br/> Added the 2x1mm_Bearing_Spacer.STL file.</p> <p>10/3/19<br/> The TT Furious page has been broken since I created it. In an effort to fix the problem simplified the upload by only uploading one file "TT Furious files xxxx19.zip" file instead of over 70 STL, INO, JPG, and PDF files. If this does not work, you can also download the files from:<br/> <a href="https://cults3d.com/en/3d-model/gadget/tt-furious">https://cults3d.com/en/3d-model/gadget/tt-furious</a>.</p> <p>I modeled this design after a Jacob and Co. Twin Turbo Furious watch. I spent many hours looking at videos and images that I found on the web of the original watch.</p> <p>Similar to the Gyrotourbillon and the Triple Axis, I tried to make the model an accurate (scaled up) version of the original Furious tourbillon mechanism. I printed plastic screws to scale and used them as caps to cover the steel screws that actually hold it together.</p> <p>This is a real-time video of it, <a href="https://youtu.be/2-7S2i6AUyM">https://youtu.be/2-7S2i6AUyM</a><br/> Also it's quite large, with a diameter over 200mm.</p> <p>In this design, I've included several versions of the Balance Shaft and the Fork which will give you some alternatives to get it to tick easier.</p> <p>Please read the Overview in Build Notes to get a better feel for the constraints of this design.</p> <h3> Print Settings</h3> <p><strong>Printer Brand:</strong></p> <p>Prusa</p> <p><strong>Printer:</strong></p> <p>I3 MK3S</p> <p><strong>Rafts:</strong></p> <p>No</p> <p><strong>Supports:</strong></p> <p>Yes</p> <p><strong>Resolution:</strong></p> <p>1.5mm</p> <p><strong>Infill:</strong></p> <p>15</p> <p><strong>Filament:</strong> Hatchbox, CC3D Silk PLA Transparent Red, Black, Gold, Silver, Copper</p> Category: 3D Printing
With this file you will be able to print TT Furious Tourbillon with your 3D printer. Click on the button and save the file on your computer to work, edit or customize your design. You can also find more 3D designs for printers on TT Furious Tourbillon.