TuneFast Harp
thingiverse
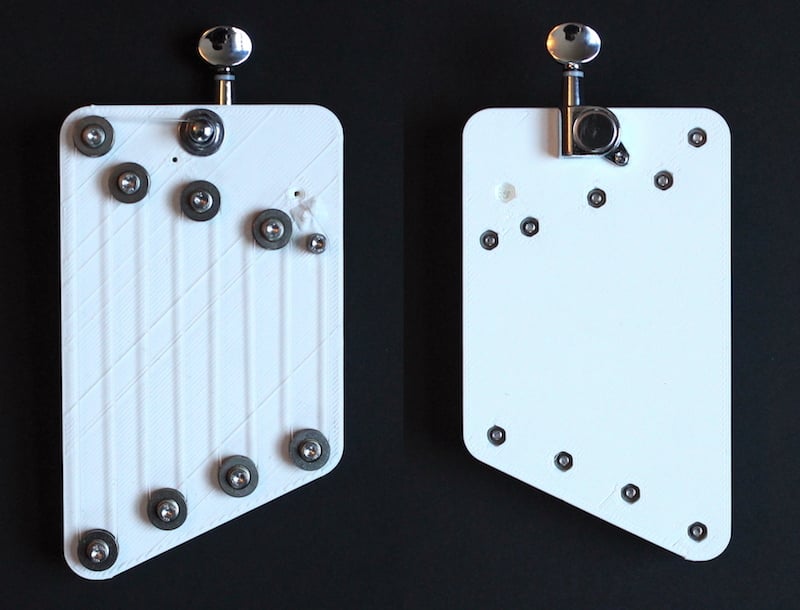
The TuneFast Harp is an experimental single-string diatonic harp that allows users to learn about how stringed instruments work and design their own custom stringed objects. Here's a step-by-step guide on building and tuning the harp: ### 1. Print the Parts Print all of the parts using your preferred method (e.g., FFF, PLA, or ABS) with at least 30% infill to increase strength. Use stiff plastic like PLA for optimal results. ### 2. Assemble the Harp * Remove the print from the bed and clean up any defects. * Add bearings using M3x20mm bolts, nuts, and washers (metal belleville washers recommended). Tighten firmly but avoid rubbing against the bearing. * Add a spacer for the shortest/highest note. * Check that each bearing rotates smoothly. If there's friction, loosen, inspect, and re-tighten. ### 3. Install the Guitar Tuner Hand tighten the guitar tuner in place with the knob facing outward. Screw it in from the bottom and fully tighten the nut. ### 4. String It Up * Feed the string through the small hole by the spacer (ball end strings) or tie a knot near the end for nylon strings. * Weave the string back and forth, holding it firmly to prevent sliding off bearings. * Thread the string through the hole in the metal shaft of the tuner and turn the knob to tighten. Bring the string up to tension so it holds in place for tuning. ### 5. Tune It Up * The notes should be relatively in tune as soon as the string is somewhat tight. * Tighten the string further to adjust the pitch. Be careful not to over-tighten, which can cause deformation or breakage. * Note that steel strings require about twice as much tension and may deform the printed part more. ### 6. Play It! The TuneFast Harp produces a pleasant sound and holds its tuning well when properly built. It's intended to be a hands-on tool for learning about stringed instruments and designing custom stringed objects.
With this file you will be able to print TuneFast Harp with your 3D printer. Click on the button and save the file on your computer to work, edit or customize your design. You can also find more 3D designs for printers on TuneFast Harp.