TurboGrafx-16 A/V cable adapter (Turbo Booster)
thingiverse
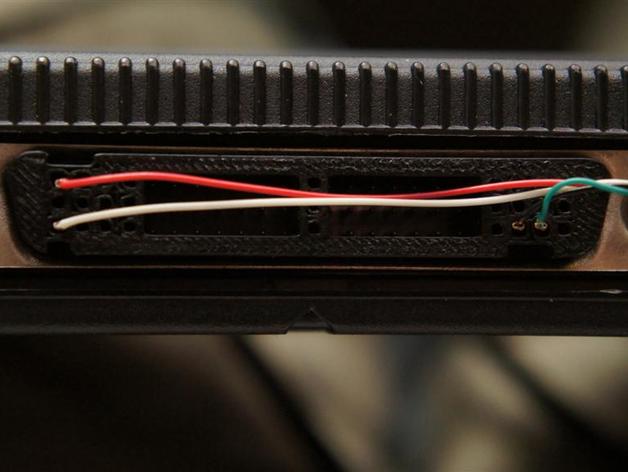
This is a printable A/V cable adapter housing for the TurboGrafx-16. Typically, the TG16 only outputs (low quality) RF, unless you buy the expensive and hard to find Turbo Booster. But the signals you need are available on the expansion connector on the back. Here's a page describing the process of making a DIY cable: http://www.cgquarterly.com/articles/tg16_cable.htm , and the full pinout information is here: http://www.gamesx.com/misctech/pcebp.php . I made one of those cables a couple years ago, but my biggest complaint was that the wires would pop out if you moved the console... which happens quite often, since the controller cord is so short. So I designed this housing, which is compatible with 0.1" Molex crimp pins (C-Grid III). I purposefully made it short (about the same length as the pin), and used a very thin A/V cable, so I could install the rear console cover and route the cable out the side (without having to modify anything). The cable I used was an A/V cable from a Samsung Galaxy S i9000, which was $5 shipped on ebay. This fits snug, but still pops in and out without much trouble (just a little bit of wiggling to get it out). Attached is the STL file as I printed it, as well as the Sketchup file for that same model, and an earlier one I did with smaller holes for all pins. With the earlier model, it was very tight and difficult to remove, so I widened the holes and removed a large number of the pins. But if your printer is better than mine, or if you want access to other signals, that older model may work better for you. The video pins were the only ones I made compatible with the crimp pins... the rest are just dummy holes (I was afraid it may be too weak with very thin walls between all the pins). Instructions I printed this with my typical settings in black ABS. The only thing to verify is that if you use support, that it doesn't fill the hole (Slic3r adds support on both sides of a hole, which tends to plug holes, which is a hassle to try to open back up). There are only a few small gaps, so I personally printed this without support, and it bridged the gaps just fine. Once printed, you'll want to prepare your cable. The following instructions assume you want to use the original rear cover. If you don't, simply crimp the pins on any A/V cable, insert them into the housing, and plug it in. The pins are Molex C-Grid III, p/n 0901192109, 0901192120, 0901192110, or 0901192121 (depending on your wire size, and whether you want gold or tin contacts). I believe the Samsung cable has 26AWG wire inside. I ordered them from Digikey, though they're available from many places. You'll want to cut the cable as close to the plug as possible so you have enough of the skinny cable to get through the opening on the side of the rear cover. Carefully strip a few inches of sheathing back, being careful not to break the insulation on the inner wires. On my cable, the pinout was as follows (though you should verify that yours is the same): Black=GND Green=Video White=Left Red=Right Strip the left and right audio wires, crimp on the connectors, and press into the housing. Then cut the video and ground wires to the proper length and strip/crimp/install them as well. I used a cheap set of crimpers from Radio Shack, but the wires are really small, so if you're not using the (expensive) official Molex crimpers, you may want to add a tiny bit of solder to make sure the wire doesn't pull out of the crimp. If you don't have crimpers, some people also just bend the tabs over the wires with needlenose pliers and solder. Now it should be functional, so I'd test it to make sure everything is good. Once you've verified it works, I'd add a small bit of epoxy over the wires, since they are very thin, and will probably break if subjected to too much stress. Then, to get the rear cover installed, you need to route the cable in the groove on the top left side, where it says "AC ADAPTER". Then plug in your AC adapter and slide the rear cover on, routing the cables out the slot on the side... and you're done!
With this file you will be able to print TurboGrafx-16 A/V cable adapter (Turbo Booster) with your 3D printer. Click on the button and save the file on your computer to work, edit or customize your design. You can also find more 3D designs for printers on TurboGrafx-16 A/V cable adapter (Turbo Booster).