Turntable for 63mm vise on a micro-mill (Sieg X1 clone)
thingiverse
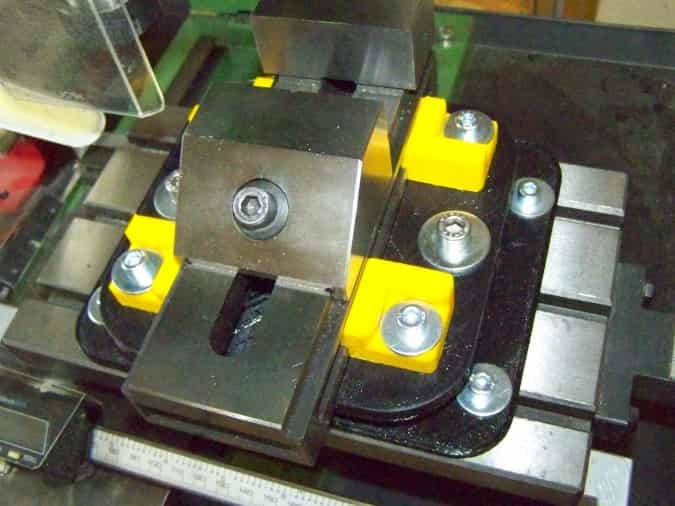
For my 63mm vise I wanted a base which I can rotate. After searching for a commercially available base I only found some which would have cost more than I paid for my milling machine. A clear sign that DIY was required. Machining it from steel I considered to much effort so I decided to try it in 3D printed. In short: it came out far better and sturdier than I expected! Sure, I could have made it quite a bit smaller but then the forces will be higher due to shorter levers and much higher accuracy would be required. On the milling machine it doesn't matter if it is a bit larger. The only advantage of smaller would have been less print time. Printed parts: 1x base 1x lip 1x table 2x block 2x clamp1 2x clamp2 Other parts: 4x Allan screw M6x18mm 4x Allan screw M6x20mm 2x hex head screw M8x20mm 4x T-nut (or printed with an M6 nut inside) 8x fender washer M6 2x fender washer M8 2x nut M8 Removing the support in the base is a bit tricky but it has to be done thoroughly. The two M8 screws are glued into the blocks as well as the four M6 nuts into the table. At this time also glue the lip to the base. Insert the 2 blocks from the bottom into the base and place the table on the M8 screws . Fender washers and M8 nuts go on top. The vise is secured with the four clamps and M6 Allan screws on fender washers. To install the vise on the machine (145mm wide table with T-slots 90mm apart) it is paced on the table, held firmly against the rear corner and secured with M6 screws and T-nuts. Print parameters: PETG with 0.3mm adaptive layers, 2mm walls and top and bottom 1.5mm. Infill cubic with dual lines; base and table 20%, rest 35%. Support everywhere for base and clamps and from hotbed only for table. Most likely it would work with PLA too. I used PETG as I had found it for <9€/reel including shipping. Refinement: install the base on the milling machine and make a very light skim cut over the top surface (the 2 "rings"). Then install the table and make a similar skim cut in the cut out for vise installation. This will make the parts 100% parallel and provide a smooth surface. Remark: As can be seen in the picture I used M8 nuts in the blocks and M8*20mm Allan screws to attach the table to the base but what is in the parts list is better. More detailed instructions in German language can be found as DE_Fraesmaschinen-Zubehoer-Anleitung-Vxx.pdf here: http://www.pinzi.us/DIY/DIY-tools/DIY_tools.php
With this file you will be able to print Turntable for 63mm vise on a micro-mill (Sieg X1 clone) with your 3D printer. Click on the button and save the file on your computer to work, edit or customize your design. You can also find more 3D designs for printers on Turntable for 63mm vise on a micro-mill (Sieg X1 clone).