Turntable
prusaprinters
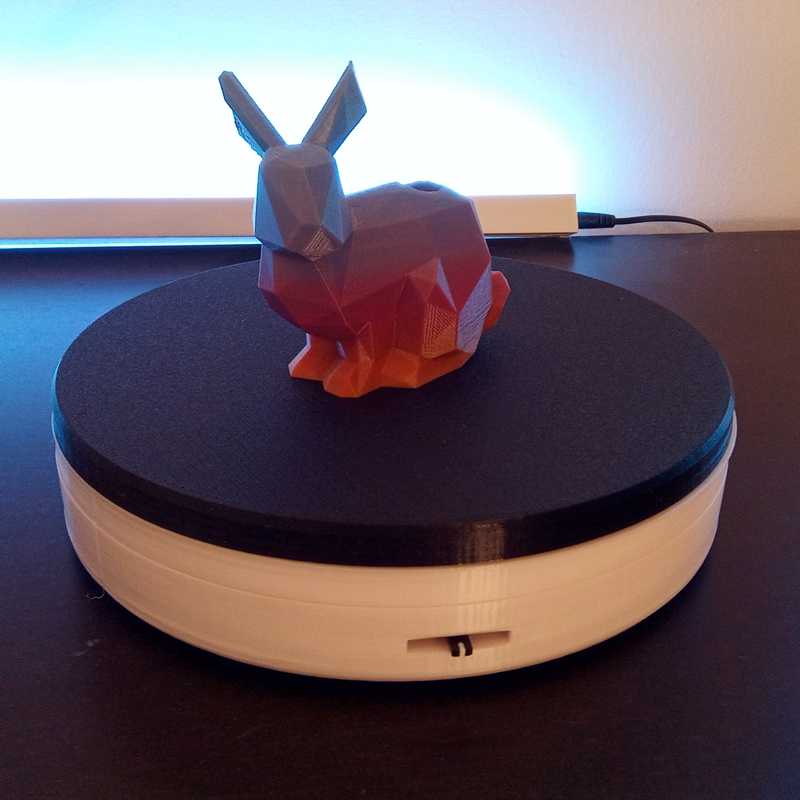
<p>Some time ago, I got a 3D scanner from a kickstarter campaign and needed now a turntable for scanning objects. </p><p>I had some cheap, unused 28-BJY stepper motors available. On the paper they seemed to be perfectly suitable for a turntable. They feature a 1:64 gearing mechanism, which should apply enough strengh for turning small object, and its maximum speed of about 3-4 seconds per full revolution is more than enough.</p><p>As I wasn't sure, how fast the object may or must be moved for scanning, I wanted to adjust the rotation speed later. So, the speed can be adjusted by a sliding potentiometer.</p><p><strong>Required parts</strong></p><ul><li>1 pc. Arduino nano</li><li>1 pc. stepper motor 28-BYJ-48 with ULN2003 driver board (available for about 3 Euro in sets of 5)</li><li>1 pc. linear/sliding potentiometer (50kOhm, 25 mm sliding path, available for about 2 Euro in sets of 10)</li><li>6 pcs. 6mm steel balls</li><li>2 pcs. M4x12 screws and nuts for mounting the stepper motor</li><li>3 pcs. M3x20 screws and</li><li>3 pcs. M3 threaded insets for assembling the base</li></ul><p><strong>Wiring</strong></p><p>Wiring is rather simple: The ULN2003 driver board (IN1..IN4) is connected to the Arduino GPIOs D8..D11. The middle pin of the potentiometer is connected to A0. Use GND and 5V pins as power source for both components.</p><p><strong>Printing</strong></p><p>I've printed all parts in PLA with a 0.6mm nozzle and 0.28mm layer height to save time (overall printing time was about 9 hours). A standard 0.4mm nozzle and a 0.2mm layer height might probably lead to better tolerances and smoother operation.</p><p>However, the groves and particularily the bearing washer needs to be sanded, so that the touching surfaces can slide well.</p><p>All parts can be printed without supports.</p><p><strong>Software</strong></p><p>Use the attached Arduino sketch to run the turntable. </p><p>To exploit the full potential of the stepper motor, half step driving is used to controlthe motor. The potentiometer setting is converted into a time delay between the steps. </p><p>A lever position in the middle will completely power off the motor. Sliding the lever to the right turns the plate clockwise, sliding to the left turns the plate counter-clockwise.</p><p><strong>Remarks regarding the design</strong></p><p>I didn't want to use large, expensive ball bearings, so I simply used a few 6mm steel balls running in a circular groove to maintain the distance between turning plate and base, even when there is a excentric weight on the turning plate. I had to learn, that filling this groove completely with steel balls excerted just too much friction. The less balls I used, the better the turntable worked. So, finally, I designed a ball bearing spacer to keep six balls at constant distance.</p><p>I must admit, that the 23-BYJ stepper motor is too week for really smooth operation. It is powered by the 5V USB supply and draws about 250mA. I'll probably redesign the turntable using a proper motor or mod the motor and use it with a full H bridge in bipolar mode- but that would require a more sophisticated power supply, and additional complexity. However, I had these cheap stepper motors laying around, anyway, and it is sufficiently working for my intended purpose.</p>
With this file you will be able to print Turntable with your 3D printer. Click on the button and save the file on your computer to work, edit or customize your design. You can also find more 3D designs for printers on Turntable.