Two-Stage Model Rocket
thingiverse
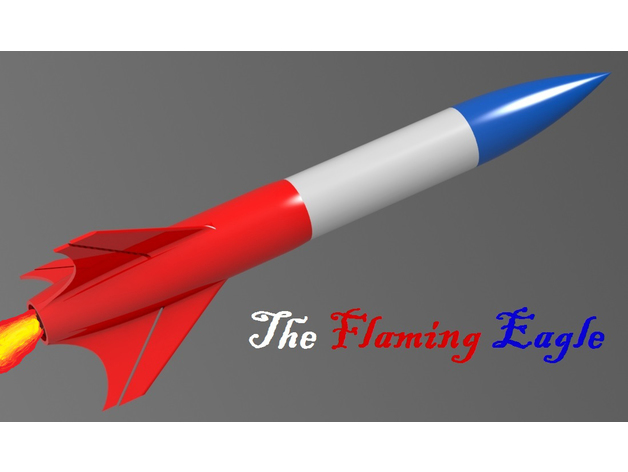
I designed this using the Open Rocketry which is a model rocketry simulator. The simulations I ran on it indicates it will reach a height of almost 2,500 feet. The rocket has a stability of 1.00 caliber with both stages and a 1.22 caliber for just the upper stage. So far I've done 3 tests launches with this rocket and the model rocket proved to be very stable on all of the tests even in some decent wind. We lost sight of the rocket 2 out of the 3 times. The time that we did see where it landed, we were unable to recover it. If you do plan on actually launching this rocket you need a clear day and a ton of space. I named my rocket the Flaming Eagle and I added a really cool flame design to the paint. Assembly Main Rocket For the body tube, you need a 33mm diameter cardboard tube. If you're buying your buying the body tube from Estates, it will be a BT-55 sized tube. The length of the body tube is 10cm. The parachute is just a cheap 12in Estates parachute that will have to be attached to a shock cord (any rubber band will work as long as it's strong enough not to break). I also added a ribbon on the shock cord the holds the parachute to assist in the parachute deployment. You'll also notice that in the diagram, I also added a ribbon which is connected to the bottom stage of the rocket which also has its own shock cord.. This makes it easy to find and slows its descent. To get the highest apogee you'll need a D12-0 Estates engine for the bottom stage and D12-7 Estates engine on the upper stage. Launch Lug To make the fall-away launch lug you need a leftover piece of a body tube (preferably the same size as the rocket's body tube). It only need to be about 1-2 inches long. Make a cut down one side of the tube. On the other side you need to make a teeth pattern that is big enough to glue on a straw. There should be one tooth on one side and two on the other (see picture above). Use a cut up rubber band to connect the two pieces on the straight cut edge. Use any leftover rubber band to glue on the inside of both pieces. This will add more traction during launches. Next, take a straw and cut it to the same length of the cut up body tube. Cut that piece into a total of three pieces and glue them onto the teeth. Paint is not necessary but recommended for looks. You may also add your rocket's name on the launch lug as well. To set up the rocket you can wrap the launch lug around the rocket around the center of gravity. Then, line up the three straw pieces and slide them onto your launch rod. From here, you can set up everything else like normal. Once the rocket launches, the launch lug will fall off and it won't affect its flight in any way. If you don't want to go through this process, just simply glue on a couple pieces onto your model rocket (making sure they're lined up) and use it like that instead. Just as a disclaimer the fall away launch lug idea was not my idea. I found it in a model rocketry book and make a few small edits to it to improve it. Engine setup To get the highest apogee you'll need a D12-0 Estates engine for the bottom stage and D12-7 Estates engine on the upper stage. In order to get them to go off correctly, you'll need to add a small amount of scotch tape to hold them together, making sure that the D12-0 is on the bottom and both of the engines are facing the correct way. You will also have to wrap both of the engines with some masking tape to make sure the fit nice and snug into the rocket. Just be careful not to add too much tape as it can be hard to take out of the rocket afterwards. Before launch you also need to add the igniter and wadding just above the D12-7 engine. You may substitute the D12-7 engine with a D12-5 or a D12-3 engine but you'll lose some height during flight. Competitions SkillsUSA Wisconsin State Championship In 2016 I entered the model rocketry competition for SkillsUSA in Wisconsin. Through my model rocketry skills I was able to take third place in the competition. In 2017 I entered the contest a second time but unfortunately I made a miscalculation while assembling the model rocket and the rocket lost control and crashed into the ground. I did not place that year, but I did learn my lesson. Third place medal for Model Rocketry competition in 2016. Contact Me If you have any ideas on how the design could be improved, questions on anything, or anything else please contact me. You can leave a comment or if you need a quick response send me an email at: borckste000@cudahysd.org.
With this file you will be able to print Two-Stage Model Rocket with your 3D printer. Click on the button and save the file on your computer to work, edit or customize your design. You can also find more 3D designs for printers on Two-Stage Model Rocket.