Two-stage Rocket 18mm (fits 18x70mm B-D class motors)
thingiverse
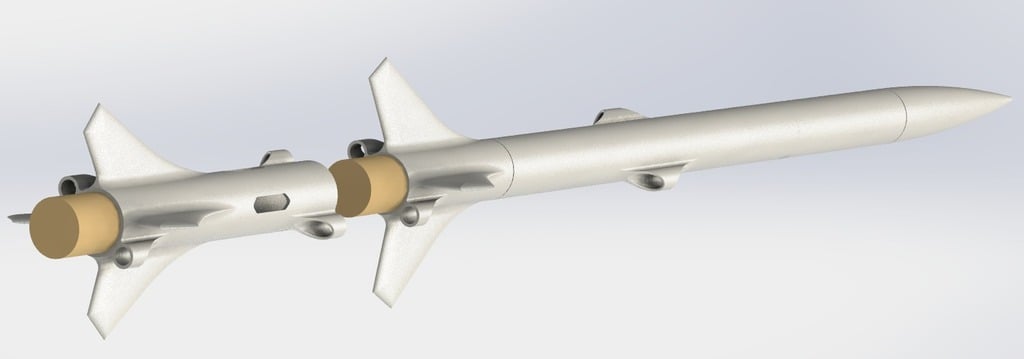
This is a 90% 3D printed two-stage airframe designed to fly on B-D class motors. Printing: No supports required. Print at 100% infill; this rocket has been simulated with filled components, so reducing their weight will push mass towards the back where the heavy motors are, and potentially make for an unstable flight. Print all components vertically, with all fin cans facing fins-up. Recommend printing with a brim of at least 16 lines if you're worried about bed adhesion, since the walls are 0.8-1.2mm thick only, and the components are quite tall and thin. Flight/design: This rocket has been simulated in OpenRocket v15.03 for various motor configurations, all of them overstable (I had an unstable flight on a prototype and it flew about 200m sideways... never again): (Sustainer only) 1. Estes C6-5/C6-7: ~200m/660ft 1. Apogee D10-7: ~550m/1800ft (from memory, this one involves a high speed recovery deployment so be careful) (Sustainer + Booster) 1. Estes C6-0 & C6-5/C6-7: ~400m/1300ft 2. Apogee D10-3 & D10-7: ~1200m/4000ft (this one may also involve high speed deployment) Although it'll fly stably, I wouldn't recommend dual-wielding D class motors on this, because good luck trying to find the sustainer afterwards. Like most low-power multistage rockets, the ejection charge on the booster is used to ignite the sustainer's motor, whose exhaust then blows the booster off. The booster will tumble back to the ground slowly enough that it shouldn't suffer any impact damage. Once the sustainer lights and blows the booster off, the rocket will continue to climb to apogee, where the ejection charge will blow the front off and (depending on what you want, see assembly/post processing below) either pull out the recovery device or let the rocket tumble to the ground. The rocket is designed to be launched off a low-power rail, at most 5mm/0.2in in diameter. I'd recommend a launch rail at least 1m/3ft long. The launch lugs were made symmetrical mainly because I'm not too sure how much a single set would affect the aerodynamic moments midflight. Plus, two sets looked cooler. Assembly/post processing: Some extra parts will be needed for the sustainer to function properly: - 1x 400mm/16" shock cord to join the nosecone to the fin can. Recommend something that will withstand the heat of the ejection charge (as long as it isn't string it should be fine). - 2x eye screws to anchor the shock cord; one in the nose and one in the fin can. Notice the small hole in both parts designed for this. - A small fluorescent streamer/parachute, while recommended, technically isn't necessary, since this rocket can safely perform a tumble recovery. It'll mainly help with locating the sustainer, which in a two-stage configuration will probably be invisible against the sky. However, if you expect it to land on anything but grass, use a chute or you will snap a fin - expect the rocket to land at roughly 7-10m/s, so plan accordingly. Something small-medium (300mm/12in length or diam) should be fine. Although minimal, some sanding and gluing will be required for good results. Once the eye screw has been screwed into the fin can and the shock cord has been tied to it, slide the main body over, gluing it to the fin can. Glue is necessary here, because after a few launches the heat will warp the plastic. Be sure to keep the launch lugs inline. Regarding the nose, two configurations are possible for sustainer recovery/deployment: 1. Nosecone & upper body separation from main body tube & fin can - this configuration is designed for tumble recovery. The nosecone & upper body should either be glued together or sanded to a tight fit. The interface between the upper body and main body should be sanded back to a mild/semi-loose fit. 2. Nosecone separation from upper body - this configuration is designed for streamer recovery. The upper and main body should be glued together or sanded to a tight fit. The nosecone shoulder should be sanded back to a mild/semi-loose fit. Note that if you're using streamer recovery, you should tie the streamer to the eye screw in the nosecone, to stop it from falling back into the body and potentially jamming separation. Finally, the booster has been designed to simply slide over the overhanging sustainer motor, and sit relatively loosely to help with deployment. Note that if your booster motor is using a delay charge, you might need to wrap a bit of tape around the motor to tighten the fit to avoid drag separation on the way up. Also note that the booster has its own overhanging motor, so theoretically this rocket should also be able to fly three stages! If you're unsure about anything here, please leave a comment and I'll get back to you ASAP. Happy printing!
With this file you will be able to print Two-stage Rocket 18mm (fits 18x70mm B-D class motors) with your 3D printer. Click on the button and save the file on your computer to work, edit or customize your design. You can also find more 3D designs for printers on Two-stage Rocket 18mm (fits 18x70mm B-D class motors).