two stage rocket D12 E9
thingiverse
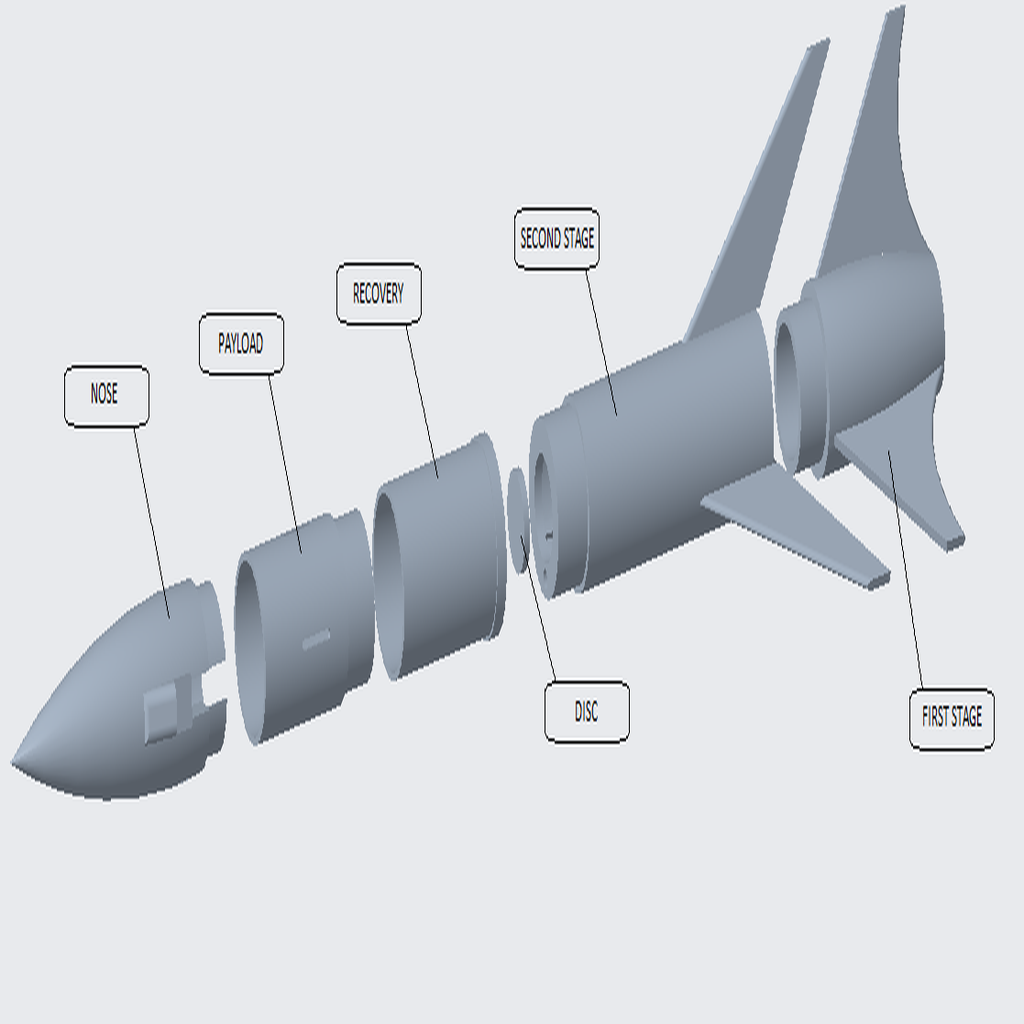
you can see it in action at the following link https://youtu.be/vICZPQ8VzQU print using the following parameters for each part PART ---INFILL ---ORIENTATION --- SUPPORTS stage one --- 0% --- upside down --- yes stage two --- 0% --- upside down --- yes recovery --- 0% --- upright --- no payload --- 0% --- upright --- yes disc --- ANY --- ANY --- no nose --- 100% --- upright --- yes launch guide --- 100% --- ring side down --- yes (two needed) rocket motors to be used are as follows stage one --- estes D12-0 stage two --- estes E9-6 NOTES: -there are two versions of the nose. the nose down version allows the camera to be aimed down, the nose side version allows the camera to be aimed sideways. -the infill density is VERY important for flight stability. follow the guide above -attach the launch guide to the recovery section using a rubber band as can be seen in the photo example. (this guide is designed for use with a 6mm diameter guide rod) -holes located on the seconds stage and payload are for the attachment of your chosen recovery system -slits in the payload section are for the use of alarm locaters. they can be covered in tape if not needed but shouldn’t have any effect on the rockets performance -the small hole in the nose is to allow the camera to be activated using a paperclip or similar sharp object -the rocket is designed with loose tolerances so the desired connection strength can be achieved for each joint. if the connections are too loose apply layers of electrical tape to one of the connecting surfaces until the desired tolerance is achieved. -the camera used is pictured. thes are available on ebay by searching for "mini camera" or "spy camera" and are reasonably cheap. the plastic case of the camera needs to be removed which will reveal a circuit board, battery and camera lens. the lens is attach to the circuit board by a ribbon cable. this allows the camera to be mounted outside the rocket while the circuit board and battery are safely inside. -the disc is to be placed at the top of the second stage to assist in the recovery stage working correctly
With this file you will be able to print two stage rocket D12 E9 with your 3D printer. Click on the button and save the file on your computer to work, edit or customize your design. You can also find more 3D designs for printers on two stage rocket D12 E9.