Two Switch Amplifier Footswitch
thingiverse
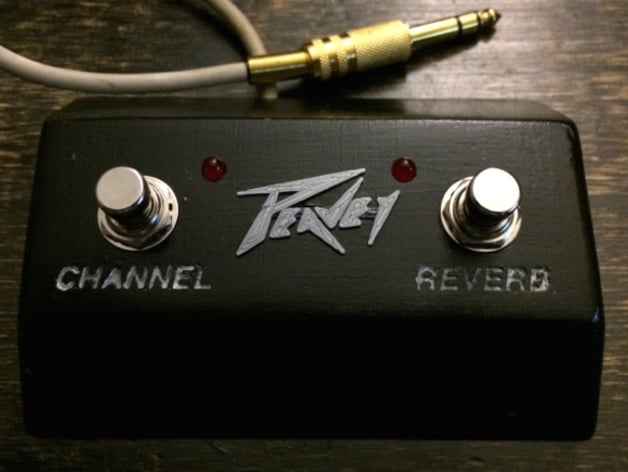
Designed primarily for self-installation as a footswitch for a Peavey amplifier, this casing can be adapted for any two-button design - such as certain Fender models. Three versions of the casing are included: one with no labels and a logo slot, one with CHANNEL and REVERB labels for use specifically with a Peavey Studio Pro amplifier, and a third option with neither writing nor a logo slot for custom personalization or painting. The design is intended to fit two 2-way double-pole double-throw (DPDT) foot switches and two LEDs. The reason for using DPDT switches is simply because they were readily available at the time; however, the standard Peavey unit uses single-pole double-throw (SPDT) switches, which are also suitable. See the instructions page for further details. Printing Print this casing with a high infill setting and adequate perimeter quality - the aim is to create a sturdy design that can withstand heavy use. In some cases, it may be necessary to apply a raft or brim during printing to avoid warping, especially if your printer has difficulties handling large flat surfaces. I personally used Slic3r and opted for three shells and 50% infill in order to achieve a satisfactory level of durability. I printed the casing using PLA material. The top section is colored with gray PLA, which I happened to have loaded into my printer already; the logo is created from silver PLA, while the base was made from black PLA, making it unnecessary for me to apply additional coloration to match the surrounding design elements. Finishing It is possible to smooth down any irregularities using a sanding technique and applying paint, which will enable the casing to closely resemble its original counterpart, as I have shown in the provided image. In order to achieve this result, you can follow my process of spraying plastic-safe primer followed by three thin coats. Prior to the application of each layer, it is crucial to gently rub down any printer-generated irregularities using fine-grit sandpaper to maintain an even surface quality. There exists a small recess on the face for the logo to be printed independently. To do so, I used a downloaded vector image to accurately recreate the obligatory cheesy Peavey emblem and attached the finished design piece into place via a bond specifically created for plastics, using additional elasticity support as necessary before completing it with a final coating of polyurethane. For personal preference reasons, you are free to paint over this logo, or simply apply multiple clear coats until you reach your desired appearance.
With this file you will be able to print Two Switch Amplifier Footswitch with your 3D printer. Click on the button and save the file on your computer to work, edit or customize your design. You can also find more 3D designs for printers on Two Switch Amplifier Footswitch.