Two-Tone Portable Coat and Purse Hook
thingiverse
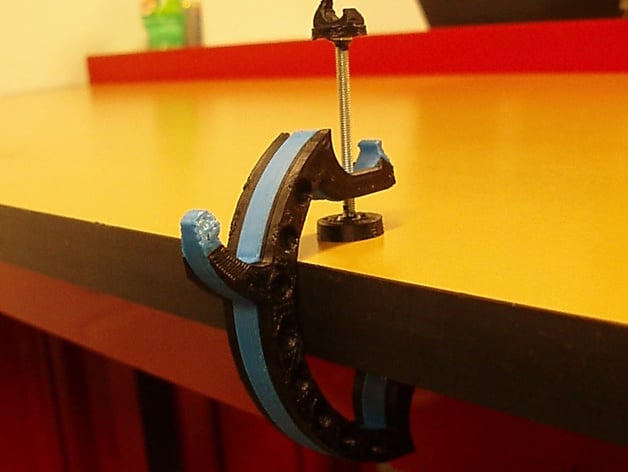
This multicolored portable coat and purse hook follows the basic C-clamp mechanism to safely secure your purse and coat to any table up to 1.75in thick. Its small design (about 5in tall and 3.5in wide) means you can store it easily and take it with you wherever you go. The clamping mechanism makes sure the hook is secure to the table and can’t be accidentally knocked off or easily stolen. Some more difficult assembly is required. Instructions I’ve uploaded the Rhino, STL, and Gcode files along with a couple of pictures to help explain the process. You will need: -Safety glasses -Jewler’s saw frame and blade -Proper ventilation -Epoxy -Acetone -Small acetone safe container -Q-tip or small brush 3 M4 nuts, .70 pitch -1 M4x45 bolt, .70 pitch, fully threaded. At least 2in. head not important -2 different colored filaments -Sandpaper (100-200 grit should work fine) -File (half-round) -Optional: vice/c-clamps and 2 pieces of wood at least as large as hook 1.) Download the file. Here are the print settings I used: 2.) Print the pieces. You will want to print the hook separately from the end caps, or else you won’t get proper adhesion in the end caps and they will lift during printing. Also, print the files labeled with an “a†in one color, and the files labeled with a “b†in the other color.(See pic) 3.) Allow print to set before removing carefully from bed. You want to keep the pieces as flat as possible, so they will adhere later. If any corners lifted in the printing process, you may want to address this issue and reprint. 4.) Before the print completely cools, break the supports that were created. I used the tip of a large half-round file, but anything strong and thin enough should work. (See pic) 5.) Drill the bolt hole with a #22 bit. (See pic) 6.) One side of the middle piece will be rough from the printing process. Use sandpaper to smooth out this side. In order to keep the rough side flat while sanding, hold or tape sandpaper to flat, smooth surface and put pressure on entire piece while sanding. 7.) Prepare a clean space in a properly ventilated area, preferably near a sink. You will need the acetone, Q-tip/small brush, and acetone-safe dish for the next few steps. (See pic) 8.) Locate two sides that will be adhered together. 9.) Working quickly and cleanly, apply liberal amounts of acetone to one of the adhesion sides. If possible, have someone else treat the other part the same way. 10.) Once the adhesion surface(s) are coated in a layer of acetone, quickly and carefully line up pieces and hold tightly together for 30 seconds, or until all the acetone has evaporated. You may want to practice on scrap pieces first. If full adhesion isn’t achieved, either take apart, or apply more acetone to the edge, lightly squeeze and release multiple times to allow acetone to get between the two layers. Then hold again until acetone has evaporated. Be aware that the acetone will make the plastic shiny. 11.) Repeat process to adhere third piece to first two pieces. 12.) I clamped my hook overnight, but I’m not sure if that was necessary. When clamping, make sure to have a piece of wood on each side of the hook to evenly disburse the pressure. These pieces of wood should be at least as big as the hook. 13.) Cut off head of bolt. Try to keep the cut square to maintain the integrity of the threads. 14.) Check that nut threads onto the cut side. If nut won’t thread, put nut on other side of bolt and revolve until the nut is sitting at the end of the cut side. 15.) Remove hook from clamp. Place a nut in each of the voids and push in as far as possible. For the voids on the top cap and hook, this may not be possible yet.(See pic) 16.) In a properly ventilated area, use hot soldering iron to heat-set nuts into place. Try to keep nuts as level as possible. If the hole is too small from the supports, carefully melt until nut barely fits. If nut comes loose, use the iron to carefully melt the plastic around the nut to encapsulate the nut. (See pic) 17.) Let pieces cool. 18.) Thread the bolt into both end caps and through hook. Make sure the flat disc end cap is on the inside of the hook. 19.) Carefully epoxy the bolt to the end cap nuts and let set. Any epoxy that bonds to metal should be fine. (See pic) 20..) Once everything is properly set, your hook should be ready to use. Please feel free to improve my designs!
With this file you will be able to print Two-Tone Portable Coat and Purse Hook with your 3D printer. Click on the button and save the file on your computer to work, edit or customize your design. You can also find more 3D designs for printers on Two-Tone Portable Coat and Purse Hook.